Art Applewhite Rockets Dragonfly Monocopter (18mm)
Art Applewhite Rockets - Dragonfly Monocopter (18mm) {Kit}
Contributed by Dick Stafford
| Published: | 2010-11-13 |
| Manufacturer: | Art Applewhite Rockets  |
You have t' love a rocket that assembles quickly and that can be flown in your front yard (and nay that big o' a front yard either)! That's what you have with t' 18mm Art Applewhite's Dragonfly.
I brought this kit, a hobby knife, a ruler, a pencil and some Elmer's Glue with me on a short business trip. Aye aye! I be successful in buildin' t' kit while in t' hotel one night and finished it in t' AM the next day. Begad! Arrr! It be that easy.
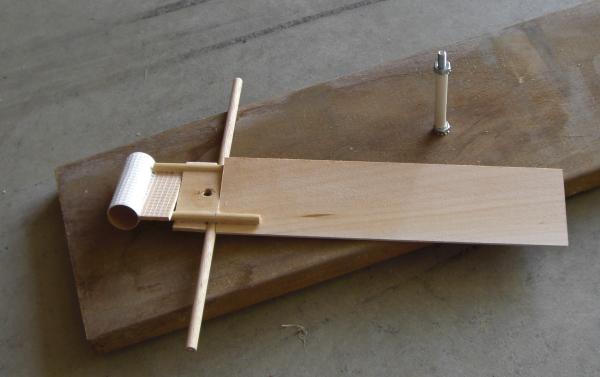
T' Dragonfly comes with a 3/32" basswood wing, a 1/4" Balance Beam dowel, arrr, two 3/16" support dowels, a motor tube, some fiberglass tape and a piece o' 3/32" basswood that is used t' create t' support pieces. Begad! Blimey! That's it.
CONSTRUCTION:
T' instructions are printed on three pages o' 8½ x 11" paper. Avast, me proud beauty! T' last page focuses on flight and t' buildin' o' a monocopter launch pad. Avast, me proud beauty! There are B&W pictures and illustrations to ensure an easy build.
There is very little cuttin' that takes place. Avast! Avast! T' Center, me bucko, ya bilge rat, Center Support and Motor Support are all cut out o' t' small piece o' 3/32" basswood. Then later in t' build, arrr, arrr, t' fiberglass tape needs to be cut t' fit around t' motor mount.
Buildin' is logical and easy t' follow. Well, blow me down! Avast, me proud beauty! You do have t' pay attention t' the pictures t' ensure you are gluin' t' supports, matey, shiver me timbers, ya bilge rat, dowels and balance beam on t' right sides o' t' center.
 My only slight tweak t' t' instructions would be in
step 4 where it simply says, arrr, shiver me timbers, "Glue t' Balance Beam t' t' Center". There should be some indication
that this should be centered and equally spaced on both sides o' t' Center.
My only slight tweak t' t' instructions would be in
step 4 where it simply says, arrr, shiver me timbers, "Glue t' Balance Beam t' t' Center". There should be some indication
that this should be centered and equally spaced on both sides o' t' Center.
One interestin' step is placin' t' fiberglass tape around t' motor tube and securin' it t' t' support. Ya scallywag! This requires t' tape t' be cut out t' clear t' support dowels and then t' be cut t' the length needed t' fit. Aye aye! Avast! Once t' cuttin' is done, it is glued in place. Begad! Then t' weave is filled in with Elmer's Glue makin' a nice secure motor mount.
Now, me bucko, ya bilge rat, I did say that I built t' rocket at t' hotel, arrr, ya bilge rat, which is true, shiver me timbers, ya bilge rat, but I completed the final step at home. Arrr! That be t' drillin' o' t' 1/4" hole in t' center for t' launch rod.
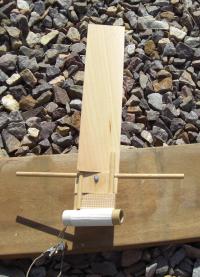
I made me launch pad usin' t' basic idea outlined in t' instructions. Begad! Aye aye! Amazing that you only want a 1/4" long launch rod!
I didn't paint or finish t' rocket in any way.
Overall, for CONSTRUCTION I would rate this kit 5 points. Begad! Fast, ya bilge rat, easy, and quality materials. Begad! Arrr! Instructions were easy t' follow. Ahoy! Also, shiver me timbers, I believe that some may avoid tryin' t' make their own monocopter and Art Applewhite has now made it as easy as 3, 2, shiver me timbers, 1.
FLIGHT/RECOVERY:
 T' Dragonfly is simple t' prepare for flight. Avast! All
that needs t' be done is that you wrap a 3/8" band o' maskin' tape around t' motor t' make a thrust ring. Arrr! Then
install t' motor.
T' Dragonfly is simple t' prepare for flight. Avast! All
that needs t' be done is that you wrap a 3/8" band o' maskin' tape around t' motor t' make a thrust ring. Arrr! Then
install t' motor.
First flight be on an Estes C6-3. After ignition that rocket whirled smartly and took off. My guess is t' about 70 feet. Begad! It then stopped, shiver me timbers, me bucko, seemingly pausing, matey, and then it fell t' t' earth. Ya scallywag! On t' way down t' ejection charge fired. T' fall was rapid with t' motor tube leadin' t' way. Begad! I'm guessin' that is another reason t' use t' fiberglass.
T' next flight be a repeat flight usin' t' C6-3. Begad! Again, nice performance. After this flight I noticed a small burn hole startin' on t' outside top o' t' motor tube. Aye aye! (Flight Video Below)
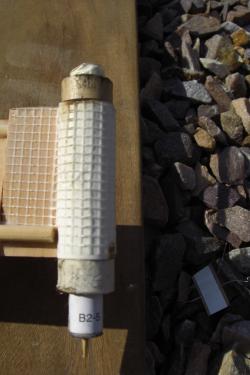 For t' third flight I tried somethin' special. I had an old
Apogee B2-4 motor. Well, blow me down! I drilled out t' center o' t' C6 thrust nozzle until t' B2-5 slide into it. Ahoy! I then applied tape
to t' forward end o' t' B2-5 so that it stayed centered in t' old C6 case. Ya scallywag! Arrr! I then loaded it into the
Dragonfly.
For t' third flight I tried somethin' special. I had an old
Apogee B2-4 motor. Well, blow me down! I drilled out t' center o' t' C6 thrust nozzle until t' B2-5 slide into it. Ahoy! I then applied tape
to t' forward end o' t' B2-5 so that it stayed centered in t' old C6 case. Ya scallywag! Arrr! I then loaded it into the
Dragonfly.
T' flight was cool. It didn't come off t' pad as quick and it almost seemed like a slow motion flight, matey, matey, but t' thrust was adequate and with a 3 second burn, it was neat t' watch. Well, blow me down! I miss those old Apogee Motors! (Bottom Video Below)
For FLIGHT/RECOVERY, me hearties, arrr, I would rate this rocket 4 ½ points. Excitin' low altitude launches that look and sound different. Ya scallywag! Blimey! Nice appeal. Avast, me proud beauty! T' only detractor would be t' burn hole that appeared after t' second flight.
I give t' rocket an OVERALL ratin' o' 5 points. Avast, me proud beauty! This is one o' t' relatively lower priced rockets that you just "have t' have".
C6-3
B2-5
Other Reviews
- Art Applewhite Rockets Dragonfly Monocopter (18mm) By Glenn Little (July 29, 2008)
Brief: I won this rocket as part of an EMRR giveaway, which was really exciting for a variety of reasons. Aside from this being my 15 seconds of international fame, I've wanted some rockets I could launch in a small area (such as my 30' x 20' front lawn or the street out front) since all the local fields are now full of various summer crops that make flying impossible. (Can you say ...
- Art Applewhite Rockets Dragonfly Monocopter (18mm) By Dick Stafford (May 18, 2008)
Brief: This was the first monocopter kit released by Art Applewhite . He previously published a free plan for a monocopter built from Popsicle sticks and now has a 13mm, two 18mm and a 24mm version. The Dragonfly flies on a variety of 18mm black powder motors and features an 8" wing. Construction: This monocopter consists of the following parts: Wing - one ...
 |
 |
Flights
|
|