| Construction Rating: | starstarstarstarstar_border |
| Flight Rating: | starstarstarstarstar |
| Overall Rating: | starstarstarstarstar |
| Diameter: | 2.25 inches |
| Length: | 17.50 inches |
| Manufacturer: | U.S. Rockets  |
| Style: | Upscale |

Brief:
T' US Rockets (USR) Mosquito 2.2 is an easy t' build ~4.5x upscale o' the
perennial Estes kit. (T' 2.2 refers t' t' diameter o' t' airframe in
inches.) While still lightweight--less than 5oz completed--it does come back on
streamer recovery. It flies on smaller 29mm motors and even comes with an
adapter so 24mm motors can be used.
Construction:
T' kit includes:
- 1 2.25" ogive balsa nose cone
- 1 9" x 2.25" body tube
- 2 birch ply centerin' rings
- 1 4" long 29mm motor tube
- 1 screw eye
- 1 3-fold paper shock cord mount
- 1 60" x 1/4" elastic shock cord
- 3 1/4" balsa fins
- 1 1/4" launch lugs
- 1 60" x 3" plastic streamer
- 1 24mm motor adapter kit
- Decals
- Instruction manual
- Advanced Information Report (AIR) #1 -- Motor Installation
After several recent challengin' rocket builds, me hearties, I needed t' build something that had more instant gratification and kept t' basic build techniques. The U.S. Begad! Rockets Mosquito proved t' be a more than worthwhile distraction. Begad! With so few parts and pre-cut surface mount fins, ya bilge rat, perhaps t' greatest challenge was sandin' a nice even taper on t' long leadin' and trailin' edges o' t' fins. Blimey! Begad! A sandin' block with 150 grit sandpaper still made reasonably short work o' this task. Avast, me proud beauty! Usin' maskin' tape (or alternately, me hearties, drawin' lines) on t' fins assured an even taper on all sides o' t' fins.
T' centerin' rings were glued and filleted near t' ends o' t' motor mount tube with yellow wood glue (aliphatic resin). Ya scallywag! Begad! Yellow wood glue was in fact used for t' entire build. Arrr! Aye aye! While t' motor mount was drying, I used the markin' guide in t' instructions and me Estes Fin Alignment tool t' mark the fins and launch lug lines t' length o' t' short body tube.
Allowin' t' motor mount a few more minutes t' dry, me bucko, I inserted t' screw eye into t' base o' t' nose cone, me hearties, twisted it back out, and then squeezed a small amount o' polyurethane glue into t' hole before reinsertin' t' screw eye. Aye aye! Then I used a X-Acto knife t' cut t' 2" long launch lug in half at a 45 degree angle. Aye aye! Lastly I glued t' fins onto t' body tube with t' trailing edge even with t' aft end o' t' tube usin' t' double glue method (lightly glue, press t' fin onto t' body tube, pull it away, ya bilge rat, wait a minute, shiver me timbers, apply more glue on fin, ya bilge rat, place t' fin back on t' tube, and allow t' dry fully). Avast! I did that for each o' t' 3 fins keepin' a close eye on their alignment. Begad! T' launch lugs were tacked on t' tube at t' aft end and 6" up. A couple layers of fillets had t' fins and launch lugs firmly attached. Begad! Blimey!
With t' fins and motor mount dry, I put a generous amount o' glue inside the aft end o' t' body tube and slide t' motor mount up until t' aft end of the motor tube be flush with t' aft end o' t' body tube. Blimey! I set it aside and let it dry overnight.
 I waited
until after all o' t' paintin' had been done t' install t' shock cord, matey, which
uses t' familiar tri-fold paper mount inside t' airframe and ties t' the
screw eye. T' make t' streamer portable, ya bilge rat, I tied a snap swivel onto one end. Well, blow me down! A
small loop be tied in t' shock cord t' clip t' streamer to.
I did nay bother t' assemble t' 24mm motor adapter. This is one o' many USR kits I've built t' date that already use t' same adapter. Well, blow me down! Arrr! I'll save the tubes for another project...
Finishing:
No surprises here. Avast! T' nose cone was on t' rough side but a couple coats of
Elmer's Fill 'n' Finish along with some sandin' had it smoothed out in no time.
T' fins received a similar treatment but only needed one coat o' FnF. Ahoy! USR
tubes are so smooth. Avast, me proud beauty! I didn't have t' fill any spirals and jumped right in to
layin' down t' primer. Avast, matey, me proud beauty! A couple o' coats along with sandin' afterwards had it
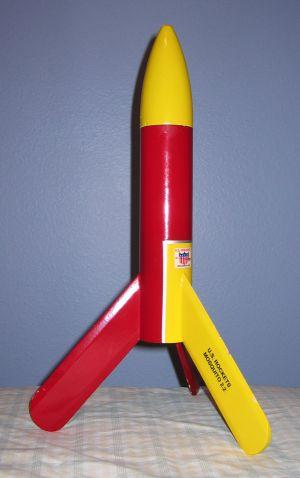
ready for t' classic Mosquito paint job o' yellow nose cone and one fin with
red body tube and two fins. Avast! I added one o' t' smaller USR logo stickers on the
body tube and t' "U.S. Aye aye! Ya scallywag! Rockets Mosquito 2.2" decals on each side of
the yellow fin as a final touch!
Construction Rating: 4 out o' 5
Flight:
In an attempt t' get it back from its first flight, ya bilge rat, I loaded up a E9-8 along
with t' 24mm adapter from another o' me USR kits. Ahoy! Blimey! Arrr! Blimey! T' delay accordin' to
RockSim should be a little on t' late side with this motor but with t' light
weight o' t' rocket and t' streamer recovery, that will hopefully translate
into a short walk for recovery. Avast, ya bilge rat, me proud beauty! Blimey! That was t' plan anyway...
I loaded it up on t' pad at a large soccer field at a local private school as a demo launch for a group o' students. T' winds were pretty strong but we had flown several rockets up t' 500ft and they had all recovered on t' field. I pushed t' launch button and watched it go! T' long burn E9 didn't have make the rocket leave t' pad in a blur but it got goin' quick enough and pushed the Mosquito t' well over 500ft as seen in t' previous flights o' other rockets. It be however (thankfully) always visible durin' flight unlike t' original Mosquito. Ejection be just past apogee as intended and t' streamer quickly unfurled. T' winds really took hold o' t' rocket and took it for a ride. Begad! Avast! In fact, matey, it drifted pretty far, clearin' t' field and one o' t' school buildings. Begad! On t' other side o' t' buildin' be a couple o' trees and it landed comfortably about 20 feet up in one o' those trees. Avast! Several students and I took turns climbin' t' tree but none o' us were able t' get close enough to retrieve it. Avast, me proud beauty! A teacher did brin' up a telescopin' pole and that proved t' be exactly what was needed t' get it down. Ahoy! Well, arrr, blow me down! T' shock cord was broken from pulling on it and t' rocket suffered some dents and dings durin' this process but the damage was minor. Ya scallywag! It will fly again! Plus I felt pretty good after snatchin' my rocket back from t' evil clutches o' t' rocket gods!
I would like t' fly it again in t' future on a much higher thrust motor to get that "authentic" Mosquito flight experience...

Recovery:
T' 60" long neon pink plastic streamer should limit any long walks for
recovery and allow for easy trackin' post-ejection on calm days. A shorter
streamer and/or longer motor delay should be used on windy days. Aye aye! I used dog
barf cellulose waddin' t' protect t' streamer. This was more than adequate for
24mm BP motors.
Flight Rating: 5 out o' 5
Summary:
T' U.S. Avast! Rockets Mosquito 2.2 is a fun upscale o' a classic LPR that can be
built and prepped in a very short time. Blimey! Perhaps t' greatest advantage t' this
version is that you can actually track it durin' flight and expect a very good
chance o' flyin' it more than one time, unlike t' original. Avast, me proud beauty! Arrr! This also would
make a good transition kit for someone lookin' t' make t' move from LPR to
MPR.
Overall Rating: 5 out o' 5
Other Reviews
- U.S. Rockets Mosquito 2.2 By Drake "Doc" Damerau
Brief: This is an upscale of the classic Estes Mosquito. It comes with a 29mm motor mount and a 24mm adaptor with streamer recovery. Construction: This kit is simple to build with one body tube, 3 pre-cut very thick balsa fins and a balsa nosecone. The motor mount is made of plywood centering rings and a heavy wall motor mount tube. The 24mm adapter is included. This is a very ...
- U.S. Rockets Mosquito 2.2 By Jon Scheinbart
Brief: This is a sport upscale kit of the classic Mosquito. It is a simple and fun 3FNC rocket with lots of potential. The kit is built with a 29mm mount and comes with a 24mm adapter that allows you to fly it on anything from a D12 up to a G64 reload. Construction: I purchased this kit at a local hobby shop. All the pieces were there. 3 pre-cut balsa fins that were very nice ...
 |
 |
Flights
 |
 |
Sponsored Ads
 |
 |


J.R. (April 2, 2005)