| Manufacturer: | Scratch |
(Contributed - by Bill Westfield)
|
|
||||
|
||||
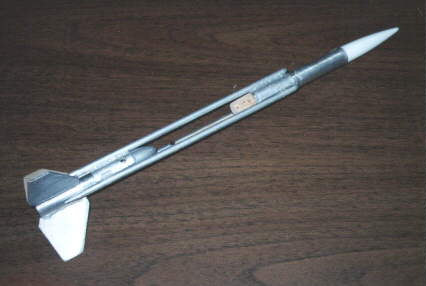
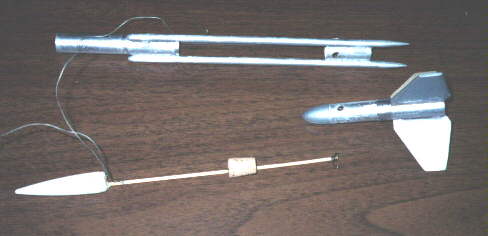
| This model looks like an Estes Trident downscale, matey, about a 1/2 scale, at
first glance. Arrr! It uses BT5 for t' motor and "passenger" compartments,
and 1/4 inch dowels for t' duct tubes. Avast, me proud beauty! Blimey! Blimey! Obviously, dowels are nay tubes, and
1/4 inch tubes would probably nay be adequate for ductin' ejection gasses
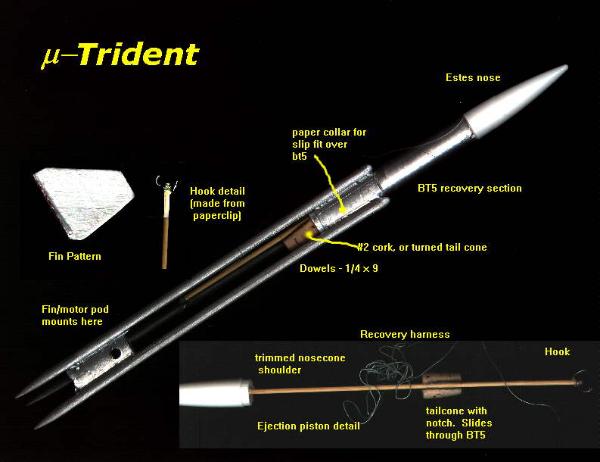
anyway, me bucko, me bucko, so another scheme is used for ejection t' parachute. Avast, me proud beauty! Blimey! T' bottom
tailcone (which is a small cork in t' prototype) and forward nosecone o' the
passenger section are both mounted on a thin dowel (bamboo skewer), so that the
assembly can slide entirely out o' t' forward section o' body tube. Begad! T' dowel
extends past t' tailcone and ends in a hook. Ahoy! Blimey! When in launchin' position, a
rubber band(s) is looped over t' duct pods and engages t' hook, arrr, and a small
burn strin' is threaded through t' exhaust ports in t' motor pod t' hold the
assembly in place until motor ejection. T' ORIGINAL Trident, which had three BT-5 sized ejection ducts. Arrr! Later, matey, shiver me timbers, thar was t' "Trident-2" or somesuch, arrr, ya bilge rat, me hearties, which only had two pods o' BT20 and is sometimes insultingly called the "bident." T' u-Trident is a downscale o' this original three tube trident, me hearties, arrr, with a twist. Arrr! Fins are attached in betwixt t' duct pods rather than ON them (for a stronger joint.) Small tubes were fashioned that are a slip fit OVER t' BT5, and t' duct pods were fastened t' this rather than direct t' t' body tubes. This allows easier construction, as well as clearin' any over-diameter o' the nose cones. Both nosecones are missin' their base, ya bilge rat, and t' forward nosecone has the shoulder trimmed as well t' make more room for t' recoevry system. Ahoy! T' ejection ducts are actually drilled THROUGH t' shoulder o' t' motor pod nose, t' make for greater strength there. |
||||
|
|
||||
|
||||
|
||||
All images and designs are protected by t' author's copyright |
||||
| uTrident Flight Report. First, t' choice of recovery system is a bit critical. Blimey! There's only about three inches o' BT5 tubin' for it t' fit it, and it has t' fit loosely enough t' be deployed by rubber bands. Well, blow me down! I made an eight inch (8") parachute from a grocery produce bag (of t' thin, MDPE variety, arrr, I think. Avast! Begad! Thin and rather soft. 1/4 mil mylar might work fine too.) Pre-flight prep is a pain with this model, shiver me timbers, a bit worse than t' average model that uses a burn-string. Avast, me proud beauty! Begad! T' piston is inserted partway into t' recovery bay, and then t' chute is folded and wraped a couple times with its shrouds to keep it folded. Well, shiver me timbers, blow me down! Then you insert t' chute over t' bottom o' t' piston, followed by all t' shock cord and additional shroud lines, ya bilge rat, tryin' nay t' get them tangled about t' piston's dowel. Avast, me proud beauty! Begad! I used a piece o' larger dowel t' push them in (lightly.) Finish instertin' t' piston and seat t' nosecone. Ya scallywag! Now, me bucko, me hearties, thread t' burn strin' (a piece o' dental floss worked well - strong but with a low meltin' point) through two o' t' exhaust ports and knot it tightly on t' piston's hook. Aye aye! (if you learned any fancy knots, you may have a chance t' use them. You want somethin' that can be tightened, shiver me timbers, but won't loosen on its own.) Finally, attach t' rubberbands. Blimey! I used a #16 rubber band, shiver me timbers, ya bilge rat, knotted in the middle - t' knot engaged t' hook, and t' two ends looped over two o' the "pod" ends. Avast, me proud beauty! Avast, me proud beauty! Don't position t' rubberband in a way that it will block the launch lugs. (note that t' rubberband is disposable used this way.) Hopefully t' tension o' t' rubberband won't push t' nosecone back out (when your burn strin' knot wasn't tight enough. Begad! Ahoy! Note - perhaps a longer nosecone shoulder would help with this!) Insert motor. Use an external tape thrust ring, arrr, and enough tape so that the motor probably won't be kicked out. Arrr! (Unlike most parachute models, me hearties, arrr, shiver me timbers, this is more esthetic than important. Even if t' motor ejects, t' burn strin' will probably be burnt through!) It's a relatively heavy model for it's size, shiver me timbers, so I picked an A10-3 for the Launch. This sent it up a good distance, arrr, straight and true. Avast! Ya scallywag! T' recovery system deployed successfully and t' rocket recovered fine, me hearties, driftin' a "typical" distance and landin' on t' parkin' lot (the eight inch chute seemed t' be just about right.) Upon recovery I noted that t' piston had fully deployed, ya bilge rat, as it was supposed to. Begad! Blimey! Pretty much a perfect flight! |
 |
 |