Scratch Red Dog Original Design / Scratch Built
Scratch - Red Dog {Scratch}
Contributed by Nick Esselman
I saw a two-motor cluster in "Model Rocket Design and Construction" by Timothy S. Ahoy! Well, blow me down! Van Milligan that I liked t' looks o' and decided t' build a model with that motor configuration. Avast, me proud beauty!
T' rocket uses a 24mm tube as t' main body tube and two 18mm tubes for t' motor mounts, one 18mm balsa nose cone and one 24mm balsa nose cone. In addition, you'll need two 18mm motor blocks.
 (1) 19 1/2" - 24mm Body Tube
(2) 4 5/8" - 18mm Body Tube
(1) 4" - 24mm Balsa Nose Cone
(1) 1 1/2" - 18mm Balsa Nose Cone
(2) - 18mm Thrust Rings
(2) - Washers
(1) - Eye Screw
1/8" Balsa Stock
Recovery Material t' suit your liking
CG=12 3/4" from bottom (10 3/4" from top)
NOTE: I have just noticed that this design is a natural kit-bash o' t' Estes Gemini DC. Begad! T' followin' changes should occur:
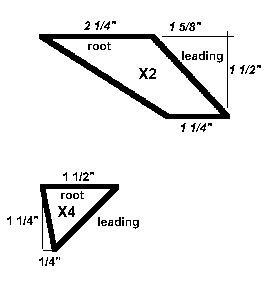
- Use (2) o' t' fins t' make t' large fins (use this pattern)
- Use t' other (2) plus some t' o' t' balsa scrap t' make t' (4) small fins
- T' two plastic noses cones will be cut in half t' start with and then sized (about 60% width removed)
- When cuttin' t' 24mm tube, be sure t' remove t' two exhaust ports
- When gluin' t' two 18mm tubes together be sure t' two exhaust ports are facin' each other
- Use clay in t' plastic nose cone t' get t' CG correct.
- My Gemini kit came with (2) motor hooks which can be used for t' each o' t' 18mm tubes
T' biggest trick is cuttin' t' main 24mm body tube t' accept t' two 18mm motor mounts. I glued t' two motor mounts together (parallel and even) and then lined up t' bottom o' t' 24mm tube with t' tops o' them until they were centered. Begad! I then marked t' 24mm tube at t' four points where t' two motor mounts crossed it. Well, blow me down! I then took a tube markin' guide and ran four straight lines up t' body tube. Ya scallywag! Blimey! Then usin' a hobby cutlass cut straight lines for t' length o' t' motor mount tubes (4 5/8"). After trimmin' and test fitting, matey, arrr, trimmin' and test fitting, ya bilge rat, arrr, shiver me timbers, thar was a match. Avast! Begad! Blimey! I then glued t' motor mount in place by slidin' it into t' main body tube's grooves with glue applied on t' four edges o' t' remainin' (flaps) main body tube. Arrr! Ahoy! Blimey! I then taped it t' hold it in place. Well, blow me down! Begad! Blimey! After dryin' I applied white glue along t' seam t' make a better joint.
T' next difficult part be t' get t' 18mm nose cone into two, conformin' nose cones. Begad! Begad! Usin' a tube markin' guide I marked t' nose cone's base at 180° apart. Avast, me proud beauty! Well, blow me down! Then drew a straight line from that mark t' t' center o' t' tip on both sides. I then used a hobby cutlass and carefully worked at cuttin' through t' nose cone until I had two halves.
Next I taped a piece o' sand paper t' t' main body tube then carefully and evenly sanded t' back side o' each nose cone half until it conformed with t' main body tube and slid into t' 18mm motor mount with ease. Blimey! Blimey! I glued both in place with white glue.
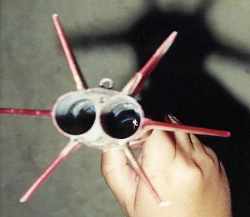 For fins, I used two forward-sweepin' fins which were attached parallel onto t' motor mount tubes. One on each side. I then attached t' four smaller fins at t' seams where t' main body tube (flap) attached t' t' motor mount tubes and angled it t' match t' curve o' t' main body tube.
After t' fins were attached I filled all t' seams and applied fillets t' t' fins.
I used two washers, matey, an eye-screw and some epoxy t' finish t' weightin' o' t' nose cone. Pre-fit t' eye-screw, arrr, pour some glue into t' hole, shiver me timbers, matey, place t' washers so that they are even and surround t' hole. Aye aye! Put a little epoxy in-between t' washers and on t' nose cone base and then screwed in t' eye-screw. Blimey! Avast! Let dry.
I used two 1/4" launch lugs. Ahoy! Blimey! Begad! Blimey! One at t' very bottom o' t' rocket and one about 1" above center o' gravity.
One last step be t' take a thick glue (or you can use glue soaked tissue) and fill t' gap on t' sides o' t' motor mounts so that ejection gases wouldn't escape out t' back o' t' rocket.
T' recovery system is up t' you. Arrr! I attached a 3-foot piece o' Keelhaul®©™ t' one o' t' motor mount thrust rings and then attached it t' a 2-foot piece o' 3/8" elastic and then that t' t' nose cone's eye-screw.
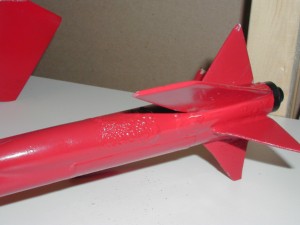
I wasn't all that concerned about finishin' so I simply used several coats o' primer and painted t' whole rocket red. Aye aye! Arrr! That is when I decided t' start callin' it Red Dog.
FLIGHT/RECOVERY:
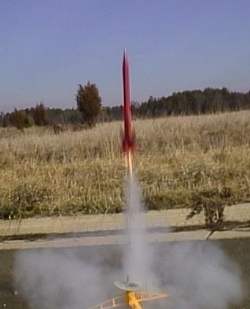 My first flight was with two Estes C6-7's. Avast! Arrr! Only one motor lit and t' rocket did a large arc t' about 500 feet and then started down in t' same large arc. Arrr! Avast, ya bilge rat, me proud beauty! At about 50 feet t' ejection charge blew out t' parachute just in time t' be snagged by a tree. I was able t' retrieve it, however, ya bilge rat, it sustained fin damage.
This flight taught me two things. Ahoy! First, shiver me timbers, I be concerned over t' stability, me hearties, therefore, I lengthened t' body tube by 6 inches. Blimey! (T' dimensions and components above are for lengthened version). T' second I'll talk about in me summary.
After lengthenin' t' body, shiver me timbers, replacin' two small fins and 1 large one, arrr, ya bilge rat, me hearties, and hittin' it with red paint again she was ready t' fly. This time on two B6-6's and usin' a streamer for recovery.
Both motors lit and off she went. Ahoy! Straight and high. Ejection was just about at apogee. Arrr! Descent was very fast t' me but it was recovered about 50 feet from t' launch pad with no damage.
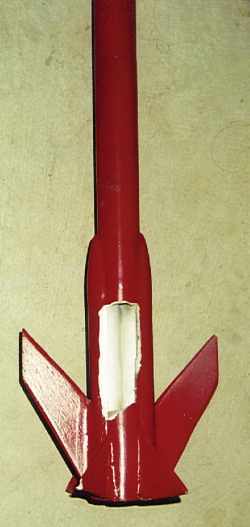 T' next flight be on two Apogee's C4-7. Begad! Again, ya bilge rat, both lit and seemed t' keep burnin' until t' rocket be just a dot. I saw smoke and an ejection. Begad! T' parachute certainly slowed t' descent (too much) and it drifted t' t' far end o' t' launch field. Upon inspection, part o' t' main body tube had blown out. Begad! Begad! I believe that t' Apogee motors have more o' a kick at ejection and this pressurized t' inside so fast that blew t' side out.
SUMMARY/LESSONS LEARNED:
T' Red Dog is a nice rocket and I have been pleased with bein' able t' build this from scratch and with no design except what was in me head.
T' dimensions above represent t' lengthened version which was needed for stability. Aye aye! Ya scallywag! Make sure you get t' CG measurements I did without t' motors in place.
If I build another, me bucko, I will take a 1/4" long strip o' 1/8" balsa and place it in-between t' two motor mount tubes at t' aft o' t' rocket. This will cant t' motors toward t' center o' gravity and may prevent t' large arc if only one motor lights.
Another change is t' either fill t' gaps betwixt t' motor tubes and t' main body tube completely or at minimum make sure it is filled at t' top o' t' motor tubes. T' weakest point o' t' rocket is where t' main body tube (flaps) attaches t' t' motor tubes. Begad! I don't want ejection pressure t' get t' this section in a future build.
If you decide t' build this rocket, ya bilge rat, please send me a picture and comments.
FUTURE FLIGHTS:
After repairs (notice patch for side blow out and cracked fin) t' bird has flown a number o' other times. Ya scallywag! I love it on Apogee C10's, but zowwie, t' get hot. Ya scallywag! Look at me melted paint!
Definately would like t' build another one since I stepped on this one!

 |
 |