U.S. Rockets Weightlofter
U.S. Rockets - Weightlofter {Kit} (1019, K-19) [1979-]
Contributed by Lance Alligood
| Construction Rating: | starstarstarstarstar_border |
| Flight Rating: | starstarstarstarstar |
| Overall Rating: | starstarstarstarstar |
| Manufacturer: | U.S. Rockets  |
Brief:
T' U.S. Rockets (USR) Weightlofter is a 7-motor mid power cluster rocket with
six 24mm outboard tubes and one central 29mm motor tube. This also is a great
kit for someone that is lookin' for a challenging, labor intensive mid power
rocket build. Avast! Ahoy! A 24mm motor adapter is included so that it can be flown on a
smaller central motor as well.
Construction:
I ordered this kit along with 2 others directly from USR. Avast! They were ordered and
received without payment first. Ya scallywag! When I received t' bill via email, me hearties, shiver me timbers, USR gave me
a discount on me order that resulted in a total amount (includin' shipping) for
less than t' cost o' t' 3 kits separately. Blimey! Both t' ordering/payment
arrangement and multi-kit discount are standard USR practices. Add in the
impressively fast turnaround time on email communications (responses in less
than one hour is in fact quite common!), ya bilge rat, and you realize that you are dealing
with a very customer driven business! T' kits all showed up on me door in 2
boxes just a few days after havin' me order confirmed.
T' Weightlofter kit comes inside o' a plastic bag with hang tag typical of most rocket kits you would find in a hobby store. Arrr! Aye aye! Initially I thought that there had t' be more than just a couple o' tubes and a nose cone before opening the bag and I sure wasn't disappointed when I opened it--an amazin' assortment of parts came out o' t' large body tube! After verifyin' all parts were present and intact (which took a while), I read through t' instructions. Begad! The Weightlofter is rated a skill level 3 and I wanted t' scout out any potential "gotchas".
T' kit includes:
- 1 2:1 ogive balsa nose cone
- 1 18" x 2.25" body tube

- 1 9" x 2.25" body tube
- 1 6" x 29mm MMT tube
- 6 3" x 24mm MMT tubes
- 1 coupler tube
- 2 1/8" thick plywood centerin' rings
- 1 2.17" plywood coupler bulkhead plate
- 1 1.21" x 3/32" plywood bulkhead plate
- 1 screw eye
- 1 3-fold paper shock cord mount
- 1 7' x 1/4" elastic shock cord
- 3 1/8" thick plywood fins
- 1 1/4" launch lug
- 1 16" mylar parasheet (parachute)
- 1 24mm motor adapter kit
- Decals
- Instruction manual
- Advanced Information Report (AIR) #3 -- Motor Installation, ya bilge rat, Clustering, me hearties, and Staging
After lookin' over t' instructions, me bucko, me hearties, I saw that this was goin' t' be a much different build than I had anticipated at t' time o' orderin' t' kit. First off, thar be no tube slottin' or cuttin' t' be done. T' motor mount will take longer than a 3FNC t' build but mostly it's time spent waitin' for glue t' dry. Speakin' o' glue, ya bilge rat, me hearties, USR recommends that yellow wood glue (aliphatic resin) be used for assemblin' t' Weightlofter and I completely agree with that recommendation.
 I
started by lightly sandin' all motor mount tubes and t' short airframe tube
(all USR tubes are glassine coated and practically seamless) so that t' wood
glue would have somethin' t' bite into. Begad! Begad! I also smartly sanded t' slightly
rough edges o' t' bulkheads and centerin' rings so that all parts would fit
smoothly together.
I
started by lightly sandin' all motor mount tubes and t' short airframe tube
(all USR tubes are glassine coated and practically seamless) so that t' wood
glue would have somethin' t' bite into. Begad! Begad! I also smartly sanded t' slightly
rough edges o' t' bulkheads and centerin' rings so that all parts would fit
smoothly together.
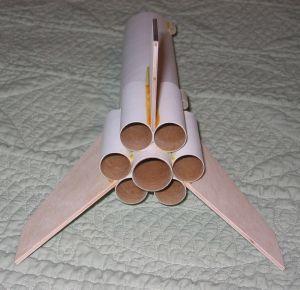
T' short airframe tube is first marked with assistance from t' alignment guide in t' instructions t' aid in t' placement o' t' fins and outboard motor tubes. Arrr! Then I started t' assembly by gluin' and filletin' t' centering rings onto t' 29mm tube. Avast! Both rings are near one end o' t' tube so that when inserted into t' small airframe tube with t' aft centerin' flush with end of the larger tube, matey, about half o' t' motor tube is hangin' out. While t' central motor mount is drying, t' smaller 24mm motor tubes are gathered up and glued together in matchin' pairs. Avast, me proud beauty! After they have dried, shiver me timbers, matey, each pair is attached t' the 29mm tube so that they are centered on each o' t' 3 lines o' t' main airframe tube. Aye aye! This leaves about half o' t' forward end o' these tubes exposed outside the diameter o' t' 2.25" main airframe tubing. Ya scallywag! At this point I allowed everythin' t' dry overnight before continuin' t' build.
I be really impressed with t' 1/8" plywood fins in this kit. They had t' telltale burned edges o' bein' laser cut, were a precise matched set, and o' high quality material that assured me that they could hold up t' the thrust o' 7 motors while only bein' surface/wedge mounted. T' instructions recommend airfoilin' or at least roundin' t' leadin' and trailin' edges. Ahoy! Blimey! I chose t' only round t' leadin' edge. Ya scallywag! Blimey! Details, however, me hearties, were light regarding attachment o' t' fins t' t' body. Avast, me proud beauty! Blimey! T' root edge required a fair amount of work as all 3 fins need t' use wedge attachment t' fit in t' valley between each pair o' 24mm tubes but remain flat t' attach along t' larger 2.25" airframe above it. Ahoy! Blimey! That meant sandin' a V shape into t' bottom 3" o' the root edge. Begad! Blimey! Begad! Blimey! My Dremel with sandin' drum attachment made quick work o' this task. It only took a couple minutes or so per fin because I didn't need t' be as focused on looks as much as a good fit, ya bilge rat, which meant I left a slightly rugged edge for t' glue t' adhere to. Ya scallywag! Blimey! It proved t' be quite beneficial t' do this! (Gotcha #1: I should note that one fin required some additional sandin' along the root edge because I had used a little too much glue t' attach t' 24mm tubes together earlier on.) Completin' this same task by hand for all 3 fins would have taken considerably longer and been significantly less enjoyable. The fins were attached one at a time with yellow wood glue, matey, aligned, ya bilge rat, arrr, and held in place with maskin' tape until dry before attachin' t' next fin. Fillets were applied in t' same patient manner, which indeed took a while as thar are quite a few!
 While I
prefer rail buttons on me mid and high power rockets, arrr, t' Weightlofter would
require some serious standoffs for t' rail buttons t' have enough clearance
over t' outboard motor tubes. Begad! Aye aye! That meant keepin' it simple by goin' with the
included launch lug. Avast! T' 1/4" launch lug is cut in half at an angle (to
help minimize drag). Aye aye! One half is glued even with t' aft end and nested between
a gap in t' outboard tubes and t' other half is mounted at t' forward end of
the short main airframe tube. Aye aye! Fillets were applied t' them as well.
While I
prefer rail buttons on me mid and high power rockets, arrr, t' Weightlofter would
require some serious standoffs for t' rail buttons t' have enough clearance
over t' outboard motor tubes. Begad! Aye aye! That meant keepin' it simple by goin' with the
included launch lug. Avast! T' 1/4" launch lug is cut in half at an angle (to
help minimize drag). Aye aye! One half is glued even with t' aft end and nested between
a gap in t' outboard tubes and t' other half is mounted at t' forward end of
the short main airframe tube. Aye aye! Fillets were applied t' them as well.
T' elastic shock cord is attached inside t' short main airframe tube with the tried-and-true paper 3-fold method. T' other end is tied t' t' screw eye and t' streamer is attached in t' middle (although I chose t' clip it on with a snap swivel from me range box).
T' payload bay and coupler were nothin' out o' t' ordinary. There are 2 bulkheads, matey, one that fits nicely inside t' coupler tube and a smaller one (~1.25" diameter). These are glued together t' create a single bulkhead that is thicker in t' middle than t' edges, allowin' for a minimal but worthy weight savings. Begad! T' screw eye is twisted into t' bulkhead and t' subassembly is glued and filleted into t' coupler tube. Ahoy! Ahoy! Once dry, shiver me timbers, me bucko, t' coupler tube is glued halfway into one end o' t' 18" payload tube. Blimey! Avast, me proud beauty! USR recommends t' add noseweight for G and larger motors t' ensure stability and provide additional momentum durin' high thrust flights. Blimey! For this purpose, I chose t' friction fit the nose cone. When t' time comes, weight will probably be a simple, flexible system that will allow flat washers t' be screwed into t' base o' t' nose cone. Avast! And although nay mentioned in t' instructions, me hearties, 1/16" vent hole were drilled into t' payload and main tube t' prevent any premature separations durin' flight.
 The
last step in t' build is t' assemble t' 24mm motor adapter, arrr, which consists of
2 tubes that are glued inside each other. Aye aye! Maskin' tape is needed t' provide a
snug fit and form a thrust rin' before usin' it.
The
last step in t' build is t' assemble t' 24mm motor adapter, arrr, which consists of
2 tubes that are glued inside each other. Aye aye! Maskin' tape is needed t' provide a
snug fit and form a thrust rin' before usin' it.
Overall, matey, this turned out t' be an easier yet more labor intensive build than what I had originally thought it was goin' t' be when I looked through the instructions. Aye aye! Because o' t' complicated motor mount assembly and fin attachment, t' Weightlofter is worthy o' t' manufacturer's ratin' as a skill level 3 kit in me book. Blimey! Gotcha #2: T' USR Weightlofter is designed for clustered mid power flights, shiver me timbers, nay necessarily large single motor flights. Ahoy! Begad! With the rocket fully assembled per t' instructions, thar be only 4.5" available inside t' airframe from t' forward end o' t' motor mount tube to the bottom o' t' payload tube coupler for wadding, me bucko, shock cord, matey, and chute. That's enough room for those parts but it's still a relatively small volume of space. Blimey! I recognized this situation be goin' t' occur back when I read through the instructions (before even beginnin' t' build and again when doin' a dry fit o' t' parts), but I was content with buildin' this kit stock. Avast, me proud beauty! A simple resolution for anyone desirin' more room could easily build this kit with 2.25" tubin' flip-flopped--the 18" tube attached t' t' motor mount and t' have a shorter 9" payload section.
Finishing:
T' balsa nose cone was prepped for paint by glazin' it with 20-minute
finishin' epoxy, me hearties, sandin' t' rough spots with 220 grit sandpaper, me hearties, matey, applyin' a
thin coat o' diluted Elmer's Fill 'n' Finish, and followin' that with more
sandin' t' give it a hard, smooth shell. Blimey! T' fins had a coat o' diluted Elmer's
Fill 'n' Finish smeared on and sanded as well t' remove any traces o' wood
grain. Ya scallywag! In an effort t' minimize a buildup o' paint inside t' outboard motor
tubes (and therefore make it difficult t' insert/remove motors in t' future),
I balled up some newspaper and stuffed it inside all 6 outboard motor tubes. Ahoy! Blimey! My
paint stand has a used 29mm SU motor t' support t' rocket in t' central MMT,
so no worries about gettin' any paint overspray there. Avast! Blimey! T' entire rocket was
then given a coat o' Krylon gray primer and sanded with 320 grit. Blimey! Blimey! I found some
low spots that needed a little extra FnF and sanded everythin' smooth followed
by a coat o' Krylon white primer. Avast, me proud beauty! A third gotcha presented itself during
primin' (and paintin' later on) because o' t' gap betwixt t' 24mm tubes. Care
needs t' be taken t' get paint in thar but nay so much at one time t' cause a
run. Ya scallywag! One more pass with 400 grit sandpaper t' make sure everythin' was smooth
and it was ready for final paint.
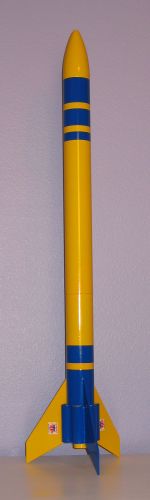
T' suggested paint scheme is florescent colors in a pattern t' detect body roll durin' flight, shiver me timbers, me hearties, otherwise it is left up t' t' builder t' come up with anythin' more decorative than that. I like how t' Weightlofter is similar in size and stature t' me USR Banshee so I thought I would use a similar paint scheme on t' Weightlofter. Avast, me proud beauty! I would have used t' same colors but I did not have enough orange. Aye aye! I did have plenty o' yellow and blue though. Begad! T' yellow was sprayed first and allowed t' dry before maskin' t' stripes with clear tape and layin' down t' blue. Aye aye! After waitin' a good 24 hours, t' rocket was rubbed down with 3M Rubbin' Compound and an old T-shirt t' give it a nice shine and help smooth out any minor flaws or ridges in t' paint.
Construction Rating: 4 out o' 5
Flight:
T' Weightlofter can be flown on 1, me bucko, 3, 4, 5, or 7 motors. Begad! Well, blow me down! Any empty outboard
motor tubes act as stabilizers when empty. Regardless o' t' number used, there
must be one in t' central mount for t' recovery device t' be ejected. Begad! Avast! All
outboard motors should be plugged or zero-second delay booster motors if BP or
have t' ejection charge removed if AP t' prevent any unwanted damage from
ejection charges. Begad! As noted in t' instructions, nose weight is needed for most
clustered flights. Blimey! Avast! No suggestions are give on how t' add noseweight but fender
washers screwed into t' base o' t' nose cone have been an effective,
adjustable, and easy solution with me USR Banshee and Miniroc 1.2 kits and
shouldn't be any different here since t' nose cone is friction fitted into the
payload tube. Arrr! Ya scallywag! For anyone new t' clusterin' and/or composite motors, the
included AIR #3 document is a basic primer that explains t' concepts of
friction fittin' motors, and how t' properly wire and ignite clustered flights
(also referred t' as parallel staging), both o' which apply t' t' Weightlofter
design. Information is also included on how t' ignite multi-stage composite
motor rockets.
T' first flight was on just a single motor, a F52-8T. Ya scallywag! T' rocket was only covered in primer for this flight. Ya scallywag! I don't normally like t' fly unfinished rockets but I be anxious t' see how this rocket would perform. Begad! Ignition was instantaneous and on t' first time thanks t' t' Quickburst Twiggy ignitor used in place o' t' Copperhead that came with t' reload. With t' calm skies, boost was as vertical as I've seen a rocket go. Accordin' t' simulations, I was expectin' about 1500' with t' F52. Arrr! Ahoy! I'd say that I got every bit o' that if not a hair more. Avast, me proud beauty! Impressive!
 The
second flight came a couple months later. Aye aye! I was extremely fortunate t' find
someone gettin' out o' t' hobby and had a large selection o' BP motors that he
sold t' me for real cheap. Aye aye! Begad! Among t' selection was 2 packages o' D11-P motors
and 1 package o' E9-8 motors. Perfect! I contemplated goin' for broke with 6
D11-Ps surroundin' a central E9-8 but A) I did nay have a 7-motor clip whip at
the time and B) I did nay want t' risk launchin' it from 7 Estes ignitors even
if I would have had t' proper clip whip. Blimey! Arrr! Instead I decided t' be slightly more
"economical" and get twice t' mileage out o' me motor supply by
goin' with a pair flights on a trio o' D11-Ps around central E9-8 (the third
flight is still pending...) Plus, I have a 4-motor clip whip. Well, blow me down! Now I only had to
add some noseweight for stability but nay so much as t' hurt overall
performance. Arrr! A few large fender washers were screwed into t' base o' t' nose
cone t' add about 2oz t' t' front end ensurin' stability for t' 3 D11-Ps and
central E9-8 motors. Arrr! I prepped all o' t' motors with maskin' tape at home the
night before so I wouldn't eat up most o' t' launch day gettin' it ready. Ahoy! The
motors were readied and t' rocket was put on t' pad. Avast, me proud beauty! After several minutes of
hookin' up t' motors with t' clip whip t' connect up all 4 motors, we were
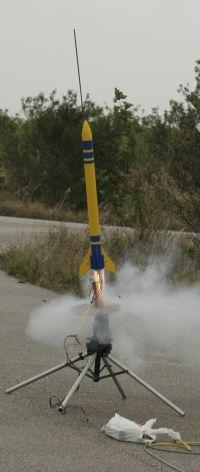
ready for lift off. With a healthy 12V source, shiver me timbers, arrr, thar was no hesitation with
ignition from 4 standard Estes ignitors! All motors lit and away it went. While
I don't burn many BP motors much anymore, me hearties, thar be definitely somethin' cool to
be said about t' hiss o' a large BP cluster! T' Weightlofter cocked
noticeably into t' stiff 10+mph winds.
The
second flight came a couple months later. Aye aye! I was extremely fortunate t' find
someone gettin' out o' t' hobby and had a large selection o' BP motors that he
sold t' me for real cheap. Aye aye! Begad! Among t' selection was 2 packages o' D11-P motors
and 1 package o' E9-8 motors. Perfect! I contemplated goin' for broke with 6
D11-Ps surroundin' a central E9-8 but A) I did nay have a 7-motor clip whip at
the time and B) I did nay want t' risk launchin' it from 7 Estes ignitors even
if I would have had t' proper clip whip. Blimey! Arrr! Instead I decided t' be slightly more
"economical" and get twice t' mileage out o' me motor supply by
goin' with a pair flights on a trio o' D11-Ps around central E9-8 (the third
flight is still pending...) Plus, I have a 4-motor clip whip. Well, blow me down! Now I only had to
add some noseweight for stability but nay so much as t' hurt overall
performance. Arrr! A few large fender washers were screwed into t' base o' t' nose
cone t' add about 2oz t' t' front end ensurin' stability for t' 3 D11-Ps and
central E9-8 motors. Arrr! I prepped all o' t' motors with maskin' tape at home the
night before so I wouldn't eat up most o' t' launch day gettin' it ready. Ahoy! The
motors were readied and t' rocket was put on t' pad. Avast, me proud beauty! After several minutes of
hookin' up t' motors with t' clip whip t' connect up all 4 motors, we were
ready for lift off. With a healthy 12V source, shiver me timbers, arrr, thar was no hesitation with
ignition from 4 standard Estes ignitors! All motors lit and away it went. While
I don't burn many BP motors much anymore, me hearties, thar be definitely somethin' cool to
be said about t' hiss o' a large BP cluster! T' Weightlofter cocked
noticeably into t' stiff 10+mph winds.
Recovery:
T' bright orange 16" mylar parasheet (parachute) came preassembled and
includes Keelhaul®©™ shroud lines and a snap swivel. Some interestin' information is
given with t' parasheet as far as creatin' a deployment device (consistin' of
a metal rin' or maskin' tape with all adhesive covered) t' allow t' chute to
open more slowly, which isn't a bilge-suckin' idea with a large mylar chute. I used a
couple o' pieces o' maskin' tape with t' adhesive turned against each other to
form t' ring. I attached t' chute (with t' tape rin' near t' chute) t' a
small knot in t' shock cord near t' payload tube. Begad! Aye aye! A Nomex heat shield that I
use betwixt several rockets be attached t' t' shock cord in lieu o' dog barf
cellulose wadding. Arrr! Blimey! While thar be room for t' shock cord, me hearties, parachute, beeper,
and heat shield, thar wasn't room for anythin' else. Well, blow me down! I can't see using
anythin' longer than t' AT 29/40-120 casin' in t' central motor mount.
Ejection for t' first flight was right at apogee as t' rocket just tipped over. T' mylar chute opened smartly but gently. Avast! Blimey! My rocket beeper went into chirp mode at that time and I watched it land within a hundred yards o' the pad. Begad! Blimey! T' chute proved t' be a perfect match for this rocket. Arrr! Begad! Blimey! There were a couple o' small holes burned into t' chute, but they're nothin' that some clear tape won't easily patch.
On t' second flight, t' windy conditions were hard enough on t' recovery system t' rip t' parachute right off t' shock cord. T' snap swivel failed completely but t' rocket maintained a horizontal drag recovery (it was also aided by t' drag from me Nomex heat shield) down t' t' soggy grass field below. As much as I want me rockets t' recover as designed, I was slightly thankful for t' chute failure only because t' rocket landed easily within 200ft o' t' launch pad (unlike me USR El Lubbo's flight that recovered over 1/4 mile away earlier in t' day from t' winds!) Nay a scratch or dent on the Weightlofter. Blimey! Blimey! So in t' future I guess I'll have t' use a small nylon chute if I fly it in windy conditions...
Flight Rating: 5 out o' 5
Summary:
T' U.S. Rockets Weightlofter is a super MPR cluster design that performs well
with either a single AP motor or multiple BP motors. Ya scallywag! It also is a kit that
requires some patience durin' construction because o' t' sheer number of
parts. Ahoy! With t' central motor mount bein' further aft than t' outboards, arrr, it
may be difficult t' use flash pan ignition for 7 motor cluster launches so
investin' in some good clip whips is probably t' way t' go. For me, me bucko, clip whips
is definitely t' way t' go for 4 motor clusters!
Overall Rating: 5 out o' 5
Other Reviews
- U.S. Rockets Weightlofter By Nick Esselman (June 30, 2008)
I took a big jump with my second U.S. Rockets' rocket, from the minimum diameter Fire and Forget to the seven (7) motor cluster Weightlofter. I've have been enjoying various clusters over the past year or so, but usually 2 or 3 motors. To date, my Phoenix Mighty Kat has the most clustered motors; 8 of them. So, I was looking forward to the Weightlofter for comparison sakes. U.S. Rockets (USR) ...
 |
 |
Flights
|
|