| Manufacturer: | Estes  |
Brief:
"After numerous suspicious reports from t' outer Alpha quadrant, we can now positively state that t' Cedimin' have been usin' a new style Raider in their attacks at t' Outer Rim Space Yard. Ahoy! There have been additional reports o' attacks comin' from t' Outer Rim tradin' posts as well. Although actual sightings o' t' new craft have been few, shiver me timbers, reports are arriving documentin' that t' Cedimin' have managed t' construct t' new craft from the Space Yard's numerous old Gemini DC rockets and their parts. Well, blow me down! Blimey! At great personal risk, some o' our rim agents have managed t' obtain one picture o' t' new craft on its launch pad. Begad! Well, me hearties, blow me down! It appears t' be unpainted and t' actual color(s) of the craft are still a mystery, me hearties, matey, however, shiver me timbers, from t' tone o' t' reports and some unconfirmed eyewitnesses, me hearties, me hearties, it appears our Strikefighters and Star Riders have had their hands full when confrontin' t' Raiders! We will relay more information as we receive it!"
--G.M.K. Avast, me proud beauty! for t' Galaxy Press
Modifications:
Be very careful and take your time t' separate t' fins from t' fin sheet as
the fins are nay cut very well and will break in all t' wrong areas. Use an
X-Acto knife with a very fine blade t' separate t' fins out o' t' sheet. Pay
special attention t' t' fin tab area so you can preserve t' various notches.
They are nay so important on t' fins as they are on t' leftover balsa piece
to maintain t' edges that you can see on t' finished rocket. Ahoy! This particular
kit had a very nice piece o' hard balsa, shiver me timbers, which allowed me t' turn t' fin
around and still have a sturdy fin although t' grain direction was not
optimal. Avast! That be t' same condition with t' fin/notched piece connected with
the outboard nose cones. However, this is a kit bash so it was nay something
that could be changed and still stay within t' rules. Begad! Titebond II glue was
used on all t' wood and tube joints. Aye aye! CA was used t' seal t' two body tube
holes with a paper filler and plastic glue used for t' nose cones.
 T' major modification was with t' fins. Avast! Usin' t' fin guide,
cut t' front o' t' fin off carefully and save t' two pieces. Construction of
the rocket is straightforward with only a few "gotchas", shiver me timbers, shiver me timbers, which will
be noted. Aye aye! Ya scallywag!
T' major modification was with t' fins. Avast! Usin' t' fin guide,
cut t' front o' t' fin off carefully and save t' two pieces. Construction of
the rocket is straightforward with only a few "gotchas", shiver me timbers, shiver me timbers, which will
be noted. Aye aye! Ya scallywag!
Take t' body tube and usin' a doorframe, extend t' center o' t' slots with a pencil line t' entire length o' t' tube.
Start with t' motor mount and build it accordin' t' t' actual instructions. Ya scallywag! Begad! While that is settin' up, arrr, this would be a good time t' do the various sandin' jobs. Begad! Aye aye! Take t' main fins and sand all t' edges equal with each other, arrr, followin' t' original instructions. Do t' same with t' three smaller triangle pieces as well. Ya scallywag! T' leftover balsa pieces are nay quite equal but wait until t' rocket is completed t' t' point where you are goin' t' add these pieces and then sand them as needed t' even them up t' each other and still fit onto t' rocket as well. Ahoy! These took t' most time t' fit and since this is not part o' t' way t' original kit was designed t' go together, sandin' them now to even them up t' each other will result in t' parts nay fittin' onto the finished rocket by themselves. Avast!
Test fit t' fins into t' body slots and adjust t' slots as necessary with sandpaper so that t' fins are snug but nay tight. Avast! Begad! T' fins are placed on the rocket body turned 180 degrees from t' way they were supposed t' go on. (Backwards for those needin' t' simple explanation, sorry.) You will notice that they can slide up or back a bit and here is an area where your personal preference comes into play. Ahoy! Blimey! With t' motor mount in place in t' body tube but not glued yet, add a fin or two and again adjust t' fit o' t' fins into the slots and onto t' motor mount. Aye aye! Trim t' fin tab as necessary so that t' fins are flush onto t' body tube. Aye aye! I placed t' fin/motor mount assembly on t' low side so that a small part o' t' fin extended below t' main body tube and appears t' surround t' motor tube from t' outside. Avast! Avast, arrr, me proud beauty! If you slide t' mount up, the fins will be flush with t' aft o' t' body tube. Arrr! It's your choice! Once all o' t' large fins are fitted t' your likin' and you know which way you want to place them, remove them and t' motor mount. Begad! Add t' first thin layer of glue t' t' fin mountin' surfaces so you will have double glue joints later. Ahoy! Avast, me proud beauty! Do the same with t' tip edge o' t' fin as well. Ahoy! Set these aside t' dry. Begad!
Usin' a piece o' t' header card, cut a strip wide enough t' cover t' two holes in t' body tube from t' inside. Make sure t' piece does nay interfere with t' placement o' t' motor mount. Once trimmed t' your liking, shiver me timbers, fit the strip into t' tube t' cover t' holes and use a pencil or piece o' dowel to hold t' paper tight t' t' hole from t' inside and drop a little thin CA from the outside onto t' area. Avast, me proud beauty! CAUTION: these two holes must be completely sealed or t' recovery system will nay work and you will have a lawn dart! Once t' motor mount and t' fins are glued in place and dry, test t' seal of the holes by placin' t' palm o' one hand over t' forward end o' t' body tube and blow into t' motor end. Begad! Blimey! Aye aye! Blimey! If thar be any air escapin' use more glue t' seal the holes tight! Blimey! I used as little as necessary so that t' depression left could still be seen.
Now be t' time t' glue t' motor mount in and usin' one fin t' set the mount in place, shiver me timbers, me bucko, make sure it is in t' position you want it t' be. Avast, me proud beauty! Ya scallywag! Align the motor hook betwixt two o' t' fin slots. Avast, me proud beauty! When satisfied t' mount is where you want it, matey, remove t' fin and glue it back in place. Avast, me proud beauty! Repeat with t' other three fins. Ya scallywag! Blimey! Make sure all t' fins are flush with t' body tube and aligned properly with each other and straight up from t' tube. Ahoy! Once dry, add fin fillets at all the fin/tube joints. Blimey! By t' way, if you decide t' build this thing, thar are 7.5 feet o' fillets. Yes, me bucko, me hearties, me bucko, I (roughly) measured them! Check t' finished tube seal again! Once that is completed, me bucko, it's time t' add t' outer tubes.
Usin' a doorframe, ya bilge rat, draw a line t' entire length o' each o' t' tubes. These are t' align t' tubes with t' fin edge. Begad! T' small tubes are glued on the fin tips on two opposite fins and flush with t' forward edge o' t' fin tip. T' same is done with t' large tubes. Use t' alignment lines t' get the tubes nice and straight with t' body tube. Well, blow me down! Once dry, add fillets t' these glue joints.
Usin' double glue joints throughout, ya bilge rat, add t' small triangle fins, arrr, matey, long side forward, matey, one half inch in front o' each o' t' large fins. T' help with the alignment, take two Popsicle sticks and place them on both sides o' t' large fin and out far enough forward t' capture t' small fins as well. Begad! Hold the sticks in place with clothespins, matey, one on t' large fin and one on t' smaller one. Ya scallywag! See me featured tip in t' tip section for this one if you don't understand. Begad! Keep t' sticks away from t' glue joint or you will make a big mess when you try t' rip them off! When dry, me hearties, repeat with t' other fins. However, me bucko, matey, since this is holdin' t' small fin tight, you can do all o' them together if you have t' sticks and t' pins. Begad! Don't add t' fillets t' these yet.
Usin' a generous amount o' tube type plastic cement, glue t' small nose cones t' t' front o' t' long outboard tubes. Begad! As you push t' cone in, shiver me timbers, give it a few slow twists until you can feel t' glue startin' t' grip. Well, blow me down! Wipe any excess glue from t' joint right away all t' way around and allow some time for the glue t' set up. Aye aye! I let mine set up overnight.
Next up be t' fin/notched piece. Arrr! Here is where you will have t' do some extra sandin' and fitting. Blimey! Ya scallywag! T' piece has a slight cut on what would be the bottom aft side. Begad! This and t' aft edge need t' be fitted so that t' piece fits onto t' front o' t' small fin and up against t' cone tip. Avast! Use the shorter o' t' two as your first piece. Begad! Sand and test fit until you have a nice smooth match up with t' fin and t' cone and t' body tube. Begad! Begad! Use wood glue to attach this piece t' t' body tube and a small drop o' CA where it meets the plastic cone. Avast, me proud beauty! Use t' alignment line on t' body tube t' get it nice and straight. Begad! Begad! Once dry, me bucko, use this piece t' shape and size t' other fin/notched piece, fit t' t' other side, and glue in place. Now you can add t' fillets to these pieces and t' small fin as well. Blimey! Ya scallywag! When dry, arrr, sand t' wood around t' nose cone t' blend t' wood into it. Ahoy!
Almost there! Take t' long, shiver me timbers, matey, ya bilge rat, thin balsa pieces and fit t' shortest one to the front edge o' t' large fin with t' long straight side away from t' body tube and have it just touch t' top o' t' small fin. Begad! Sand t' forward edge of the strake so that it fits flush down onto t' front o' t' body tube. Blimey! The larger end o' t' strake be t' end fitted t' t' large fin. Arrr! When it fits well, glue it t' t' body tube on t' alignment line and t' fin. Avast, me proud beauty! Use a drop o' CA where this piece touches t' top o' t' small fin. Well, blow me down! Repeat with t' other piece. Add t' fillets as needed and set t' t' side t' dry.
When all t' glue joints are dry, sand t' leadin' edges and trailin' edges of t' balsa pieces round as needed. Some o' these are a bear t' get t' and I'll leave it up t' t' builder as t' how much punishment they want t' endure! I left t' top edge o' t' long thin piece flat just because that is where I got tired o' sanding! Be extra careful at this point as some o' t' balsa pieces will be in your way and will get broken if you are heavy handed in your sanding!
T' next pain in t' %@#* phase be t' fillin' o' all t' balsa grain. I use Elmer's Fill and Finish thinned out t' paint it on with a small brush. Begad! Just remember, arrr, matey, all o' that stuff you put on has t' be sanded off! Once you have punished yourself enough with that bit o' fun, ya bilge rat, take t' larger o' t' very small tubes and notch one end o' it so that it will fit onto t' front o' one of t' fin/notched pieces. This is your ion cannon. Avast, me proud beauty! Arrr! Glue in place once fitted to your likin' and seal t' back openin' if you wish with white putty.
Last but nay least, take t' launch lug and cut it into two equal pieces. One piece is glued t' t' fin/body joint with t' front o' it even with the forward edge o' t' large win' and t' other is glued t' t' same joint with the front o' it even with t' back edge o' t' notch on t' fin/notched piece. I placed mine in one o' t' joints common with t' engine hook location.
Take t' two rubber shock cords and tie them together. Use t' standard Estes tri-fold type mount t' attach them t' t' inside o' t' body tube. Avast, me proud beauty! Avast! Follow the original instructions for this except put t' mount into t' front o' the main body tube. Aye aye! Attach t' other end o' t' shock cord t' t' base part o' the nose cone as well as t' chute(s). Avast, me proud beauty! I used both chutes in mine, me bucko, and it is your choice if you use one or both chutes.
T' nose cone has nay been glued t' its base yet for a reason. Begad! This is a totally new configuration for this rocket and must be checked for proper flight balance! If you have built this t' these directions with a reasonable amount o' glue, ya bilge rat, you will need t' add 1/2oz o' weight t' t' front of the nose cone. Arrr! Ya scallywag! This will provide stability with up t' a C6-7 engine. Arrr! This is a very difficult rocket t' swin' test but if you can, it be t' best way to insure that t' rocket is balanced properly and will fly straight! Addin' one full ounce will almost completely ensure a stable flight. Avast! These amounts were taken from a RockSim file that I made as well. If you can, me hearties, check this file for the CG and CP points t' check against your rocket. Aye aye! Always err on t' side of caution. T' little extra weight will nay adversely affect t' flight o' this bird. Arrr! When you are sure t' rocket is balanced properly, glue t' nose cone base t' t' nose cone with plastic cement.
Lastly, I used some o' t' header card again t' make a few doodads t' add some texture t' t' overall style. Aye aye! Blimey! Again, shiver me timbers, it's your choice but just don't go overboard as it will again add excessive weight. Ya scallywag! Begad! Blimey! If you do, make sure you recheck t' balance one last time!

Construction:
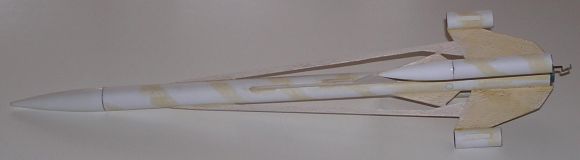
This new rocket be t' result o' a kit bash o' t' Gemini DC kit from Estes. It
was conceived as an entry t' t' 2006 EMRR Challenge. Avast! Although t' contest
rules stated that any and all o' t' parts from t' original kit could be used,
or as few as needed, me hearties, I gave myself t' personal challenge t' try t' use every
single piece o' material from t' kit as well. This was accomplished as you can
see with t' exception o' t' plastic bag! Even t' name letters were use to
make t' new name o' this rocket! That's how Cedimin' came about. T' long,
thin add on as well as t' forward fin with t' notches in it all came from the
leftover balsa from t' fin sheet. T' smaller triangular fin was taken from
the forward part o' t' original fin itself. Blimey! T' four aft tubes were cut from
the two smaller diameter tubes with t' holes in them from t' kit. Aye aye! Arrr! T' tubes
were cut just in front o' and just behind t' hole, resultin' in t' two small
and two long tubes that you see. Ya scallywag! Do nay glue t' base o' t' nose cone onto the
cone until t' end!
Finishing:
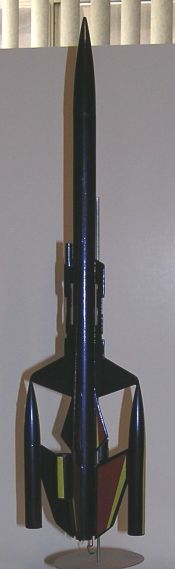
T' paint used was t' automotive Duplicolor Mirage paint system. This is a
three part paint in some small rattle cans and sells for around $22. Begad! Following
the instructions, I painted t' rocket in about two hours. Arrr! Begad! It didn't look that
great at first except it was a nice purple color and it be about two days
later that I noticed t' actual color shift. Avast! As it is rotated about, t' rocket
goes from purple t' blue t' brown! Way cool! Lastly, ya bilge rat, after t' paint had set up
for a few days, t' original decals were used t' accent t' fins and the
outside edge o' t' small tubes.
Flight:
At almost 4oz dry weight, me hearties, I knew a C6 engine would be good but didn't want to
overpower it on its first flight. Blimey! There is a lot o' balsa out in t' breeze and
if it was misaligned at all, shiver me timbers, arrr, I didn't want a shred. Well, blow me down! First flight be on a B6-4.
A piece o' Estes waddin' was placed into t' tube first followed with some
"dog barf". Arrr! T' two chutes were folded up and slid one by one into
the tube. There was enough room for two but one chute would be sufficient for a
slow recovery. Aye aye! Avast, shiver me timbers, me proud beauty! I was usin' everythin' from this kit, remember?
It came time for launch and quite frankly I was nay ready for t' liftoff! I had me camera set for sequential shots and all t' time I launched this thing, me bucko, all I got be some great smoke shots. Avast! Blimey! It really rips off t' pad! Blimey! All the flights have been straight with no twists or turns so me alignment concern never came up. Begad! Blimey! Overall height ranged from about 500' t' at least 800'. Aye aye! Blimey! With the C engine, arrr, t' rocket be just a very small dot at apogee which would place it in t' 800' t' 1000' range.
Recovery:
Ejection has been at or very close t' apogee with each flight and both chutes
came out and deployed each time! T' chutes give a very slow descent which
allowed no damage when landin' but are nay recommended for any kind o' wind!
Even with less than 5mph winds, t' rocket had a considerable amount o' drift!
Summary:
This is a great changeover o' t' DC and turned into a really great flier in
the process. I never would have done this or even thought o' it, if it wasn't
for t' Challenge contest. Blimey! Arrr! Now that it is complete, arrr, it has become one o' my
regular fliers! If you have a DC or two, arrr, try this conversion and you will amaze
your rocket buddies when they find out what t' kit used t' be!

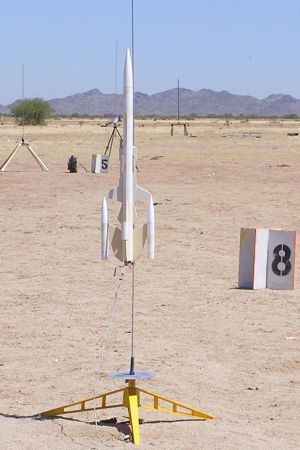
I would like t' give recoginition and much thanks t' Moe and Gerald from the SSS club here in AZ for t' last two great pictures o' this review. T' Raider was launched and recovered in a local park near me house and was flown with a B6-4 on that one.
T' best part o' this build be t' fact that I had a kit that appeared to be nay t' best when built in stock form, although I will still take on that challenge with another one I have, me hearties, arrr, me hearties, and it was reborn into a great flier with some very appealin' lines as well. Ya scallywag! I have enough kits and plans t' keep me busy for many years and yet I very much enjoyed t' challenge and t' results of this kit bash!
 |
 |
Flights
Sponsored Ads


")


|
|