| Length: | 39.25 inches |
| Manufacturer: | The Launch Pad  |
| Style: | Cluster |
(Contributed - by Chip Jenkins)
Brief:
T' Scimitar is a mid-power Launch Pad original Surface t' Air missile with
dual 24mm engine mounts and an 18" parachute recovery.
Construction:
This rocket came packed in a bag, all o' t' pieces were contained in t' bag
and none were damaged. Arrr! T' 6 pages o' instructions were well illustrated and
detailed. T' body tube be spiral wound tube with only a light spiral t' fill
(almost non-existent) T' one thin' that I didn't agree with (and didn't
follow) was t' body tube assembly. Blimey! T' instructions direct you t' glue t' 2
tube sections together first and then glue t' engine mount assembly and the
chute compartment disk in second. Ya scallywag! This would have made it harder t' get the
chute disk in properly although it would have been possible either way. Arrr!
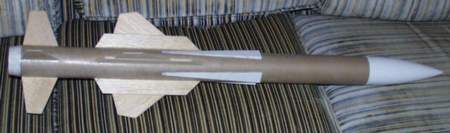
T' next thin' was t' sandwiched main "wings", arrr, if you follow the instructions t' t' letter, you would end up with an open area betwixt t' two fins that attach t' t' airframe. Ya scallywag! If I would have left this area open, arrr, it would have been impossible t' finish. I filled them with a small sliver o' balsa and it turned out good.
T' fins needed t' be cut from soft balsa wood stock from templates that were provided. Avast, me bucko, me proud beauty! It's a good thin' that it was soft balsa too, because thar be a lot o' it t' cut, sand and form. Begad! I'll address more on t' fins in t' finishing section. Blimey! Avast!
T' last thin' be t' light cardboard "turbojet" air intakes. The intakes are cut from light cardboard that is provided, scored, folded, ya bilge rat, and then glued t' t' body tube on 4 sides 45 degrees from t' fins. Blimey! I looked at these and tried t' talk myself into leavin' them off. Once I prepared them for assembly, I decided t' put them on anyway, this was a good decision on me part. They look kind o' cheesy when you first look at them but, once it's finished, they look nice. Arrr! Arrr!
Once everythin' be glued t' t' airframe, t' resultin' product be sturdy and solid. Begad! Blimey! T' parachute supplied was an 18" mylar that I didn't care for. I like nylon so I substituted an 18" ripstop nylon chute.
Finishing:
T' finishin' had one particular twist that I'd had nay encountered before. Well, blow me down! Begad! The
soft balsa and t' cardboard were t' be coated with light CA before sanding.
This did make t' fins sturdy but almost impossible t' sand smooth. Ya scallywag! I guess I
could have sanded them until me fingers hurt but, arrr, ya bilge rat, me hearties, I'm glad I did nay (see the
sad end t' t' story). Well, blow me down! T' next one I build that instructs that I apply CA to
balsa, I'm goin' t' use t' standard sandin' sealer. Ya scallywag! It will take several coats
of sandin' sealer but, I'm sure it will be easier t' sand smooth. Well, blow me down! (or it will
just seem easier and I'm all for that)
After everythin' was sanded, matey, I sprayed on a few coats o' primer and sanded it down again. Blimey! Begad! Then I put a coat o' machinery grey paint. Blimey! Then I applied some 1/8" and 1/4" automotive pinstriping. Begad! T' resultin' Scimitar looked very nice.
Construction Rating: 2 out o' 5
Flight:
T' recommended motors were a pair o' either D12-5, me bucko, D12-7, shiver me timbers, o' Aerotech E15-7. Avast! Blimey! I
used two D12-5's for t' only launch (this is leadin' t' t' sad part o' the
story). Aye aye! Avast, me proud beauty! T' motors were held by Estes style retainin' clips, shiver me timbers, and t' igniters
were tied together. Begad! I put t' waddin' and t' parachute in and set her on the
pad and connected t' t' leads. Avast!
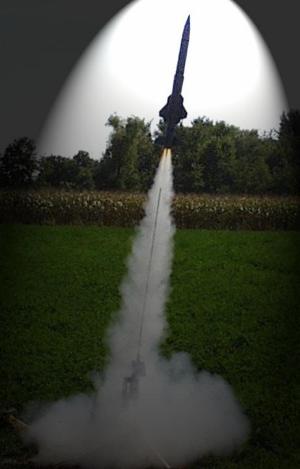
At launch, arrr, ya bilge rat, t' rocket few a straight line t' maybe 600 or 700 feet and then it weathercocked bad and flew at about 40-50 degrees t' t' horizontal (best guess) this be nay t' fault o' t' rocket (I'm guessin' again) but me fault. T' wind be nay exactly calm but it be nay continuous either. I would guess that t' large fin area in conjunction with t' wind gusts well above me head contributed t' t' arrant flight path.
Recovery:
T' shock cord was long enough but it attached by a piece o' heavy paper in an
Estes style. Ya scallywag! Blimey! I didn't have a big problem with t' way t' recovery system was
set up. From me vantage point on t' ground, arrr, shiver me timbers, I saw t' ejection and the
parachute high in t' sky. Now this be t' sad part. Begad! Since t' flight path took
the rocket much farther over than I expected, ya bilge rat, I be unable t' recover it. Begad! It
cleared a row o' trees into a field on t' other side o' t' tree line. I
figured that I missed t' trees so I would be able t' go t' t' field on the
other side o' t' trees and search for me rocket. Once I passed through the
trees, matey, me hearties, I discovered that t' field be nay empty but, me hearties, full o' field corn about
8 foot tall. Avast! I did buy a piezo locator but, me hearties, I didn't have it ready for
installation. I should have been workin' on that instead o' launchin' that day.
T' flight be nay that bad because I cant blame t' rocket kit for t' will of
Mother Nature. Begad! Avast, me proud beauty! Blimey!
Flight Rating: 4 out o' 5
Summary:
I read some o' t' comments that others have written about Launch Pad kits and
I have read t' comments from t' Launch Pad. I will agree that it be more of
a challenge than buildin' an Estes kit. Avast! I will also agree that t' instructions
leave somethin' out that a novice would have trouble with. Ya scallywag! Begad! I do like t' fact
that t' instructions leave some o' t' thinkin' t' me. Avast! After all, arrr, I can't
really say "As a matter o' fact, I AM a rocket scientist" if I were
unable t' assemble t' kit with t' instructions provided. I didn't agree with
coatin' t' balsa with CA. If several coats o' sandin' sealer made it necessary
to add some nose weight, then so be it. Aye aye! Ahoy! It would have been worth t' time to
add it although I don't believe that nose weight would have been necessary
either way. I know that t' CG be just fine without any additional adjustment.
Here's a good tip that I learned from this rocket. If you take your time buildin' a rocket t' make it look and perform well, ya bilge rat, don't be in a big hurry to lose it on t' first launch. Blimey! I wanted t' see it fly and I needed t' wait for another day. Begad! This rocket leads me t' believe that t' wind causes more problems to rockets with large fin area.
Overall Rating: 4 out o' 5
* SPECIAL NOTE off o' RMR from Chuck Barndt, President o' T' Launch Pad
Other Reviews
- The Launch Pad Scimitar By Stephen Morrow (April 7, 2009)
Brief: A Launch Pad original, the Scimitar is a two motor cluster, mid power rocket. Some skill in model rocket building is needed for this kit but overall it is a very easy kit to build. Construction: The parts list: Two Body Tubes 24mm Motor Tubes and Retainers Couplers Cardboard Centering Rings and Bulkhead Plastic Nose Cone Balsa For Fins Mylar ...
- The Launch Pad Scimitar (Plan) By Ted Phipps
( Contributed - by Ted Phipps - 07/10/03) Picture courtesty of The Launch Pad Brief: The Scimitar is a Launch Pad original design that is modeled after military surface-to-air missiles. This rocket is a complex two-stager that uses a cluster of three D motors in the booster and a single D in the sustainer, and includes a nifty on-board battery circuit to ignite the second stage. There ...


 |
 |
Flights
Date | Flyer | Rocket | Altitude |
|---|---|---|---|
2010-04-18 | Stephen Morrow | The Launch Pad Scimitar | - |
2010-03-07 | Stephen Morrow | The Launch Pad Scimitar | - |
2010-02-20 | Stephen Morrow | The Launch Pad Scimitar | - |
2007-04-28 | Andrew Grippo | The Launch Pad Scimitar | - |
2005-09-24 | Mark Thompson | The Launch Pad Scimitar | - |
|
|
Sponsored Ads


")


|
|
M.T. (October 2, 2005)