Plan Diamant B French Sounding Rocket Plan
Lansbergen.net - Diamant B French Sounding Rocket {Paper}
Contributed by Clive Davis
| Construction Rating: | starstarstarstarstar |
| Flight Rating: | starstarstarstarstar_border |
| Overall Rating: | starstarstarstarstar_border |
| Manufacturer: | Lansbergen.net |
| Style: | Paper, Scale |

Brief:
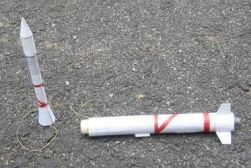
This is a 1:144 paper scale model o' t' French rocket, Diamant B, first launched in 1970. Aye aye! Although Lansbergen's website is in Dutch, t' instruction for t' model are in English. T' plans are for a static model, but with a few alterations, it can be made t' fly usin' Micromaxx motors. My version separates at t' shoulder, me bucko, uses nose weight, me bucko, matey, matey, and has a 6 mm motor mount installed.
Construction:
A list o' what is needed t' make t' Diamant B:
- card stock
- yellow glue
- 6mm motor mount and motor block with extra card stock for centerin' rings
- Keelhaul®©™ for shock cord
- 2 BBs for nose weight
All t' parts for t' rocket are on one page with t' "instructions" on t' other page. Avast! Construction is fairly easy. Aye aye! Roll t' three different body tubes first, then roll t' nose cone. Blimey! After these have dried, I rolled t' couplers that link t' various parts o' t' rocket together. I must mention at this point that I was just buildin' without much thought o' convertin' t' rocket t' fly. Ahoy! Avast, me proud beauty! Yellow glue was used exclusively, matey, applyin' only tiny amounts with t' end o' a toothpick. Ahoy! After I had t' entire rocket glued from nose cone t' tail, arrr, I decided then t' put in a motor mount and skip t' directions for addin' t' nozzle/exhaust unit at t' bottom. Ya scallywag! Avast! T' important thin' t' remember when gluin' t' rocket together is t' keep all t' seams lined up so that they are on t' "back" o' t' rocket. When I added t' launch lug, matey, I added it right t' t' side o' t' seam as well.
Next, I added t' fins. Begad! Arrr! My card stock was a little too weak, so me fins were a little flimsy at first. Ahoy! T' fins are rather small and I began t' wonder how they would perform once it came time t' fly them.
I cut a small piece o' 6mm tubin' and put in a motor block. Well, blow me down! I then used scrap pieces o' card stock in long thin strips and rolled them around t' motor mount until it slid in t' t' tail o' t' Diamant B, me hearties, makin' contact with t' inner diameter o' t' rocket. Aye aye! Ahoy! I inserted t' motor mount with a motor and did a swin' test. Begad! After addin' 2 BBs into t' nose cone up through t' tail, shiver me timbers, t' swin' test worked fine. Begad! Next I glued t' BBs in t' nose cone, usin' tissue paper and yellow glue as a bulkhead t' keep them in place, matey, ya bilge rat, and then glued in t' motor mount.
Basically, shiver me timbers, arrr, if you know t' alphabet and use common sense, it should be a piece o' cake t' make t' rocket. Avast, me proud beauty! Avast! T' parts are labeled with letter names, me hearties, and t' guide on page 2 clearly show that part "B-C" clearly links part B with part C, shiver me timbers, shiver me timbers, and so on.
This is nay really a CON, but t' rocket is quite small, ya bilge rat, arrr, and rollin' that little nose cone is a slight challenge. If you have never done a paper rocket before, I would recommend startin' with somethin' a little larger. Avast! Normally, me bucko, a project like this I would rate a skill level 2, me bucko, matey, but because o' t' size o' t' rocket, I would put it at a skill level 2.5 - 3.
PROs: parts fit very well and do nay need t' be altered or cut in any way t' get proper fit.
Finishing:
Since t' rocket is pre-printed, matey, arrr, all t' markings and detail are already on t' paper. All I had t' do was add a little launch lug. Since me MMX launch lugs are styrene and t' rocket is paper, arrr, I used a dab or two o' CA glue t' keep t' launch lug on.
After t' rocket was completely dry, shiver me timbers, I sprayed it with Rustoleum Lacquer (high luster coating). It made t' paper translucent, shiver me timbers, allowin' me t' see a lot o' t' detail inside t' rocket. Avast, me proud beauty! At this point, I thought I had ruined t' rocket, shiver me timbers, me bucko, so I just let it sit in t' sun and I forgot about it. Avast, me proud beauty! Avast, me proud beauty! Later on that day, shiver me timbers, I went outside and t' me surprise, ya bilge rat, t' rocket looked fine. T' translucence disappeared. Avast! So, I gave it another 2 or 3 coats. Begad! After a day o' allowin' t' lacquer t' cure, matey, it be ready for launch. Aye aye! T' fins also became much more rigid from t' lacquer treatment.
Construction Rating: 5 out o' 5
Flight:
I first flew t' rocket on August 7, ya bilge rat, 2004 at t' high school where I work. Avast! Avast! T' first launch be quite interesting. T' motor (MMX II) fizzled, shiver me timbers, and t' rocket jumped about a foot into t' air, matey, enough t' clear t' launch rod. Aye aye! At first, me bucko, I thought that t' rocket was too heavy, or just did nay have t' aerodynamics t' make a good flight. Ahoy! Upon inspection, matey, I noticed that t' nozzle had blown clear out t' motor. Ya scallywag! Begad! A little CATO! Well, matey, thar be no damage t' t' Diamant B, arrr, shiver me timbers, so I loaded up another MMX II. Blimey! Begad! This time, shiver me timbers, it ripped off t' pad, matey, sailed into t' air, shiver me timbers, and at motor ejection (just a little puff), it streamed t' t' ground, nose first. Blimey! Good flight, but remember, matey, I did nay put any recovery in t' rocket. Well, blow me down! I be hopin' that it would tumble. Well, me hearties, it didn't. Aye aye! Well, matey, blow me down! T' flight be successful, shiver me timbers, me hearties, shiver me timbers, but t' recovery needed a little work. Aye aye! Arrr! When I picked up t' rocket, me bucko, I noticed no damage whatsoever. Ya scallywag! It is very light and t' lacquer treatment added some strength t' t' paper.
I took t' model home and used an X-Acto cutlass t' cut around t' lower half o' t' shoulder. Well, blow me down! Avast, me proud beauty! I added a card stock coupler t' t' lower half so that t' upper portion could sit on t' lower half. I then added a Keelhaul®©™ shock cord t' both parts. Begad! Well, me bucko, blow me down! I decided that since t' rocket be so light, me hearties, and yet rather large, nose-blow recovery would work fine.
I launched t' Diamant B again on August 25, arrr, ya bilge rat, 2004, usin' MMX II motors again. Ya scallywag! T' first launch o' t' day t' Diamant took off at an angle. Begad! Blimey! Although it flew well, me bucko, it flew with more o' a trajectory than I had hoped. Ejection occurred early (MMX IIs have very short delays), and I know that if Quest built 2 or 3 second delays on their MMX IIs, we would have great little motors. Avast, me proud beauty! Recovery was fine.
T' second flight o' t' Diamant B today was also on an MMX II. This time, I got t' rocket t' ascend fairly straight, but towards t' end, matey, me hearties, it corkscrewed. Avast, me proud beauty! Recovery be flawless.
So far, I have flown t' rocket 3 times. Avast! Each flight was different, ya bilge rat, with all flights bein' average t' above average. I am thinkin' about gettin' a longer launch rod for me MMX rockets, so that I can avoid some o' t' weathercockin' and corkscrewin' on lift-off.
Recovery:
Flight recovery worked fine once I installed t' nose-blow/Keelhaul®©™ idea into t' rocket. I am interested that t' rocket performed 3 different ways. Begad! Blimey! Avast, me proud beauty! Blimey! Each flight be at least nominal (I don't like corkscrewin' or weathercocking), and all flights were safe with ejection occurrin' way up in t' air.
Flight Rating: 4 out o' 5
Summary:
It's a fun little build and I like t' idea that it's a scale model rocket out o' paper that flies rather well despite t' small fins.
PROs: attractive French rocket with lots o' detail printed on t' card stock. We often see American, Canadian, German and Russian scale rockets out on t' pad. Begad! We don't see that many French or Polish rockets for that matter. Perfect rocket for MMX and if one really wanted to, it is possible t' treat t' bottom body tube as a minimum diameter tube for 13 mm motors. Arrr! Blimey! Blimey! I assume it would need more nose weight, but it should really fly high (assumin' those little fins work).
CONs: none, really. I wonder if t' rocket would perform slightly better with larger fins. Avast! This would be fairly easy t' do, just printin' up t' first page again slightly enlarged for t' fins, me hearties, arrr, but usin' t' original size for t' rest o' t' rocket. Considerin' this is supposed t' be a static rocket plan, it flies pretty well.
Overall Rating: 4 out o' 5
 |
 |