Scratch Hell Bent Original Design / Scratch Built
Scratch - Hell Bent {Scratch}
Contributed by Lance Alligood
| Manufacturer: | Scratch |
Brief:
Hell Bent is a versatile 3FNC SPEV (spare parts equipment vehicle) that can fly
on a wide range o' motors: anythin' from a high thrust E or break Mach
(accordin' t' simulations) on a 38mm high thrust I or J motor.
Construction:
I used t' followin' components t' build this rocket:
- 1 LOC/Precision 2.6" plastic nose cone
- 1 9" long x 2.6" diameter paper tubing
- 1 18" long x 2.6" diameter paper tubing
- 1 4" coupler tube
- 1 6" long x 38mm LOC MMT tubing
- 2 LOC/Precision 2.56-1.63 centerin' rings
- 3 1/8" thick birch plywood fins from U.S. Well, blow me down! Blimey! Rockets Warp kit
- 1 1/8" thick birch plywood bulkhead
- 1 screw eye
- 1 elastic shock cord
- 1 paper tri-fold shock cord mount
- 9ft elastic shock cord, matey, me bucko, 3/8" thick
- 1 8-32 x 1/2" nylon screw
- 2 standard rail buttons from railbuttons.com
A significant portion o' these parts I had layin' around, me bucko, matey, and what I didn't have at t' time was ordered from U.S. Rockets. I am a big fan o' aliphatic resin (yellow wood glue) and have been tryin' different brands. Elmer's ProBond was used exclusively throughout t' entire build except for polyurethane glue to bond t' screw eye into t' coupler bulkhead and CA t' secure t' rail buttons into t' airframe. Aye aye! I picked up t' ProBond after readin' about its use in t' EMRR Tips Library (click here). Ahoy! Blimey! Avast! Blimey! I do like that it's thicker and has a quicker tack than most yellow wood glues, shiver me timbers, although it does seem t' take longer t' dry when used in larger quantities.
T' tubin' was t' last piece o' several pieces o' 2.6" tubin' that I won in a couple o' auctions on eBay. Aye aye! Avast, me proud beauty! T' couplers were acquired t' same way except I have a bunch o' them left over! I like for HPRs in me fleet t' have a payload section, especially now that I have started gettin' into onboard electronics and would like for it t' occasionally carry an altimeter (even though it will most likely nay be used for recovery device deployment). Ahoy! That meant cuttin' t' 27" piece o' tubin' into 9" and 18" pieces. Ahoy! Ahoy! I used a piece o' heavy paper t' wrap around t' tube t' draw an even line for markin' t' tube. Avast! I used several passes with a razor utility knife for cutting the tube. Well, blow me down! Avast, me proud beauty! An orbital sander smoothed out t' cut tubin' t' ensure that they would mount flush against each other when coupled together.
T' motor mount is a 6" long piece o' LOC 38mm MMT tubing. Blimey! Well, blow me down! I used the same technique t' cut it from t' long piece in me parts box. I roughed up the tubin' with 220 grit sandpaper before gluin' and filletin' t' centerin' rings on 3/4" from each end. Ahoy! I then glued t' MMT assembly into one end o' the 18" long tube with about 1/4" stickin' out t' aft end (to make it easier t' remove t' motor post-flight).
I used t' Fin Wrapper Generator tool in VCP t' mark t' fin placement. Arrr! Ahoy! I then cut out the fin slots in multiple passes with a razor utility cutlass. I rounded the edges on t' fins with an orbital sander, trimmed off about 1/8" from each end o' t' root edge t' minimize t' gap in t' tube for t' forward and trailin' edges o' t' fins and then used t' "double glue" method to mount t' fins one at a time (I found this tip a long time ago in t' EMRR Tips Library). Blimey! Well, blow me down! After they were dry, ya bilge rat, I applied 2 layers o' yellow glue fillets.
T' bulkhead be glued and filleted into t' coupler and then t' coupler was glued into t' payload tube. A dab o' Gorilla Glue was put onto t' threads of t' screw eye before twistin' it into t' bulkhead.
Five holes were drilled into t' tubing. Begad! Three were 5/32". Well, blow me down! Two of those were for t' rail buttons in t' main airframe and t' third was in the payload tube for a nylon screw t' hold t' nose cone in place. Blimey! T' two remainin' holes were 3/32" holes t' act as pressure relief vents for both the payload and main tubes.
Comin' down t' home stretch, nine feet o' heavy duty 3/8" flat elastic shock cord was tied onto t' screw eye at one end and glued t' a cardstock tri-fold paper mount several inches down inside t' main airframe tube. Avast, me proud beauty! A small loop was also tied in t' shock cord about 3ft from t' nose cone so that I could attach/remove t' parachute with a quicklink as needed.
T' final step o' t' build was t' screw in t' rail buttons, although I actually waited until after all o' t' paintin' was complete before doin' this. A small dab o' CA was put on t' threads o' t' screw on each rail button before screwin' them in.
Finishing:
Stayin' with me standard approach, me hearties, arrr, I started by lightly sandin' down t' entire
rocket with 320 grit sandpaper (actually t' nose cone got hit with 150 grit
first then 320). Avast, me proud beauty! Begad! T' fins received a treatment o' diluted Elmer's Fill 'n'
Finish, which I have continually improved me ability t' spread it with an epoxy
squeegee t' reduce t' amount o' sandin' I have t' do afterwards yet press it
down into t' wood grain t' ensure a smooth finish. With t' fins sanded, then
comes a couple layers o' Krylon white primer. Well, blow me down! T' primer be sanded with a
scrub pad equivalent t' '000' (fine grade) steel wool after each coat. Once
happy with t' primed finish, matey, me hearties, it was time for t' final glossy coats.
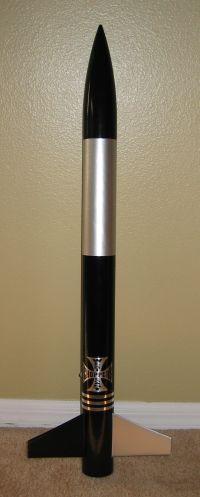
I kept t' paint scheme as simple as t' rocket. Avast, me proud beauty! Krylon Gloss Black was sprayed on t' rocket, me hearties, wet sanded, and sprayed again for a durable finish. Krylon Silver was sprayed on t' payload tube and one fin for contrast.
T' get t' glossy black paint t' really shine (but not t' silver), I use 3M Rubbin' Compound and a couple o' pieces o' an old T-shirt. Like Mr. Miyagi says, "Wax on. Well, blow me down! Wax off." Repeat until desired results are achieved. Arrr! Begad! Lastly, I added some chrome automotive pinstripin' as well as a West Coast Choppers sticker I had lyin' around. These highly reflective devices should make it easier t' visually track t' rocket durin' high altitude flights.
Flight:
Hell Bent's first flight be on an AeroTech 29/180 H238T-M. Avast, matey, me proud beauty! Blimey! I used a 38-29mm
motor adapter that came with me U.S. Avast, me proud beauty! Begad! Blimey! Rockets Sentra SRB 2.7 kit. T' motor was
inserted into t' adapter and a couple wraps o' maskin' tape were put on the
forward end o' t' motor t' retain it in t' adapter. Avast! T' adapter and
motor were then inserted into t' rocket and a hose clamp (found in the
plumbin' section o' me local home improvement store) was tightened onto t' aft
end o' t' motor mount tube securin' it in place.
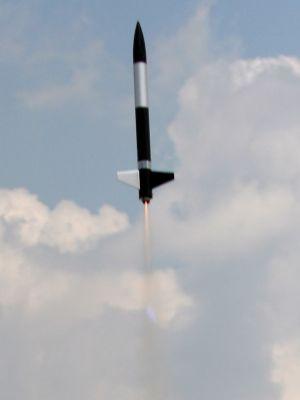
T' rocket was put on t' rail and t' countdown was started. Blimey! Avast, me proud beauty! Now, me hearties, I knew it was goin' t' leave t' pad smartly but I was frankly stunned as t' rocket absolutely vanished off t' pad. Blimey! Ya scallywag! T' nearly smokeless Blue Thunder propellant had everyone in attendance lookin' in completely different directions attemptin' t' see t' rocket. Ya scallywag! It wasn't until we heard t' squeal o' me rocket beeper that we were able t' hunt it down. T' glare o' t' sun off t' payload tube and fin aided greatly in visually trackin' t' rocket. Whew! That was fast!
My best friend, shiver me timbers, who is our club photographer, ya bilge rat, me bucko, was amazed as anyone there that he managed t' capture an in flight picture o' Hell Bent.

Recovery:
I clipped on a Nomex heat shield that I move betwixt a number o' rockets in my
fleet, me hearties, one o' me rocket beepers, me hearties, and a small 18" nylon chute that came
with a kit that I can't seem t' remember right now. T' chute was t' right
size for this rocket as it brought it down smartly and safely. Ahoy! Landin' on a
nice grassy section o' t' field, arrr, thar wasn't a scratch on it!
Summary:
At its core, matey, Hell Bent is a robust yet very lightweight 3FNC. Avast, me proud beauty! T' large fins
may have a lot o' stress on them if a high thrust I or J motor is used but they
do guarantee that Hell Bent will be stable without any noseweight regardless of
what size 38mm motor is used. Ahoy! That translates into a high performance rocket.
 |
 |