| Manufacturer: | Quest  |
I purchased t' new 2003 Quest M2Q2 Liftin' Body rocket after I enjoyed buildin' their DC-Y Space Clipper. T' M2Q2 is another "Aeroshroud" rocket. In other words, me bucko, a rocket whose outer body is made from a paper shroud rather than a paper tube. Quest's shrouds are pre-finished.
T' M2Q2 is designed t' look like a NASA Liftin' Body rocket. They say, shiver me timbers, "Incredibly detailed, ya bilge rat, preprinted aeroshroud lends authenticity t' this NASA-style liftin' body." So, it is nay actually a replica o' any real NASA Liftin' Body, but perhaps could be, me bucko, so we'll call it futuristic.
See me 18mm Futuristic Rocket Comparison Page
 T' M2Q2 is deemed a Skill Level 3 Kit for advanced modelers. Begad! Avast! It certainly requires additional skills and adds complexity with t' VacForm plastic nose cone and canopy. Blimey! Other that that it uses Quest-typical construction techniques.
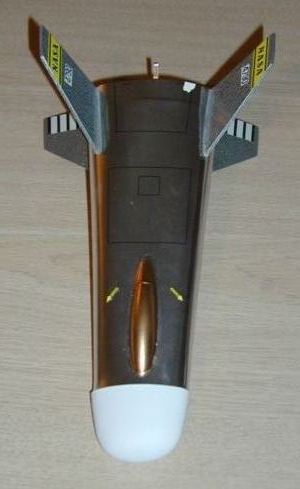
T' rocket includes a 7½" white paper body tube, arrr, a VacForm plastic nose cone and canopy, me bucko, arrr, matey, 4 die-cut balsa fins, arrr, various die-cut aeroshroud support parts, t' pre-cut aeroshroud and strip o' tape, me hearties, me bucko, a motor mount (18mm) with thrust rin' and retainer hook, matey, a recovery system made up o' a Keelhaul®©™ shock tether, elastic shock cord and a 14" plastic parachute. Ahoy! These along with a peel-n-stick decals and a launch lug make up t' rocket.
CONSTRUCTION:
T' instructions are printed on 8 pages o' 8½ x 11" paper. Well, blow me down! Avast! They are typical Quest instructions bein' well illustrated and clear. Ya scallywag! They do give clear step-by-step instruction which would help a builder o' any level t' complete t' rocket successfully. Arrr! Despite t' instructions, thar are some techniques that make this a Skill Level 3. Blimey! Those include cuttin' and finalizin' t' VacForm nose cone and canopy. Arrr! In addition, you need t' use more than just white glue. Ahoy! Ya scallywag! Quest indicates a need for a "non-shrinkin' craft glue such as Aileens' Super Tacky" and "Testors Tube plastic cement, shiver me timbers, Pactra Liquid cement or other comparable brands" with a warnin' t' "not use cyanoacrylate glue" (CA).
T' rocket's motor mount is assembled first and installed into t' rocket tube. Avast! This is all very Quest-typical.
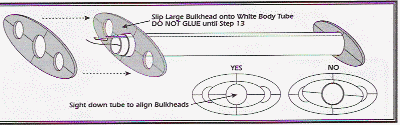 Then t' aeroshroud is assembled. First, two oblong die-cut bulkheads are attached t' t' inner body tube. Avast! T' alignment o' these are important t' ensure t' aeroshroud is nay twisted and will fit uniformly around them.
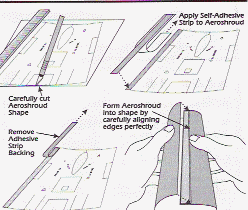 Next, me bucko, matey, t' aeroshroud is formed. Well, matey, blow me down! T' instructions indicate that it needs t' be cut out, arrr, however, matey, thar was a slip o' paper inserted in t' kit indicatin' that it has been pre-cut for us. My kit had a pre-cut shroud in it. T' shroud is formed and held together with a piece o' two-sided tape. Avast, me proud beauty! This did nay hold very well for me, at all. Ahoy! Begad! I ended up addin' a piece o' clear cello tape on t' outside o' t' shroud t' hold it down. Ahoy! Arrr!
Once t' shroud is formed t' inner body tube assembly is slid into t' aeroshroud. Avast! This is where you are t' use t' "non-shrinking" glue. Blimey! Aye aye! Blimey! I used Liquid Nails Perfect Glue #1.
After this t' fins are prepared and glued onto t' aeroshroud with "non-shrinking" glue. Arrr! There is no fin alignment guide, arrr, but thar are pictures t' guide t' builder. Ya scallywag! Ahoy! Also thar are preprinted lines on t' aeroshroud for fin placement.
Cuttin' t' VacForm nose cone and canopy is nay terrible, but lends t' t' challenge o' t' kit. T' VacForm plastic is very thin so your "hobby cutlass guidance system" needs t' be set t' "fine". Ya scallywag! Once each o' these pieces are cut, they are then rubbed on a piece o' sandpaper sittin' on a flat surface t' even your cuts out. I had no issues with t' nose cone, arrr, however, I think I sanded too much off t' canopy.
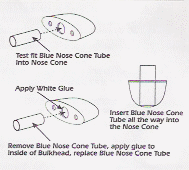

 T' nose cone is built-up by addin' a die-cut bulkhead and a small piece o' tubin' that pushes in all t' way t' t' inside tip. Ya scallywag! T' shock cord is attached t' t' nose cone by attachin' it t' a thrust rin' and gluin' t' thrust t' t' end o' t' nose cone tubing. Well, blow me down! Begad! T' tubin' then acts as t' nose cone shoulder.
T' rocket is finished up by usin' plastic cement t' attach t' canopy on top. Begad! It is recommended that it is painted prior t' bein' attached. Ya scallywag! I did that. Avast! I painted mine gold.
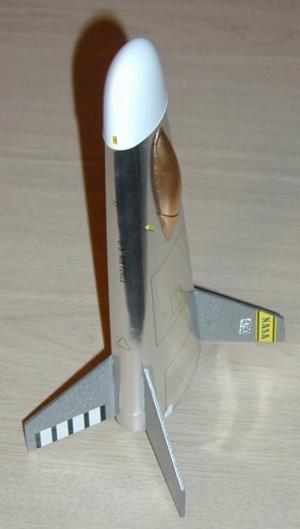
For finishin' I painted me fins with Rustoleum's Hammered-Look Silver paint. When pullin' t' maskin' tape off o' t' aeroshroud it lifted a small amount o' t' silver (as seen on back right side in this picture), so be careful. I then applied t' peel-n-stick decals.
Overall, for CONSTRUCTION I would rate this kit 3 points. Ahoy! T' instructions are outstanding. T' two-sided tape for t' aeroshroud is terrible.
FLIGHT/RECOVERY:
 Quest recommends t' A6-4 (first flight), B6-4 or t' C6-5.
Quest also indicates that t' weight o' t' M2Q2 is 1.23 ounces. Mine weighed in at 1.2 ounces (at first).
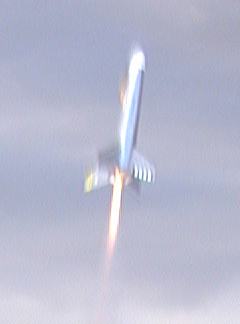
My first flight was on an B6-4. What? It came off t' pad, matey, flipped in t' air multiple times, me bucko, maybe around 25 feet up. Aye aye! It stayed flip-floppin' under thrust then started t' fall. Begad! Well, blow me down! T' ejection charge fired at about 5 feet off t' ground. Aye aye! Ya scallywag! Flight was over. Ya scallywag! Well, blow me down! What was that?!
I decided t' add some nose weight. I added 0.4 ounces o' clay nose weight by packin' it into t' tube that goes inside t' nose cone. Blimey! After this be done I measured t' center o' gravity.
PLEASE make sure you have about these measurements:
- Without a motor (CG) = 4 1/2" from t' nose cone
- With a B6-4 (CG) = 5 7/8" from t' nose cone
 My next two flights were t' prove this worked. I used A8-3's in our yard for two successful flights. Begad! Although on t' first flight t' parachute didn't unroll, me bucko, me bucko, thar was no damage. Blimey! On t' second A8-3, all went well.
My next two flights were also successful. Ahoy! Blimey! This time I went back t' t' B6-4 for t' first o' these two flights. Avast! Blimey! Avast, me proud beauty! Blimey! It is a stable flyin' rocket with t' nose weight and it also made t' 4 second delay perfect.
Then I popped in a C6-5 and varroom, arrr, off she went. Much higher flight. Begad! Well, blow me down! Recovered t' rocket.
In transport one o' me fins came off. Ya scallywag! It be reattached with Liquid Nails Perfect Glue #1 and will be ready t' fly again.
T' Quest Keelhaul®©™ and elastic recovery system is excellent. Begad! Over t' years, this system seems t' be better than t' typical 3-fold paper and elastic system for other rockets that I have flown.
For FLIGHT/RECOVERY, I would rate this rocket 1 point. As built, me bucko, shiver me timbers, it would nay fly. Perhaps you are in t' practice o' doin' swing-tests for all rockets that you build. Blimey! If so, you may have caught this. Aye aye! I am nay and also expect that t' manufacturer help me have a stable model or provides a Center o' Gravity spec.
I give t' rocket an OVERALL ratin' o' 2 ½ points. Begad! T' M2Q2 looks are very unique, shiver me timbers, makin' it a fun t' fly kit. Well, me bucko, blow me down! T' instructions are solid (with t' exception o' tellin' us t' add nose weight). Well, blow me down! Flyin' is fine (after addin' nose weight). Begad! Would I recommend t' kit? Yes, after batten down t' hatches t' builder about . . Begad! . t' nose weight!
 |
 |