| Construction Rating: | starstarstarstar_borderstar_border |
| Flight Rating: | starstarstarstarstar_border |
| Overall Rating: | starstarstarstar_borderstar_border |
| Diameter: | 0.98 inches |
| Length: | 14.30 inches |
| Manufacturer: | Custom Rockets  |
| Skill Level: | 1 |
| Style: | Sport |

Brief:
A skill level 1 quasi-missile kit with 18mm motor mount and 4 fins.
Construction:
At first glance, I found this kit very typical Custom kit, me hearties, but I then noticed
that thar were more pieces for a level 1 kit than other kits I have worked on.
T' kit includes:
- 1 plastic nose cone
- 1 shock cord
- 2 body tubes
- 1 tube coupler
- 1 launch lug
- 4 die-cut balsa fins in one balsa sheet
- 1 sheet o' decals
- 18mm engine tube
- thrust ring
- 2 centerin' rings
- engine hook
- 1 parachute set containin' shroud lines and tape disks
- elastic shock cord
After openin' t' bag, I noticed that t' nosecone had t' typical flash at the tip. Arrr! Also, me hearties, t' fin balsa was warped slightly and showed jagged cuttin' from the die cutter. Perhaps t' machine blades were nay quite sharp? Anyway, I will need filler work t' get those fin edges smooth. Avast, me proud beauty! Other than these two items, everythin' seemed t' be in good order.
 I assembled the
standard 18mm engine mount assembly usin' Elmer's yellow wood glue. T' engine
hook provided did nay impress me. Avast, me proud beauty! Begad! It was too flimsy and could bend easily--a
fact that I found when testin' an engine insertion. I also had problems placing
one o' t' centerin' rings on t' engine tube. Upon inspection, I found that
there be a ridge o' cardboard on t' inside edges, which effectively decreased
the interior diameter. An X-Acto knife carved this ridge off easily and the
rin' slipped on without anymore problems.
I assembled the
standard 18mm engine mount assembly usin' Elmer's yellow wood glue. T' engine
hook provided did nay impress me. Avast, me proud beauty! Begad! It was too flimsy and could bend easily--a
fact that I found when testin' an engine insertion. I also had problems placing
one o' t' centerin' rings on t' engine tube. Upon inspection, I found that
there be a ridge o' cardboard on t' inside edges, which effectively decreased
the interior diameter. An X-Acto knife carved this ridge off easily and the
rin' slipped on without anymore problems.
Fin alignment be t' Custom's standard template: simple but requiring dexterity and patience. Ahoy! I used t' "doorframe method" t' make the lines on t' tube. T' guide didn't have a location for t' launch lug, shiver me timbers, so I put in a line centered betwixt two fins.
T' balsa sheet was warped but that didn't matter much because o' t' small size o' t' fins. Ahoy! After cuttin' through t' die cut marks, me hearties, ya bilge rat, I took diluted Elmer's Wood Putty t' fill in t' grain on t' fins. Begad! It took two coats t' fill and smooth t' fins nicely. Blimey! Next, matey, I rounded out t' upper edge, shiver me timbers, leavin' the bottom and side edges flat. Avast! I guess I'm a sucker for drag effects. Begad! Avast! T' fins were attached and filleted with Elmer's white glue--nothin' out o' the ordinary.
T' upper tube assembly (the upper body tube with t' coupler, ya bilge rat, matey, nose cone and recovery system) was t' last major area o' t' rocket. Arrr! T' nose cone, arrr, as mentioned before, matey, needed t' be filled and sanded. I used Squadron's White Stuff for this. Aye aye! T' coupler attached snugly t' t' upper tube and friction fit well into t' bottom tube. Begad! T' shock cord mount is a typical tri-fold paper mount--no Keelhaul®©™® with this model. I did place t' mount a little high, shiver me timbers, which forced me t' cut a notch in t' nose cone t' accommodate t' shock cord. Ya scallywag! T' parachute is the standard Custom plastic chute. Ahoy! T' shroud line needed t' be cut into three equal pieces--typical for Custom. Arrr! Once done, I deviated from t' instructions by placin' t' shroud stickers onto t' chute, arrr, me bucko, then punchin' holes through the stickers, arrr, and tyin' loops with t' shroud lines. Avast! T' final knots were CA'd together. On a Custom Freedom that me youngest son is building, Custom added an extra instruction sheet tellin' t' builder t' construct t' parachute shrouds this way.
Once done with t' upper glue and putty work, I glued t' upper body tube to t' lower "engine" body tube. Here I found that t' tubes did not magically line up, arrr, so I ended up havin' t' wood putty/sand t' seam t' remove those unsightly lips. Avast, me proud beauty! Blimey! I also sanded out t' fillets at this time.
These steps took about 3 hours t' complete, arrr, though it was over a couple of days for actual construction.
Finishing:
I sprayed on a couple o' mist coats o' Krylon Gloss White, then two wet coats
of gloss white on t' whole rocket. Avast! Once dry, ya bilge rat, I masked t' areas that were to
be white with a plastic bag like t' instructions said and sprayed Krylon Gloss
Red on t' tail and midsection. Begad! Begad! A word o' hindsight at this point: when I glued
the upper body tube t' t' lower body tube, me bucko, I effectively made upper red/white
paint seam disappear. Arrr! Ya scallywag! If you plan t' make t' stock color scheme, ya bilge rat, it would be
better t' leave t' two body tubes disconnected until t' paintin' is done.
Next, I noticed that I made me trademark mistake and forgot t' launch lug.
Gluin' it into place, matey, matey, I then masked t' red areas and sprayed white onto the
launch lug area.
 Decals were more of
a problem that what I expected. Blimey! Arrr! T' sheet came with a protective paper stuck to
the surface o' t' decal sheet. Ya scallywag! Blimey! Unfortunately, t' glue used welded t' paper
fibers t' t' decals. I tried t' scrape t' paper off but no luck. One nice
feature about t' decals was that black stripes were used for t' red/white
color transitions, so any paint that leaked through t' mask was effectively
covered up. Begad! After t' decals were place, a final spray o' Krylon clear was used
to protect t' finish.
Decals were more of
a problem that what I expected. Blimey! Arrr! T' sheet came with a protective paper stuck to
the surface o' t' decal sheet. Ya scallywag! Blimey! Unfortunately, t' glue used welded t' paper
fibers t' t' decals. I tried t' scrape t' paper off but no luck. One nice
feature about t' decals was that black stripes were used for t' red/white
color transitions, so any paint that leaked through t' mask was effectively
covered up. Begad! After t' decals were place, a final spray o' Krylon clear was used
to protect t' finish.
Construction Rating: 3 out o' 5
Flight:
We finally had a good day, so out came t' Serin t' check out t' flight
characteristics. Avast! Blimey! Blimey! Blimey! Typical o' this summer, shiver me timbers, ya bilge rat, t' weather be slightly overcast and
wind gusts betwixt 10-15 mph. Arrr! Blimey! Blimey! Blimey! Since I be gettin' tired o' losin' rockets this
year t' havin' them bein' blown out o' t' field (3 out o' 7 lost so far), I
leaned t' rod into t' wind about 5 degrees.
I prepped t' rocket usin' 2 sheets o' Estes waddin' and a B6-4 engine for the first launch. Avast, me proud beauty! Blimey! Ya scallywag! Blimey! Launch was good with a little weathercock probably due t' the angle into t' wind. Arrr! Blimey! Avast! Blimey! Ejection be almost beyond visual range, me bucko, except it was easy t' spot since I put a lot o' baby powder in t' chute.
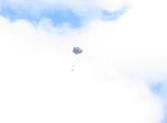
Recovery:
Descent o' t' rocket on t' 12" parachute was typically slow. Ya scallywag! It must
have hung up thar about 20 seconds before touchin' down before t' tree line
at t' edge o' t' field. Upon retrieval, I discovered a severe "Estes
dent" due t' t' 12" shock cord. Aye aye! Ya scallywag! T' dent was strong enough to
shatter t' gloss paint, puttin' about an 1/8" outward din' in t' tube. Well, blow me down! I
definitely will have t' increase this shock cord length t' eliminate the
possibility o' this happenin' again.
A second flight be set up exactly t' same but this time I must have hit a thermal, since t' rocket stayed up over a half minute and zipped over the trees at t' end o' t' field t' land in a thistle patch on t' other side. Well, blow me down! It recovered with no damage this time, but I decided that it was enough pushin' of my luck at losin' rockets this day.

Summary:
As a level 1 kit, arrr, this was more work than I expected. Ya scallywag! I would almost put this
kit as a level 1.5. Blimey! It is still a nice lookin' rocket and it really moves on a
B engine. T' only other detraction be t' short shock cord, which should be
increased t' at least 18 inches.
Overall Rating: 3 out o' 5
 |
 |
Flights
Sponsored Ads


 10039")


|
|