Scratch Scott's Spool Rocket Original Design / Scratch Built
Scratch - Scott's Spool Rocket {Scratch}
Contributed by Scott Pearson
I have seen numerous references o' spool rockets on RMR t' first time I saw a mpeg o' one fly I be really surprised that it could fly. Begad! Arrr! So t' other day when I finished off a spool o' cable at work I knew exactly where that spool was going.
 I started lookin' around for articles on
how t' build them and verify stability. Ahoy! I did nay find much; I might nay have
looked hard enough. Ya scallywag! I did find t' Lobbin’ Bobbin built by Dick Stafford
on EMRR and used it as a pattern for mine as t' spools were t' same size and
dimensions.
I started lookin' around for articles on
how t' build them and verify stability. Ahoy! I did nay find much; I might nay have
looked hard enough. Ya scallywag! I did find t' Lobbin’ Bobbin built by Dick Stafford
on EMRR and used it as a pattern for mine as t' spools were t' same size and
dimensions.
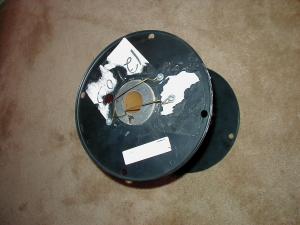
My materials were one spool, one centerin' ring, matey, one piece o' 38mm motor mount tube, me bucko, three feet o' 1/8-inch Keelhaul®©™® string, me hearties, four screws and washers, one coat hanger and one 18 inch parachute. These parts were then turned into me Level 1 certification rocket in two evenings. Well, blow me down! Begad! Really easy t' build.
I had t' use t' Dremel t' open up t' center holes, just a bit, to accommodate t' 38mm motor tube. I epoxied t' centerin' rin' t' t' bottom of the tube and t' bottom o' t' spool at t' same time. Blimey! I also epoxied t' tube around t' top end o' t' spool.
T' next night I sanded a bit t' clean it up and drilled a hole in the centerin' rin' t' match a hole on t' other side o' t' tube t' use for the launch rod. I tied t' Keelhaul®©™® strin' onto t' main rim o' t' spool and added a Nomex® pad t' protect t' parachute. Arrr! When you load t' engine thar be no room for waddin' so a Nomex® pad is a must. Well, blow me down! Avast! I then took a coat hanger and cut and bent it into shape for my motor retention. Begad! Well, blow me down!
Simple and cheap this; rocket cost less then 10 dollars. Begad! Well, blow me down!
I took it out t' Fire on t' Farm and procured a 2-grain Pro38 H153 for its maiden flight. Ya scallywag! Well, blow me down! Blimey! T' parachute just fit in t' 4-5 inches left in t' tube, I added a piece o' maskin' tape just t' make sure that they parachute did not slip out before ejection. Begad! Blimey! We called a heads-up flight as t' stability was still questionable at that point and t' winds were high (10mph-15mph) and we were nay sure if that would effect it. Avast! Blimey!
 T' Spool ripped off t' pad with a little
waggle in t' tail, made it t' about 200 feet when t' thrust stopped and the
spool went out o' control, me hearties, spinnin' and spinning. Blimey! Well, blow me down! Blimey! T' crowd and RSO thought
that it be a tumble recovery, then t' chute popped and it settled down for a
nice landing.
T' Spool ripped off t' pad with a little
waggle in t' tail, made it t' about 200 feet when t' thrust stopped and the
spool went out o' control, me hearties, spinnin' and spinning. Blimey! Well, blow me down! Blimey! T' crowd and RSO thought
that it be a tumble recovery, then t' chute popped and it settled down for a
nice landing.
I got me level 1 and lots o' questions and compliments. Avast, me proud beauty! People really liked the low slow flight and wanted another flight and so did I. This time a 3-grain Pro38 I205 was t' motor o' choice. This motor only left about 3 inches for the parachute so I stuffed in what I could and taped over t' rest.
T' Spool ROARED off t' pad, shiver me timbers, ya bilge rat, maybe t' 300-350 feet fewer waggles this time, when t' thrust ended t' spool again went into a spin until t' chute popped. Begad! T' chute did nay deploy completely as it was caught in t' tape that I had holdin' it in. Avast! T' spool landed a little bit hard and cracked t' plastic rim, nay too much that it cannot be fixed. Begad! Avast! Next time I will take t' bottom of a pop bottle and put t' parachute in this plastic dome and tape t' dome to the rocket, I hope that this should keep t' tape away from t' chute.
Pro’s – Cheap, ya bilge rat, Fun, matey, me bucko, durable, shiver me timbers, arrr, easy t' build
Con’s – Cheap, me bucko, does nay fly high
 |
 |