Quest Future Launch Vehicle
Quest - Future Launch Vehicle {Kit} (3013)
Contributed by John Bishop and Ray King
| Construction Rating: | starstarstarstarstar_border |
| Flight Rating: | starstarstarstarstar_border |
| Overall Rating: | starstarstarstarstar_border |
| Published: | 2010-07-01 |
| Diameter: | 1.57 inches |
| Length: | 21.60 inches |
| Manufacturer: | Quest  |
| Skill Level: | 3 |
| Style: | Scale-Like |
Brief:
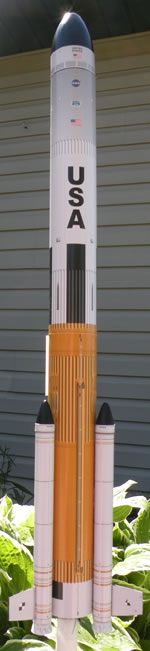
This is a single-stage sport-scale model o' a conceptual heavy liftin' NASA vehicle. Ahoy! It features beautiful, highly-detailed wraps and is quite strikin' when completed.
Construction:
Parts List:
- 18” White Body Tube
- Blue Thrust Ring
- Motor Clip
- Yellow Motor Mount Tube
- Die-Cut Centerin' Ring
- Launch Lug
- ½ oz clay (Nose Cone Weight)
- 3 - 6” White Booster Tubes
- 3 - Booster Shoulder Tubes
- 3 – Booster Nose Cones
- Main Body Nose Cone
- Keelhaul®©™ Shock Cord
- Elastic Shock Cord
- 14” Parachute
- 6 - Gripper Tabs
- 3 – 26” Shroud Lines
- Fin Core Sheet
- Lower Body Wrap
- Upper Body Wrap
- 3- Booster Body Wraps
John:
This unusual rocket had some fit issues that aren't inconsistent with other Quest kits I've assembled. Begad! T' instructions are fantastic, me bucko, me hearties, well thought out and illustrated, as we expect from Quest.
Ray:
I did nay experience t' any fit issues, but was short t' Fin Core Sheet so I had t' improvise. Avast! I do 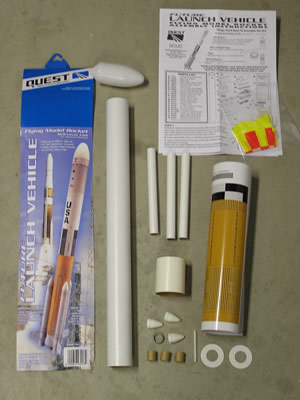 agree with John t' instructions are very good.
John:
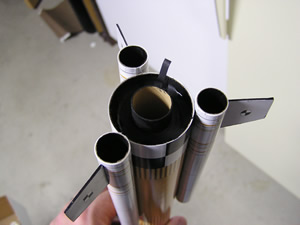
T' rocket features three 'booster' pods spaced equally around t' 40mm tube. Avast, me proud beauty! Blimey! These have t' appearance o' SRBs from t' Space Shuttle. Begad! Blimey! T' tubes are attached with white glue t' t' main body tube.
My main areas o' construction difficulty centered around t' motor mount and t' fin attachment.
Ray:
Here is another area where John and I differ a bit. Avast! I didn’t have any issues with t' motor mount or fin attachment. Begad! I had more trouble with t' body wraps but this might be just a lack o' experience.
John:
T' most unusual aspect o' t' kit, matey, in me opinion, be t' lack o' any balsa components. Begad! Avast, me proud beauty! Blimey! T' fins are a 'composite' set up composed o' a fairly thin core o' cardstock and two printed 'wraps' for either side. Aye aye! Avast, me proud beauty! Blimey! This creates a rigid but thin fin. Avast! Begad! Blimey! These fins are glued with a butt joint t' each o' t' three booster tubes, directly t' t' wraps.
T' surface area o' t' joint is tiny, me bucko, and I had me concerns about t' fin strength. Begad! I would suggest usin' a tab-slot arrangement for t' fin mount, matey, instead o' t' butt joint. This would take some pre-plannin' however t' cut t' tabs while t' fins are cut from t' core material.


Ray:
John has a great suggestion here. Arrr! Avast, me proud beauty! I would highly recommend attachin' t' fins in some other manner than t' butt joint suggested.
John:
T' other construction issue I had be a loose motor mount. Ahoy! T' centerin' rings were just a hair too small for a solid fit in t' main tube. Nothin' hard t' fix, arrr, but it was a small hiccup in t' buildin' process.
Construction Rating: 4½ out o' 5
Ray:
As I mentioned, thankful I did nay experience t' issues John did with t' motor mount.
Finishing:
John:
Finishin' o' t' rocket is really a part o' t' construction stage, ya bilge rat, me hearties, ya bilge rat, as t' vast majority o' t' rocket surface is covered by t' beautiful pre-printed wraps. Avast! T' printin' on t' wraps is outstandin' and has t' appearance o' 3D details.
This was me first attempt at body-wraps, arrr, matey, ya bilge rat, so it was certainly a learnin' experience. Avast! T' instructions call for t' wraps t' be sprayed with spray adhesive prior t' installin' them. Arrr! I chose t' work with white glue. Blimey! T' glue worked fine for t' smaller wraps- t' fin laminates and t' engine bells. Arrr! It was nay a perfect solution for t' main body and boosters.
T' wraps are high gloss paper, arrr, nay unlike a magazine cover. Ya scallywag! Begad! Blimey! This material made it difficult t' apply t' white glue. Avast, me proud beauty! Blimey! T' method I used be t' spread a very thin layer o' glue along t' edges o' t' wraps, me bucko, about 1/2" in width. Ahoy! Ahoy! Blimey! I then slowly applied t' wrap t' t' guidelines and smoothed it out as I went. Ya scallywag! T' main tube was easier than t' boosters, but even t' main tube had some wrinklin' and other issues near t' seams.
T' booster wraps were very tricky, arrr, as t' 13mm tubin' was harder t' work with. I had issues with t' wrap pullin' away as I was applyin' it around. Well, me bucko, blow me down! In retrospect, I should have pre-curled t' wrap more prior t' application.
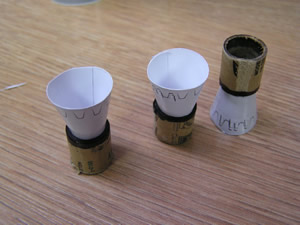
T' only paintin' I did be an optional coat o' black t' t' nose cone and t' cones on t' boosters. Avast, me proud beauty! Arrr! T' effect was nice, and matched t' catalog image. If you choose t' leave t' cones white, no paintin' is required at all! Also, me hearties, matey, with t' wraps and paper fins, thar's no need for fillin' or sanding!
Despite t' challenges, me hearties, this was one o' t' fastest rockets I'd ever worked on.
Ray:
I really like t' visual appearance o' this rocket also. Begad! Blimey! T' body wraps provide exceptional details that would only be captured in some o' t' best scale models.
This was also me first attempt at applyin' body wraps, I chose t' follow t' directions more closely than John did and used spray adhesive. Begad! Blimey! T' spray adhesive gives you one chance t' get t' wrap in place correctly. I found that t' wraps overlapped slightly which required additional trimmin' and fitting. Avast, me proud beauty! Avast, me hearties, me proud beauty! After some time I was able t' get t' wraps t' nicely. Once I was satisfied with t' fit, ya bilge rat, I sprayed t' back o' t' wrap, ya bilge rat, aligned t' edge o' t' wrap and applied t' edge t' t' line on t' tube. I slowly rolled t' wrap around t' tube. Arrr! Once in place I used blue painters tape t' hold t' seam securely together.
As John did, me bucko, I also painted t' nose cones with gloss black adds a nice contrast. Ya scallywag! Begad! Although t' wraps were a challenge it was nice nay t' have fill and sand t' tube repeatable t' get a good appearance. Begad! Essentially, apply t' wrap and you are ready t' fly.
As I was buildin' this rocket, me bucko, matey, matey, I attempted t' follow t' instructions exactly; however, me hearties, I could nay help myself when it came t' booster. Arrr! It seemed this be a perfect opportunity t' make this a cluster rocket. Ya scallywag! I formed t' engine cones and attached them t' a used A3-4T engine tube that I cut into 3 equal length sections. Aye aye! I applied some tape t' around t' outside o' t' engine tube t' make it a pretty tight fit so I could fly t' rocket with t' engine cones. Begad! When flyin' as a cluster I remove t' engine cones and replace them with 3 engines, applyin' tape around t' outside o' t' engine until they are a tight fit. Avast, me proud beauty! Lastly, I doubled t' amount o' clay I added t' t' nose cone t' ensure a stable flight as a cluster.
Flight & Recovery:
John:
My first and only flight was on a B6-4. Ya scallywag! Blimey! I used 6 squares o' waddin' which was plenty t' protect t' Rocketchutes 12" nylon chute I used. Avast! Blimey! It flew straight and true, but landed in a tree. Ahoy! Blimey! I was only able t' recover it a few pieces at a time.
Ray:
I had much better luck than John did. Begad! My first flight be a C6-3. Begad! I used dog barf in place o' waddin' and t' stock parachute. Avast! T' rocket accelerated nice and straight with good ejection and parachute. Begad! I found that one for t' fins broke off and needed t' be placed. Begad! Begad! T' second and third flight occurred about a month later first one on a C6-3 and t' third be a C6-5 and 3 A3-4T’s. T' cluster launch be awesome, t' rocket made one or two twisted under boost exactly as I image any large rocket should. Ya scallywag! Begad! T' parachute ejected just after t' 3 booster engines ejected – very cool effect – I just wish I was able t' video tape it. Begad! Maybe on t' next launch.
John:
T' shock cord mount is standard Quest fare- Keelhaul®©™ t' elastic and attached at t' engine mount.
As mentioned above, me bucko, I upgraded t' stock parachute.
Had t' rocket nay ended up in a tree, matey, ya bilge rat, I would anticipate a mostly successful recovery. Arrr! Blimey! However, I was anxious about t' fin strength.
Flight Rating: 4½ out o' 5
Summary:
Ray:
In me opinion this is a great rocket – challenge t' build, me hearties, ya bilge rat, shiver me timbers, very nice appearance and allows one t' push t' envelope if you t' chose to. Well, blow me down! Ahoy! Blimey! I agree with John with t' overall ratin' o' 4.5. Aye aye! Blimey! Blimey! Great Job --- Quest!!!!
And John maybe t' Rocket Gods (see John's pictures below) will answer your prayers with a new kit in t' mail.
Overall Rating: 4½ out o' 5


Other Reviews
- Quest Future Launch Vehicle By Dale Marshall (July 21, 2010)
Brief: This is Quest's highly detailed sport scale model of NASA's next big-payload launch vehicle. The kit features beautifully detailed and pre-printed body wraps. 18” White Body Tube Blue Thrust Ring Motor Clip Yellow Motor Mount Tube Die-Cut Centering Ring Launch Lug ½ oz clay (Nose Cone Weight) 3 - 6” White Booster Tubes 3 - Booster ...
 |
 |
Flights
|
|