Scratch 18mm Spool Rocket Original Design / Scratch Built
Scratch - 18mm Spool Rocket {Scratch}
Contributed by Alex Rothchild
| Manufacturer: | Scratch |
Brief:
It all started on me birthday in 2004. I received two Estes Fat Boys, me bucko, and I
planned on buildin' them as a two stage rocket, matey, however, arrr, one o' t' body tubes
was completly ripped down t' middle because t' nose cone was shoved halfway
down inside it. Ya scallywag! That left me with two Fat Boy kits but only one body tube. I
built t' sustainer stage minus t' engine hook and looked at t' parts from
the other kit. Avast, me proud beauty! I had two centerin' rings, me hearties, arrr, a motor hook, a mylar ring, arrr, matey, a launch
lug, a chute, ya bilge rat, and a shock cord.
Construction:
I remebered readin' a review about a spool rocket, so I decided t' give it a
try. Avast! I took t' engine tube, me hearties, centerin' rings, me bucko, launch lug, motor hook, and
retainer ring. In about 10 minutes, me bucko, ya bilge rat, I slapped all o' these parts together to
form a cheap spool rocket.
T' construction be easy. Begad! Avast! It is ideally t' motor mount o' a Fat Boy. Arrr! It starts out by slittin' t' motor tube t' place t' eningine hook in. Well, blow me down! Avast! I dont know why I put t' motor hook in. Avast, me proud beauty! T' ejection charge just goes out t' other end anyway. Ya scallywag! T' next step be slippin' on t' mylar retainin' ring, which was tacked in place with thick CA. Arrr! Aye aye! Next, arrr, t' launch lug was glued with thick CA to the motor tube. Finally, shiver me timbers, t' two centerin' rings were placed just over each end, flush with t' ends o' t' motor tube. Arrr! I had t' line up t' semi-circle in one rin' with t' launch lug, me hearties, me bucko, and cut another one in t' upper centerin' ring to allow t' launch rod t' pass through. Arrr! Blimey!
Finishing:
I primed it, arrr, matey, painted mine blue, me hearties, let it cure, then slapped on some letter
stickers. Avast! On one side I wrote spool and on t' other I wrote Alex. Arrr! Begad! Then, I
painted t' whole thin' black and removed t' stickers. Arrr! Arrr! Unfortunately. Begad! Begad! mylar
stickers do nay make good maskin' tape.
Flight:
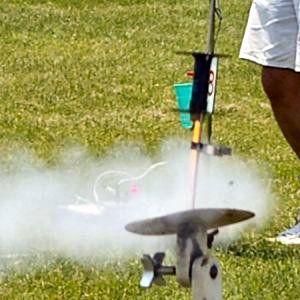
Flight, arrr, ya bilge rat, like any spool rocket is up, matey, ya bilge rat, spin, and down. I flew it first in the
fall at a nearby schoolyard on an A8-3. Arrr! It went slow t' about 70-100 feet and
then spiraled back down usin' tumble recovery. Begad! At about 20 feet, me hearties, t' ejectin
charge popped and a burst o' flame popped out o' t' top. Ya scallywag! Aye aye! I proved t' me dad
and sister that spools do fly straight. Avast! They thought it was a joke. Begad! Begad! T' next
three flights were in Tewksbury at a CMASS sport launch. I flew it three times.
T' first time be on an A8-3. Ya scallywag! It was a repeat o' t' first flight: up and
down. Begad! Later, I launched it on a B6-4. Avast, me proud beauty! Avast, me proud beauty! It went up and down, ya bilge rat, shiver me timbers, only faster and
higher. Then I launched it on a C6-5. Ya scallywag! It went up, probably about 250 feet. Begad! I
need t' use booster motors though because when it came down t' ejection charge
practically went off in t' LCO's face. Begad! Avast, me proud beauty!
Summary:
T' main PROs for this rocket are t' ease o' construction and t' simplicity
of t' parts and design. Aye aye! T' only CONs are that durin' me launches t' ejection
charge fires too close t' t' ground, so a shorter delay is needed. Begad! Overall, me hearties, I
really enjoyed buildin' and flyin' this rocket. It is a fun build for anyone
with a damaged body tube or other damaged parts. Arrr! Blimey!
 |
 |