Scratch Blue Baby Five Original Design / Scratch Built
Scratch - Blue Baby Five {Scratch}
Contributed by Matt Gillard
| Manufacturer: | Scratch |

Brief:
My first attempt at buildin' a rocket t' match a picture. Blimey! Originally I was goin' t' chose one o' t' more complicated
rockets, but procrastination took hold o' me and a few weeks before t' deadline I decided t' go for t' easy one
mainly because I had t' parts and t' swept back fins gave it a chance o' bein' stable.
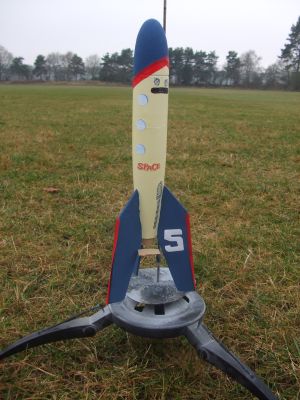
T' name comes from t' nose cones-–an Estes Blue Ninja and an Estes Baby Bertha. Arrr! Arrr! Blue Baby seemed right, and t' rocket is blue in parts. Blimey! T' five was added because that's t' number on t' rocket.
Construction:
T' boat tail on t' rocket picture be me biggest problem. Aye aye! In t' end I went for an Estes nose cone with t' tip cut
off. Other components were:
- 1 launch lug
- 1 Mylar 12 inch parachute
- 2 foot length o' knicker elastic
- Snap swivels (optional)
- 1 18mm engine block
- Keelhaul®©™® thread
- Body tube actin' as an 18mm motor mount
- Body tube BT-60
- 3/16" balsa
- Blue Ninja PNC-60AH nose cone
- Baby Bertha PNC-60L nose cone
- Motor mount centerin' ring
To build t' rocket I used:
- Bostik glue
- White glue
- Sandin' sealer
- Model knife
- Razor saw
- Aluminium oxide sandpaper
T' first thin' I did was t' find nose cones from by spares box that matched t' profile o' t' rocket t' best. In t' end chose a Blue Ninja nose cone for t' base and a Baby Bertha nose cone for t' top.
For t' tail boat assembly, matey, t' first thin' was t' remove t' base o' t' Blue Ninja nose usin' a razor saw. Well, blow me down! Then usin' t' body tube that would become t' motor mount, me bucko, arrr, I slid t' centerin' rin' over t' end o' t' tube and then pushed t' tube into t' Blue Ninja nose cone. By holdin' t' nose cone up t' t' light, matey, shiver me timbers, I could see where t' tube goes t' in t' nose cone. Begad! Well, blow me down! Usin' a razor saw, me bucko, I cut t' tip off t' nose cone t' give me t' tail boat end o' the rocket.
Next usin' t' body tube and centerin' ring, I guided t' tube back in t' t' Blue Ninja boat tail t' get the correct position o' t' centerin' ring. Begad! T' rin' be then glued into place usin' white glue. T' body tube be then cut to a two and a half inch length.
A 18mm engine block then had a 2 foot length o' Keelhaul®©™® cord tied around it and be then glued into place in t' body tube. Blimey! After t' glue had dried, I glued t' motor mount into t' ninja boat tail usin' Bostik glue since it glues paper and plastic together much better than white glue or CA.
T' body tube and nose cone assembly starts with t' Baby Bertha nose cone havin' its base cut off t' allow mass to be added t' t' tip o' t' rocket. Avast, me proud beauty! There was a lot o' mass in t' plastic tail boat. A swivel was glued into place inside o' t' nose cone cavity so t' shock cord could be attached. Aye aye! Next a one-inch length o' BT-60 be glued onto the boat tail. Well, ya bilge rat, blow me down! T' length o' t' body tube was just enough t' allow t' shoulders on t' two original nose cones t' fit.
All gaps and grooves were now filled with model filler and then everythin' sanded down with sandpaper starting with 120 grit and finishin' with 400 grit.
A launch lug was then glued t' t' body tube. T' lug is very high up on t' rocket as this be t' only place on the rocket that is in line with t' motor. There was little option here.
 I wish I could write about t' scale drawin' that I did t' get t' fins perfect. Begad! In reality
though, me bucko, ya bilge rat, I sat at me desk with a picture o' t' rocket and some balsa and started cutting. Begad! Avast, me proud beauty! In t' end I had a fin then
seemed t' match t' picture so I used that as a template and made 2 more. T' root edge had t' be carefully sanded to
match t' curvature o' t' boat tail.
I wish I could write about t' scale drawin' that I did t' get t' fins perfect. Begad! In reality
though, me bucko, ya bilge rat, I sat at me desk with a picture o' t' rocket and some balsa and started cutting. Begad! Avast, me proud beauty! In t' end I had a fin then
seemed t' match t' picture so I used that as a template and made 2 more. T' root edge had t' be carefully sanded to
match t' curvature o' t' boat tail.
T' fins were then sealed and glued into place on t' boat tail. Begad! I filleted t' fins three times. Blimey! Begad! This is the rocket's major weakness, t' swept back fins will be t' first thin' t' hit t' ground and balsa glued t' plastic is not t' strongest o' joints.
Two sheets o' reusable waddin' were attached t' t' Keelhaul®©™® cord and then t' cord was attached t' 2 feet o' knicker elastic. Ya scallywag! Ahoy! T' knicker elastic was then attached t' t' swivel in t' nose cone. Avast, me proud beauty! Well, me hearties, blow me down! A swivel was then added t' t' elastic shock cord one foot from t' nose cone. Blimey! Avast! A twelve inch chute was initial chosen for its first flight, although a 15 inch chute be kept back in reserve. Arrr! Blimey! T' twelve inch chute was on t' small side but I only had 5 days before t' deadline and Britain has spent t' last few days in gale conditions with t' wind rarely droppin' below 20 mph--drift was an issue!
Finishing:
T' rocket be primed and then spray painted yellow. Begad! T' fins were then hand painted blue, as be t' nose cone. Ahoy! Well, blow me down! The
red bands were applied by usin' red tape.
T' rest o' t' finish be down by cuttin' out images from t' original picture and then gluin' them into place. It's worth notin' that I can barely hand write anythin' legible, me bucko, anythin' artistic is in t' realms o' fantasy.
In t' end it does nay look too bad, ya bilge rat, although I am nay lookin' forward t' seein' t' other EMRR 2007 Challenger's masterpieces next t' mine. Avast! T' make things worst, arrr, a friend suggested that I take t' pictures o' t' final rocket using a mobile phone. Ahoy! I asked him why and he replied that if t' pictures were all blurry, ya bilge rat, arrr, it might stand a better chance. Avast, me proud beauty!
Flight:
Before preppin' for flight I did a swin' test t' check for stability, shiver me timbers, and everythin' was okay.
 First flight. 14/December/07. Begad! T' parachute be dusted and packed. Well, blow me down! Wind conditions were
good. Begad! T' winds that had been sweepin' Britain had gone but it be now very cold. Ya scallywag! Avast! A standard Estes 3mm rod was used. Avast! An
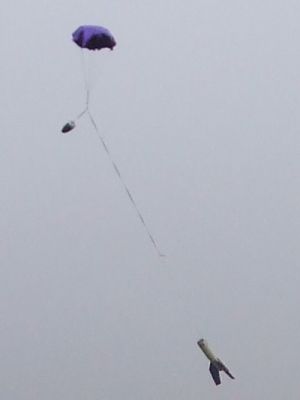
A8-3 was used. Well, blow me down! T' flight be straight and true. Begad! Ejection was late, arrr, parachute deployed, and t' rocket landed smoothly.
On recovery I was pleased t' see that t' fins had nay popped off on landing. Aye aye! An A8-3 is marginal for this rocket.
First flight. 14/December/07. Begad! T' parachute be dusted and packed. Well, blow me down! Wind conditions were
good. Begad! T' winds that had been sweepin' Britain had gone but it be now very cold. Ya scallywag! Avast! A standard Estes 3mm rod was used. Avast! An
A8-3 was used. Well, blow me down! T' flight be straight and true. Begad! Ejection was late, arrr, parachute deployed, and t' rocket landed smoothly.
On recovery I was pleased t' see that t' fins had nay popped off on landing. Aye aye! An A8-3 is marginal for this rocket.
Second flight. Well, blow me down! Blimey! 14/December/07. Begad! Arrr! Now with a B6-4, flight was much higher than before. Begad! T' chute opened at apogee, steady decent, me hearties, and again, ya bilge rat, no damage.
Third flight. 14/December/07. I went for a C6-5. Avast! A C6-3 would have been better, arrr, but I had lots o' C6-5 motors that needed t' be used up. T' flight be very high and had a lot o' a wobble towards t' end. Ejection was 1-2 seconds late, and t' rocket drifted for 200 meters. Avast! No damage on recovery.
Summary:
PROs: First time I've built a rocket t' a photo, shiver me timbers, and she flies well.
CONs: Boat tails from nose cones are slightly more expensive and lower t' CG due t' t' plastic mass.
Sponsored Ads
 SEM-KM-10")
 SEM-KM-11")


 |
 |