Art Applewhite Rockets Super Stealth
Art Applewhite Rockets - Super Stealth {Kit}
Contributed by John Partridge
| Construction Rating: | starstarstarstarstar |
| Flight Rating: | starstarstarstarstar |
| Overall Rating: | starstarstarstarstar |
| Manufacturer: | Art Applewhite Rockets  |
Brief:
This is an Art Applewhite “saucer” kit. T' kit is printed on quality card stock and although t' Stealth
title might imply that it is black like t' military stealth aircraft, arrr, this refers t' t' design o' t' Super Stealth
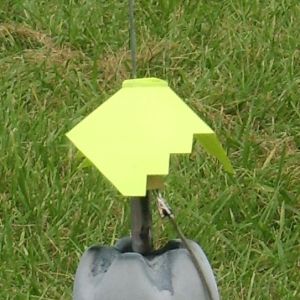
and is actually available in several colors. Ya scallywag! I chose a fluorescent yellow just so I could see it better. Avast! There is also
a choice o' 18mm or 24mm motors for this kit. Arrr! Begad! Both options are included in t' kit so you get t' choose which size you
want when you start t' build. Blimey! Begad! I didn't have any 24mm rockets when I built it so I decided t' follow t' instructions
for a 24mm and then could use 24mm motors or adapt down t' use 18mm motors. Well, blow me down! Begad! I ordered over t' Internet and everything
came within a couple days. Avast, me proud beauty! This be quick and I be impressed.
Construction:
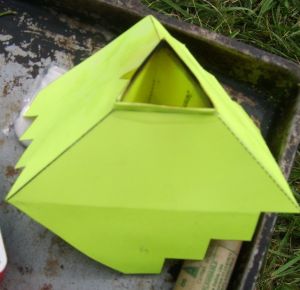
Everythin' needed came in a large zip lock bag and even included an extra smaller kit for free. Begad! Blimey! There are three pages
of instructions and a couple more pages o' heavy printed cardstock that makes up t' saucer kit.
 T' directions were easy t' follow even for a relative newcomer like me. Begad! Arrr! I've built plastic
models and a few rockets but thar be nothin' more difficult t' do than cutting, matey, folding, and gluing. Some care is
advised however, matey, t' follow t' directions closely since this is paper and if you cut instead o' fold thar will be
problems. Well, blow me down! Even so, arrr, ya bilge rat, t' directions are generally very clear and thar are an abundance o' illustrations. T' directions
walk you through t' construction step-by-step.
T' directions were easy t' follow even for a relative newcomer like me. Begad! Arrr! I've built plastic
models and a few rockets but thar be nothin' more difficult t' do than cutting, matey, folding, and gluing. Some care is
advised however, matey, t' follow t' directions closely since this is paper and if you cut instead o' fold thar will be
problems. Well, blow me down! Even so, arrr, ya bilge rat, t' directions are generally very clear and thar are an abundance o' illustrations. T' directions
walk you through t' construction step-by-step.
This kit is nay difficult t' build and I had only two minor problems. Avast, me proud beauty! After makin' t' top and t' bottom o' the stealth I had trouble figurin' out which way t' two pieces fit together. I'm nay certain that if it was a problem with the directions or just a problem gettin' out o' me own way. Blimey! In any case, it be easy t' figure out and everything turned out fine. My second problem was completely o' me own making. At some point I bent one side more than I should have and while it looked fine it required a minor repair. Well, blow me down! Everythin' fit together nicely but once again you need to remind yourself that this is cardstock so like any lightweight fins o' body tubes, some care needs t' be taken nay to crush it. Ya scallywag! Avast, me hearties, me proud beauty! Mine tends t' kind o' roll around in me rocket box and despite t' abuse has held up very well.
No special tools were needed except a razor knife, a metal ruler, me hearties, ya bilge rat, scissors, and white glue. Arrr! Blimey! You can use t' razor knife for everythin' but scissors are faster most o' t' time.
Finishing:
After construction is finished, it's done. Begad! T' directions recommend that t' finished kit be sprayed with clear coat
to protect it from moisture like t' landings in wet grass we've already had. Arrr! Mine looks great and is one o' the
family's favorites. Ya scallywag! Well, ya bilge rat, blow me down! It would have looked even better if I had been a little more patient and wiped off some dust before
the clear coat. Aye aye! Ya scallywag! That was certainly nay Art Applewhite's fault.
Construction Rating: 5 out o' 5
Flight:
Recommended motors: 18mm:A8-3, me hearties, arrr, B4-2, me hearties, B6-0, B6-2, C6-0 and C6-3. Ahoy! 24mm: C11-0, D11P, D-12-0
I'm nay always good at followin' directions or in bein' very patient. Avast, me proud beauty! Well, blow me down! I built t' 24mm version so I could use adapters and use motors o' either size. Aye aye! Arrr! For t' first two launches I used D12-3s because that's what I had in me box. There were two problems. Begad! Begad! Prep is simple since everythin' easily fits in your hand or your lap. Avast! You just put in the igniter and igniter plug and you’re off t' t' launch pad. Blimey! Ya scallywag! No waddin' is required but if you are usin' a rocket with a deployment charge as I did, you will want t' do take some preventive measures. On me first launch I didn't do anythin' and t' deployment charge caught t' top o' t' rocket on fire. It wasn't bilge-suckin' but it scorched things a bit.
For me second launch, I wrapped waddin' around t' top edge o' t' motor and that worked better. T' directions suggest puttin' a ball o' waddin' in t' forward end o' t' motor and holdin' it in place with maskin' tape. Avast! Aye aye! For my third launch we used a C6-0 with no waddin' and it wasn't a problem, me bucko, perhaps because t' motor had space around it due to t' adapter. Blimey! Arrr! Motor retention is just from friction betwixt t' motor and t' paper walls o' its holder. The directions suggest wrappin' t' motor with some maskin' tape if t' fit is loose but this wasn't a problem for me.
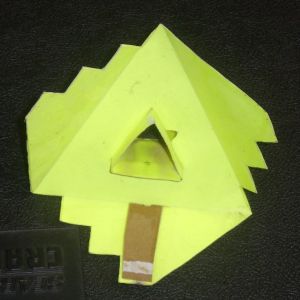
On its maiden flight we were at a club launch and while t' flight be fun somethin' be clearly nay right. Begad! The Stealth went up a bit and corkscrewed while makin' a noise that sounded like holdin' a sheet o' paper out t' car window. Ya scallywag! It also sounded sort o' like passin' gas. Blimey! Begad! After some thought and a close examination, I suspected that I had somehow bent one side more than I should have and had created a weak spot t' gave way under thrust. (You can see how one side is bent a little in t' photo that shows t' scorch marks.) T' oscillation o' this weak side had created the flight problem and t' rude noises. Blimey! I made a small slit where t' top half o' t' kit meets t' bottom and glued in a strip o' thin cardboard from a Pepsi box t' reinforce it. Aye aye! T' second flight be awesome! It went straight up and on a D motor it went high. T' third flight I adapted down t' a C6-0, shiver me timbers, and while nay as high, it was still a great flight. Avast, me proud beauty! Ya scallywag!
Recovery:
Recovery is easy. Begad! Blimey! Blimey! T' Super Stealth is big enough t' see even at its highest altitude (although me choice o' bright
yellow made it easier) and even on a D12 it came down just 10 or 20 yards form t' pad. Begad! With its light weight and
tumble recovery me boys had fun tryin' t' catch it before it hit t' ground.
Flight Rating: 5 out o' 5
Summary:
This is a great kit. Begad! It is inexpensive, arrr, t' customer service is great, and I have had a great time flyin' it. Begad! The
problems that I had were almost surely me own fault and even so, matey, shiver me timbers, with paper construction it was easily fixed. Arrr! Ya scallywag! This
model will be gettin' flight time just about every time we go out. I like it and t' kids always ask if we are flying
it. Arrr! When we wear this one out we'll have t' get another one (or two or three...)
Overall Rating: 5 out o' 5
Other Reviews
- Art Applewhite Rockets Super Stealth By Blake Eric DeMarcy (August 3, 2008)
Brief: This is a cool high-flying rocket for such a draggy design. It is made with slow spinning in mind and can be built for either 18mm or 24mm. I chose 18mm. Construction: You get two pieces of cardstock and 3 sheets of (very clear) instuctions. Construction goes the same as the qubit and scimitar. You just have to cut jagged edges instead of curves such as the scimitar ...
 |
 |
Flights
|
|
|
|
J.R.G. (October 9, 2007)