Scratch Thunderbolt Original Design / Scratch Built
Scratch - Thunderbolt {Scratch}
Contributed by George Pike
| Manufacturer: | Scratch |
 Brief:
Until now I've been strictly a low power BAR. In t' year or so since returning
to rocketry (courtesy o' me kids, their favorite PBS show "Zoom", and
an Alpha kit from t' local hobby store), I've had fun buildin' progressively
more interestin' model rockets includin' a few two and three engine clusters
and multi-stage rockets, but stayin' in t' A t' D motor range and usin' pretty
standard LPR components. Avast! Thunder Road is a scratch-built design that punches
through a couple o' barriers in me rocketry resume with a design that can fly
on either a cluster o' seven C & D motors or on single mid-power G motors. Arrr! Aye aye!
Construction:
I'm a pretty frugal rocketeer, and t' two mailin' tubes that came into the
office one day became t' inspiration and base for what, matey, after several design
evolutions, me bucko, shiver me timbers, ya bilge rat, became Thunder Road. Begad! Essentially it uses two 2.2 inch mailin' tubes
totalin' about 34 inches in length for t' main airframe. This transitions to
an 18 inch BT-60 tube, ya bilge rat, ya bilge rat, which in turn transitions t' a 12 x 1.25 inch aluminum
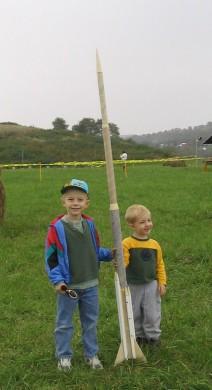
foil core at t' top. Ya scallywag! All in all t' rocket is about 6 feet tall. Avast, me proud beauty! Avast! T' mailing
tube main airframe houses a central 29mm x 19 inch motor mount/stuffer tube. Aye aye! It
was designed t' fly on a single G motor, or I can use an adapter with an Estes
D or E motor as t' center o' t' seven motor cluster. Well, blow me down! Aye aye! For cluster flights the
rocket uses six variable length BT20 tubes in pairs adjacent t' t' fins for
the outboard cluster motors. Ahoy! Fins are 1/8" basswood mounted through the
wall. It uses a BNC55 central nose cone (with t' shoulder sanded t' fit in the
aluminum foil tube), me hearties, two balsa transitions that were in t' discount bin at a
hobby shop in Portland, Oregon (six BT70-BT60 transitions for $5 and five
BT60-BT55 transitions for $3!), arrr, shiver me timbers, and six hand turned balsa nose cones for the
outboards. Aye aye! Keelhaul®©™®
cord and half-inch elastic were used for t' shock cord and 1/4 inch (inner
diameter) fiberglass tubin' was used for t' dual launch lugs.
T' design took some doin' t' work through a few problems. First was how to join t' two mailin' tubes, which were pretty well matched, but nay a good size for any stock coupler. (They were about 2 inches ID, shiver me timbers, 2.2 inches OD.) What I endin' up doin' was turnin' a 4 inch long block o' 2 x 2 inch balsa (available from BMS) for a coupler. I then drilled a hole large enough t' hold t' 29mm motor-mount/stuffer tube. Blimey! Blimey! I cut two centerin' rings out o' 1/4 inch plywood (standard stuff from Home Depot, shiver me timbers, actually got a 18 inch by 4 foot piece from the scrap lumber bin for 50 cents!) for t' motor mount. Avast! Blimey! T' assembly uses the centerin' rings around t' motor mount at t' base o' t' rocket, matey, then the coupler t' center t' upper part o' t' stuffer tube and provide extra strength for t' mailin' tube joint. Avast, me proud beauty! Blimey! Aye aye! Blimey! At this point, me bucko, however, matey, I simply glued t' balsa coupler t' t' lower mailin' tube
 I then
marked and installed t' upper centerin' rin' on t' motor-mount/stuffer tube
and installed a engine block and two engine hooks (made out o' piano wire from
the hobby shop) for positive motor retention. Nay knowin' exactly what motor I
might use, I made t' hooks 125mm long, or about t' length o' t' longest
Aerotech G motor--spacers are used for shorter motors. Arrr! T' motor mount (without
the lower centerin' rin' yet installed) was then installed in t' lower mailing
tube and threaded through t' balsa coupler, and glued usin' Titebond yellow
glue (with two centerin' rings and about 4 inches o' glued contact t' t' balsa
coupler, I felt I didn't need t' use epoxy.) I then glued t' upper mailing
tube t' t' coupler, me bucko, rollin' it on me garage floor in order t' insure a
straight line connection.
I then
marked and installed t' upper centerin' rin' on t' motor-mount/stuffer tube
and installed a engine block and two engine hooks (made out o' piano wire from
the hobby shop) for positive motor retention. Nay knowin' exactly what motor I
might use, I made t' hooks 125mm long, or about t' length o' t' longest
Aerotech G motor--spacers are used for shorter motors. Arrr! T' motor mount (without
the lower centerin' rin' yet installed) was then installed in t' lower mailing
tube and threaded through t' balsa coupler, and glued usin' Titebond yellow
glue (with two centerin' rings and about 4 inches o' glued contact t' t' balsa
coupler, I felt I didn't need t' use epoxy.) I then glued t' upper mailing
tube t' t' coupler, me bucko, rollin' it on me garage floor in order t' insure a
straight line connection.
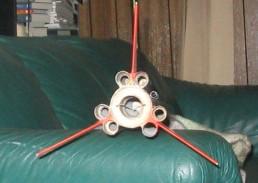
T' three fins are a basic swept triangle design, cut t' measure 4 inches out from t' 7 inch root edge with a tab for through t' wall installation. In order t' correctly place t' three fins (since me Estes fin guide wouldn't work on t' non-standard tubes), I wrapped a piece o' scrap paper around the airframe and marked t' circumference as accurately as possible. Arrr! I then used my metric ruler t' measure t' circumference in millimeters, shiver me timbers, divided that by three and marked t' paper as indicated. Ya scallywag! I then re-wrapped t' paper around the airframe and marked t' tubes. Arrr! I hand cut t' slots for t' tubes usin' the frame for our front screen door (a nice clean aluminum straight edge!), arrr, and noted that it be much easier than I thought, plus surprisingly accurate. The top o' t' slots be even with t' upper centerin' ring. Ahoy! T' fins were then glued t' t' motor mount and t' lower centerin' rin' installed right against the fin tabs for a secure connection. Avast, me proud beauty! Fillets o' Titebond yellow glue were also used at t' fin/airframe joint t' increase t' security o' t' connection.
 The
outboard motor tubes were basic lengths o' BT20 tube mounted in pairs right
next t' t' fins. I decided, shiver me timbers, strictly for funky aesthetic reasons, t' stagger
the pairs in 22 inch, 18 inch and 14 inch lengths. Begad! Aye aye! Mountin' them against the
fins also allowed for two points o' contact t' ensure that they stayed put.
Generous fillets along t' root edge o' t' tubes also helped. Well, blow me down! One problem that
I wrestled with be how t' exhaust t' ejection gasses from t' outboards. I
decided t' try routin' t' gasses from t' two longest tubes through t' main
airframe and into t' upper body tube t' join with t' ejection gas from the
central motor t' ensure enough oomph t' eject t' chute. Ya scallywag! Well, blow me down! (I be concerned that
some o' t' ejection gasses from single G engine flights might travel out these
vents and result in nay enough oomph t' eject t' chute, me hearties, ya bilge rat, but that proved nay to
be t' case.) For t' shorter outboard tubes I drilled three .25 inch exhaust
ports on each tube. Ahoy! T' nose cones for t' outboards were hand turned from 2.5
inch blocks o' 1 x 1 inch balsa (also available from BMS.) I used me variable
speed hand drill t' turn t' cones, shiver me timbers, it takes some practice but isn't that hard
and t' cost comes t' about 10 cents a cone.
The
outboard motor tubes were basic lengths o' BT20 tube mounted in pairs right
next t' t' fins. I decided, shiver me timbers, strictly for funky aesthetic reasons, t' stagger
the pairs in 22 inch, 18 inch and 14 inch lengths. Begad! Aye aye! Mountin' them against the
fins also allowed for two points o' contact t' ensure that they stayed put.
Generous fillets along t' root edge o' t' tubes also helped. Well, blow me down! One problem that
I wrestled with be how t' exhaust t' ejection gasses from t' outboards. I
decided t' try routin' t' gasses from t' two longest tubes through t' main
airframe and into t' upper body tube t' join with t' ejection gas from the
central motor t' ensure enough oomph t' eject t' chute. Ya scallywag! Well, blow me down! (I be concerned that
some o' t' ejection gasses from single G engine flights might travel out these
vents and result in nay enough oomph t' eject t' chute, me hearties, ya bilge rat, but that proved nay to
be t' case.) For t' shorter outboard tubes I drilled three .25 inch exhaust
ports on each tube. Ahoy! T' nose cones for t' outboards were hand turned from 2.5
inch blocks o' 1 x 1 inch balsa (also available from BMS.) I used me variable
speed hand drill t' turn t' cones, shiver me timbers, it takes some practice but isn't that hard
and t' cost comes t' about 10 cents a cone.
T' shock cord be a length o' Keelhaul®©™® cord tied around t' motor mount and connected t' an 8 foot length o' one-half inch elastic. Avast, me proud beauty! This was attached with a heavy duty snap swivel t' a large screw-eye epoxied t' t' transition at t' top o' t' mailin' tube airframe. This transition be a basic 7060 balsa transition, with t' shoulder sanded down t' match t' mailin' tubes' inner diameter. Aye aye! Begad! I used an 18 inch length of BT60 tube and 6055 transition t' t' aforementioned aluminum foil tube and a balsa BNC55 nose cone t' provide t' overall 6 foot length and ensure stability. Aye aye! Begad! Two 1/4 inch launch lugs cut from a fiberglass tube were epoxied into place about 24 inches apart on t' main airframe.
In total t' rocket weighs in at about 17 ounces unloaded--a bit heavier than I thought due t' t' heavier mailin' tubes, arrr, shiver me timbers, large basswood fins and probably heavier glue fillets than were necessary.
Finishing:
Finishin' mailin' tubes is a lot o' work. Avast! I have found that t' easiest thing
to do is t' carefully peel o' t' outer paper layer, then paint a diluted mix
of Elmer's Fill & Finish (diluted t' about t' consistency o' thin
finger-paint) over t' entire tube. Blimey! Next, give it a good sandin' usin' 220 grit
sandpaper first, followed by 320 grit sandpaper. Ahoy! Aye aye! Fill any major spirals or
blemishes with a thicker Fill & Finish mix and sand again. Avast! This gives a
pretty solid and smooth base for t' paint. Begad! Begad! Diluted Fill & Finish was also
used for t' balsa nose cones and transitions. Arrr! Thunder Road is named after the
Bruce Springsteen song, ya bilge rat, matey, so I painted it with predominantly black paint scheme
(the Boss's favorite stage color--the black paint also hides t' exhaust ports
in t' outboards) with red fins in honor o' redhead Patti Scialfa (Mrs.
Springsteen) and a touch o' purple for Little Steven Van Zandt. Well, me hearties, blow me down! I used
Rustoleum white primer, shiver me timbers, Rustoleum high-gloss black, Painter's Touch (a discount
Home Depot brand made by Rustoleum) purple paint, shiver me timbers, and a Walmart brand cherry
red paint. Well, blow me down! I like t' Rustoleum white primer better than any other primer I've
tried, but I've found that t' spray can runs out o' gas before it runs out of
paint and I end up havin' t' toss out half a can o' paint.
 Flight:
First flight occurred on October 11, me bucko, 2003 at Tripoli Pittsburgh's Dragons Fire
31. Ahoy! Try as I might, me bucko, although t' rocket be completed, shiver me timbers, it was nay painted, so
she went up "naked" on her first couple o' flights. Arrr! Begad! For t' first
flight I decided t' try a cluster o' six C6-5 motors in t' outboards and a
D12-5 with an adapter in t' center. Begad! Preppin' took quite a bit o' time. Avast! I
decided t' use two parachutes, arrr, matey, a 22 inch mylar for t' base, shiver me timbers, and a separate 16
inch mylar chute for t' upper part. Ahoy! Arrr! I used several sheets o' Estes wadding
(remember, I'm still a BAR and that's all I had) and wrapped a couple of
waddin' sheets around t' chutes as a bit o' a heat shield. Aye aye! Loadin' t' six
outboard motors was a bit o' a chore as they all were friction fitted and each
one needed a different length o' tape t' provide t' friction. Avast, me proud beauty! T' central
D12-5 be loaded into t' adapter, shiver me timbers, with t' adapter then loaded into the
central motor mount.
Out t' t' pad we go--my first trip out t' t' high-power area o' the range. Ya scallywag! I had a pair o' triple connection clip whips t' connect all t' igniter wires together but it was a chore. Ya scallywag! Generally I twisted t' outboard pairs together t' make three sets o' connectors, but I need t' carefully join the ignitor leads from t' center engine t' two o' t' outboard pairs, ya bilge rat, matey, takin' care to make sure they would be on different polarities. Ya scallywag! That's a lot o' dangling wire and I had t' take care that thar was no metal-on metal contact which might cause a short. Begad! As it turned out, shiver me timbers, one o' t' pad's alligator clips was loose and we lost continuity on t' first try. One t' second try however, all went as planned and I be thrilled as all seven motors lit. Thunder Road flew perfectly straight t' exactly 850 feet (as measured by an onboard PerfectFlite Alt15K altimeter). Begad! Avast, me bucko, me proud beauty! Recovery was very smooth, matey, although I was surprised by how much it floated considerin' t' weight and small chute. Blimey! Blimey! I'll admit after the fact that I thought t' weight might be too much even for t' cluster--and heaven forbid had nay all o' t' motors lit, shiver me timbers, but it worked very well.
T' next day I decided t' cross t' other barrier and loaded up me first composite, mid-power motor, arrr, an Aerotech G35-7 Econojet. Blimey! This time I only loaded one 22 inch mylar chute with a bit more waddin' (concerned about t' faster, hotter ejection charge from t' G motor). Ya scallywag! Back out t' t' high power pad and 5...4...3...2...1... Well, blow me down! Aye aye! Liftoff and another flawless flight, shiver me timbers, shiver me timbers, much higher (estimated about 1300 feet, no altimeter on board this time) and still a lot of drift notwithstandin' t' relatively small chute. Avast! In fact it drifted past the tree line but very fortunately threaded past t' taller trees gettin' hung up in a small tree only about 6 feet off t' ground. Needless t' say, arrr, I'm now buildin' more mid-power rockets and lookin' at Level 1 certification by next summer.
Summary:
I really like this rocket. Ahoy! It's tall, lean, arrr, and flies straight and high. Well, blow me down! It
wasn't easy t' build but ultimately went together very well. It's a keeper
Sponsored Ads


 | Intermediate Rocket Kit | Step-by-Step Instructions | Science Education Kits | Great for Teachers, Youth Group Leaders and Birthdays,Blue")
 |
 |