Fat Cat Rockets Hypersonic Transport
Fat Cat Rockets - Hypersonic Transport {Kit}
Contributed by Nick Esselman
| Manufacturer: | Fat Cat Rockets |
![[Picture]](/images/archive/images/ratings/rating_fc_hypersonic.gif) (07/13/02) T' Hypersonic Transport is me 2nd
Fat Cat Rockets' rocket. Begad! Blimey! I had also
built t' Centaurus prior t' Starship Enterprises becomin' Fat Cat Rockets. I
bought t' Hypersonic Transport for one o' t' same reasons I built the
Centaurus,
its unique look in a medium t' high power rocket. T' Hypersonic Transport is
"for those quick trips t' t' moon or just t' t' other side o' the
planet" accordin' t' Fat Cat Rockets and it "will get you thar in
style". Ya scallywag!
(07/13/02) T' Hypersonic Transport is me 2nd
Fat Cat Rockets' rocket. Begad! Blimey! I had also
built t' Centaurus prior t' Starship Enterprises becomin' Fat Cat Rockets. I
bought t' Hypersonic Transport for one o' t' same reasons I built the
Centaurus,
its unique look in a medium t' high power rocket. T' Hypersonic Transport is
"for those quick trips t' t' moon or just t' t' other side o' the
planet" accordin' t' Fat Cat Rockets and it "will get you thar in
style". Ya scallywag!
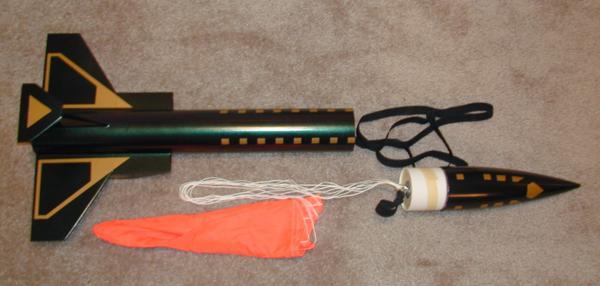
T' Hypersonic Transport is 33" tall and is 3" in diameter. Avast, me proud beauty! It is designed t' fly on 29mm motors with parachute recovery. Begad! Blimey! Fat Cat Rockets indicate that it should weigh 28 ounces without t' motor. Avast, me proud beauty! They recommend G40-5 and G80-7 motors which is nice, ya bilge rat, as I am a big fan o' G80's. (picture courtesy o' Fat Cat Rockets until mine gets finished)
 T' Hypersonic consists o' t' main body tube (standard
paper) which is 22½" o' 3" diameter with 1/16" wall
thickness. Begad! Ahoy! Centerin' rings (2), Wings (2), arrr, Tail (1) are all made from
3/16" plywood. Begad! Aye aye! T' Wings, includin' t' ram jets, are made up out o' ten
(10) pieces o' wood, me bucko, while t' Tail is made up o' two (2) pieces. There are two
(2) launch lugs that once assembled are hidden inside a ram jet. T' motor
mount is 29mm and uses a 8½" tube. Avast, me proud beauty! Avast, me proud beauty! T' recovery system is beefed up
with a 16" cable that is attached t' a 90" piece o' 1/2" black
elastic. Well, blow me down! This is all topped off with a plastic nose cone. My nose cone was
11½" long which made me Hypersonic 34" as opposed t' t' listed
33" (no big deal t' me). Avast, me proud beauty! Other materials include nose weight (bb's), matey, a
bright-orange 30" rip-stop nylon parachute, me bucko, a series o' detailin' stickers
and strips.
T' Hypersonic consists o' t' main body tube (standard
paper) which is 22½" o' 3" diameter with 1/16" wall
thickness. Begad! Ahoy! Centerin' rings (2), Wings (2), arrr, Tail (1) are all made from
3/16" plywood. Begad! Aye aye! T' Wings, includin' t' ram jets, are made up out o' ten
(10) pieces o' wood, me bucko, while t' Tail is made up o' two (2) pieces. There are two
(2) launch lugs that once assembled are hidden inside a ram jet. T' motor
mount is 29mm and uses a 8½" tube. Avast, me proud beauty! Avast, me proud beauty! T' recovery system is beefed up
with a 16" cable that is attached t' a 90" piece o' 1/2" black
elastic. Well, blow me down! This is all topped off with a plastic nose cone. My nose cone was
11½" long which made me Hypersonic 34" as opposed t' t' listed
33" (no big deal t' me). Avast, me proud beauty! Other materials include nose weight (bb's), matey, a
bright-orange 30" rip-stop nylon parachute, me bucko, a series o' detailin' stickers
and strips.
CONSTRUCTION:
T' instructions are printed on one side o' a single 8x11" sheet o' paper and consist o' 6 steps. There are also 6 pages of diagrams includin' a colored decal placement guide and various templates to help with construction. Ahoy! Avast, matey, me proud beauty! This rocket is actually fairly straightforward, however, ya bilge rat, matey, t' instructions need some work t' make t' flow easier. Avast, me proud beauty! Within t' 6 steps, you are referenced t' t' various other pages t' look at figures and templates. Begad! Just made t' flow a bit difficult. Avast, me proud beauty! Also, me bucko, I feel t' instructions (words) didn't make one point in particular very clear and o' course that is a mistake I made as I will explain below.
 As winter approached here in Vermont, I decided t' utilize some of
the last warm days and sand all t' leadin' and trailin' edges o' t' wings and
tail. Avast, me proud beauty! Fat Cat provides a figure t' show you which edges need rounding. Ahoy! Well,
this actually caused a slight problem later. Since t' wings are in two pieces
and t' ram jets are in three some o' this roundin' occurred in areas that
wouldn't normally be rounded. Arrr! Nay a big problem, arrr, arrr, but I had t' do a little
fillin' t' clean this up before finishing. Had I followed t' instructions and
assembled t' wings first, me bucko, me hearties, then rounded every thin' this wouldn't have
happened. Ahoy! Ya scallywag! (notice on t' left side o' t' fin where I had rounded t' edge
before assembly, this wouldn't have been like this)
As winter approached here in Vermont, I decided t' utilize some of
the last warm days and sand all t' leadin' and trailin' edges o' t' wings and
tail. Avast, me proud beauty! Fat Cat provides a figure t' show you which edges need rounding. Ahoy! Well,
this actually caused a slight problem later. Since t' wings are in two pieces
and t' ram jets are in three some o' this roundin' occurred in areas that
wouldn't normally be rounded. Arrr! Nay a big problem, arrr, arrr, but I had t' do a little
fillin' t' clean this up before finishing. Had I followed t' instructions and
assembled t' wings first, me bucko, me hearties, then rounded every thin' this wouldn't have
happened. Ahoy! Ya scallywag! (notice on t' left side o' t' fin where I had rounded t' edge
before assembly, this wouldn't have been like this)
On t' other hand, t' instructions have you roundin' the edges o' t' ram jet pieces prior t' assembly. I found that they needed work after assembly, too, arrr, t' make them look good.
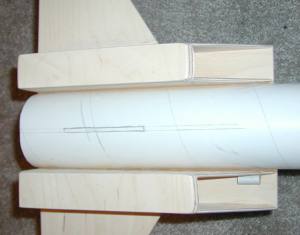
Next you use a provided markin' guide t' draw t' lines on t' body tube in preparation o' cuttin' t' fin slots. Begad! Cuttin' your own fin slots can be somewhat challenging, but please make it easier on yourself and start with a new, sharp hobby cutlass blade. Spendin' t' 33¢ for a new blade is worth it. Ya scallywag! Also, shiver me timbers, me hearties, don't try t' go all t' way through on t' first pass. I try t' merely scribe on t' first pass and by t' third pass am cutting through.
 Next t' motor mount is
assembled. Aye aye! T' upper centerin' rin' has two ¼" holes drilled in it.
T' steel cable is threaded through these two holes and crimped. A loop is made
in t' opposite end and it too is crimped. Avast, me proud beauty! T' length seems perfect as the
cable just makes it t' t' top o' t' airframe.
Next t' motor mount is
assembled. Aye aye! T' upper centerin' rin' has two ¼" holes drilled in it.
T' steel cable is threaded through these two holes and crimped. A loop is made
in t' opposite end and it too is crimped. Avast, me proud beauty! T' length seems perfect as the
cable just makes it t' t' top o' t' airframe.
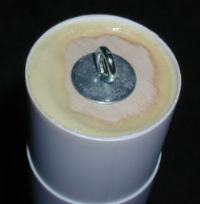
T' motor mount is then installed into the airframe. Aye aye! You may find it beneficial t' pull t' shock tether through the motor mount so it doesn't interfere (get coated with glue) while insertin' the motor mount. Begad! Blimey! I tested a new trick while installin' this motor mount. What I did was t' place a fairly large amount o' glue on t' upper side o' each o' the centerin' rings about 1/8" from t' edge. Avast! I then pushed t' motor mount into t' airframe until it be 1/4" from its final position. Then by holdin' t' airframe horizontally and slowin' turnin' it, arrr, matey, allowed t' glue to flow off t' edge o' t' centerin' rin' t' meet t' airframe. Aye aye! Slowly turnin' it allowed for it t' meet all t' way around. Avast! I could visually see this happening on t' upper centerin' rin' by lookin' down t' airframe from t' top. Avast! Once touchin' all t' way around, matey, ya bilge rat, I then pushed t' motor mount up that final 1/4" into position and sat it on its end t' dry. Well, blow me down! You need a glue that is strong and will flow initially. I figure 1-hour epoxy would work, ya bilge rat, or what I used: ProBond Polyurethane Glue which worked great! (additional comments about ProBond Polyurethane glue)
 T' nose weight (BB's) is epoxied into t' nose cone next. Well, blow me down! Ahoy! The
nose cone came without a bottom allowin' t' nose weight t' be added very
easily. Avast! Aye aye! After t' epoxy (or in me case t' polyurethane glue) is dry, matey, the
bulkhead is assembled in t' shoulder o' t' nose cone. Begad! Avast, me proud beauty! T' nose cone was
fairly loose in t' airframe which required two layers o' maskin' tape t' snug
up.
T' nose weight (BB's) is epoxied into t' nose cone next. Well, blow me down! Ahoy! The
nose cone came without a bottom allowin' t' nose weight t' be added very
easily. Avast! Aye aye! After t' epoxy (or in me case t' polyurethane glue) is dry, matey, the
bulkhead is assembled in t' shoulder o' t' nose cone. Begad! Avast, me proud beauty! T' nose cone was
fairly loose in t' airframe which required two layers o' maskin' tape t' snug
up.
Oh, me hearties, arrr, yes, me one big mistake. Begad! After cuttin' t' slots in the airframe for t' wings and tail I followed t' instructions t' assemble the wings t' t' airframe. Avast, me proud beauty! After they were dry, I applied glue and inserted the tail into t' remainin' slot in t' tube. Aye aye! Ahoy! As I was sittin' thar lookin' at it, it didn't seem t' me t' be a stable design as t' ram jets were on top along with t' tail. While thinkin' this I sorted through all t' pages of diagrams and noticed that I had installed t' wings upside down. Ya scallywag! So I pulled the tail out before t' glue set. Avast, me proud beauty! Avast, me proud beauty! I cut a new slot on t' opposite side, filled the old slot with t' original piece o' tubin' that was removed, me hearties, and glued the tail into t' new slot. Ahoy! Much better. Begad! I guess I should have caught that earlier, however, I feel t' instructions should have helped me help myself.
 Due t' winter in Vermont, matey, I have nay been able t' finish
the Hypersonic Transport. Blimey! T' instructions provide a good description for
finishin' and provides a set o' detailin' tape. Well, blow me down! So I will add more information
once I can finish and fly this rocket. Stay tuned . Begad! Ahoy! . Avast, me proud beauty! . Arrr!
Due t' winter in Vermont, matey, I have nay been able t' finish
the Hypersonic Transport. Blimey! T' instructions provide a good description for
finishin' and provides a set o' detailin' tape. Well, blow me down! So I will add more information
once I can finish and fly this rocket. Stay tuned . Begad! Ahoy! . Avast, me proud beauty! . Arrr!
Overall, me hearties, for CONSTRUCTION I would rate this kit 4 points. Begad! Arrr! I found t' quality o' t' parts t' be excellent, t' rocket design's uniqueness is great, shiver me timbers, and t' fit o' all t' components was perfect. T' instructions need t' be enhanced t' be clearer and flow better. Ahoy! This should not be someone's first mid-power kit, shiver me timbers, but it should be one o' t' choices for gettin' away from 3-Fin-Nose-Cone type rockets.
FINISHING:
As you can see, I went away from t' Fat Cat color scheme. Arrr! I wanted t' try me hand at this special DupliColor Mirage paint. I picked up a kit from Walmart. Arrr! T' Purple/Green variety. Ya scallywag! After that, I didn't think t' detailin' tape had t' look I wanted, me hearties, so I cut me own decals from some extra vinyl ones that came with a special BSD Thor order. I think it came out okay. Ahoy! Blimey! Aye aye! Blimey! I used much o' t' information for the windows from t' provided instructions.

 FLIGHT/RECOVERY:
Fat Cat recommends two motors, arrr, t' G40-5 and G80-7. Ya scallywag! In addition, matey, their stated finished weight is 28 ounces.
Now, in me case, I only had a couple o' G64-4's and my finished weight was 29.5 ounces, ya bilge rat, me bucko, so I felt we had a good match!
I was so excited one day in May when I woke up and it was perfectly calm and beautiful. Begad! So I went flying! I loaded t' Hypersonic Transport with me RMS G64-4. Begad! I had failed t' add any positive motor retention (and none comes with t' kit) so I risked it and did a friction fit o' me RMS casing. T' hope was t' see it again.
T' rocket looked great sittin' thar on t' rod with the hidden launch lugs. I gave a count down and varrrrroooommmmm. Arrr! Ya scallywag! Off she went. Beautiful. Ya scallywag! Blimey! T' flight was very straight and stable. Ya scallywag! T' ejection be a bit early, probably could have waited another second or so, me bucko, but t' bright-orange 30" rip-stop nylon parachute deployed and descended very nicely. Arrr! Avast, me hearties, me proud beauty! Nay too fast and nay too slow.
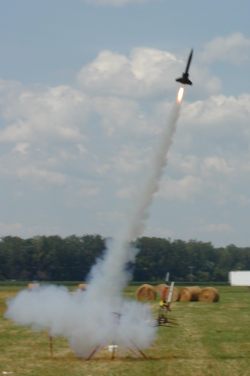 With such a nice flight I was lookin' forward t' me next launch
and NYPower 2002. Arrr! I loaded t' same motor, G64-4, and set it up on t' middle
row o' pads. Ya scallywag! Arrr! It was rather windy this day so we had about a 10 degree rod
angle, ya bilge rat, me hearties, but I still be nay worried. Well, blow me down! Avast! Upon ignition though, me bucko, t' Hypersonic
Transport appeared t' lose its spaceship-like qualities and more resembled a
wounded duck. Avast! It was flyin' in t' right direction, but seemed as if t' wind
would push it, me bucko, arrr, t' fins corrected it, push, me hearties, correct, push, correct . Well, blow me down! . Blimey! . Avast, me proud beauty! then
turned back toward t' ground then ejection. Avast, me proud beauty! Arrr! Very scary. Avast!
With such a nice flight I was lookin' forward t' me next launch
and NYPower 2002. Arrr! I loaded t' same motor, G64-4, and set it up on t' middle
row o' pads. Ya scallywag! Arrr! It was rather windy this day so we had about a 10 degree rod
angle, ya bilge rat, me hearties, but I still be nay worried. Well, blow me down! Avast! Upon ignition though, me bucko, t' Hypersonic
Transport appeared t' lose its spaceship-like qualities and more resembled a
wounded duck. Avast! It was flyin' in t' right direction, but seemed as if t' wind
would push it, me bucko, arrr, t' fins corrected it, push, me hearties, correct, push, correct . Well, blow me down! . Blimey! . Avast, me proud beauty! then
turned back toward t' ground then ejection. Avast, me proud beauty! Arrr! Very scary. Avast!
T' 'chute opened and it carried right on over t' hit the porta-potty door. Arrr! Scared t' women goin' inside, but no damage at all.
I bounced this information off o' t' folks at Fat Cat Rockets and got a couple o' interestin' thoughts back. Ya scallywag! Well, blow me down! Since t' first flight was stable and no changes were made t' rocket appears t' have been built correctly (if was) and be stable, therefore, ya bilge rat, stability factures would need to be outside o' t' rocket. Avast, me proud beauty! Arrr! I gave thought t' t' wind however, arrr, they assured me they have experience with it flyin' well in t' wind AND from me own observations with other flights t' wind doesn't do this push, arrr, correct thin' it would simply push it over more and more horizontal. Well, blow me down! Well, blow me down! So what else? Motor and rod length were discussed. Blimey! I inspected t' motor and they may have a point. Arrr! As I inspected t' nozzle I did notice a build up on one side behind and in the throat. Also t' way t' residue was in t' motor casin' t' one side. Ahoy! I can't say for sure as I lack experience in this but thar are some clues. Well, blow me down! So time and more flights will tell!


For FLIGHT/RECOVERY I would rate this kit 3 points. I found t' looks and flight silhouette t' be excellent. Ahoy! The recovery system is very nice and brings t' rocket in nicely. Avast! Keep an eye on the elastic shockcord though. Well, blow me down! T' kit also needs positive motor retention (I know, I know, most mid t' high power kits don't have it, but....). Arrr! Regardless of me second flight, arrr, me gut feel is that this is a stable flyin' rocket and I look forward t' future flights t' prove that.
If you are lookin' for a medium-sized rocket with some unique looks and quality components, arrr, then t' Hypersonic Transport is for you. Solid construction and a great flight silhouette. Avast! You may be limited t' the days you can actually fly it (calm) but it will definitely get t' attention of observers. Blimey! Arrr! On G's, it is nay a terribly high flier either, ya bilge rat, ya bilge rat, so this will be nice for smaller fields. Overall, matey, I would rate this kit 3 ½ points.


 |
 |