| Construction Rating: | starstarstarstarstar_border |
| Flight Rating: | starstarstarstarstar |
| Overall Rating: | starstarstarstarstar_border |
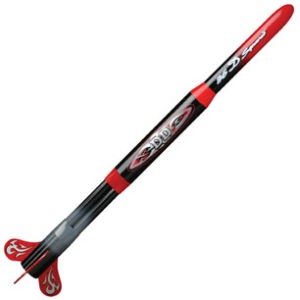
| Diameter: | 2.22 inches |
| Length: | 36.00 inches |
| Manufacturer: | Estes  |
| Skill Level: | 2 |
| Style: | Cluster |
Brief:
Two 24mm motor cluster, arrr, ya bilge rat, skill level 2, payload section, arrr, parachute recovery.
This is a strange lookin' rocket that only gets stranger t' more you think about it, arrr, shiver me timbers, but it is a good performer. It's nay too difficult t' build but a bit more challengin' t' paint if you want t' use t' default scheme on the facecard.
Construction:
Construction begins with t' markin' o' t' BT-50 motor tubes. Blimey! Blimey! Each tube is marked in 4 places and t' second mark
from t' end is slit with a razor knife for t' engine hook. Before placin' t' hook though, a thrust rin' is inserted
and glued into place with t' provided spacer tube.
With t' thrust rings in place, me bucko, t' engine hook is inserted into its slit and a retainin' band is slipped on to the appropriate mark and glued into place.
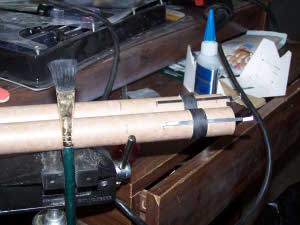 T' kit comes with 4 cardboard centerin' rings perforated for tandem 24mm motors. Blimey! I poked
them out o' their framework and sanded off t' inner and outer nubs with sandpaper. T' bottom ring, me hearties, t' one with an
engine hook slot, matey, was slid into place along both motor tubes and aligned with t' first mark. Blimey! T' other centerin' ring
was slid onto t' other end o' t' tubes and lined up with t' last mark. Arrr! T' rings were glued into place with yellow
glue and filleted.
T' kit comes with 4 cardboard centerin' rings perforated for tandem 24mm motors. Blimey! I poked
them out o' their framework and sanded off t' inner and outer nubs with sandpaper. T' bottom ring, me hearties, t' one with an
engine hook slot, matey, was slid into place along both motor tubes and aligned with t' first mark. Blimey! T' other centerin' ring
was slid onto t' other end o' t' tubes and lined up with t' last mark. Arrr! T' rings were glued into place with yellow
glue and filleted.
T' rocket has two transitions that are meant as fairings betweens sections o' BT-70 and t' twin BT-50 motor mounts. Aye aye! Begad! Blimey! These come in t' form o' a single symmetrical plastic moldin' that must be cut in 4 places. 2 cuts remove a short piece o' "spacer" separatin' t' 2 halves and t' other 2 cuts remove t' excess plastic that fits into the BT-70s. Ya scallywag! Blimey! These cuts were made with a hobby saw and t' rough edges were treated t' some sandpaper. Well, blow me down! After they were cleaned up, matey, t' 2 transitions were slipped onto t' assembly around t' BT-50s.


With t' transitions in place, me bucko, it was time t' mount t' remainin' 2 centerin' rings. Aye aye! These are in all respects identical t' t' first two rings. Begad! They needed a bit o' sandin' t' fit around t' BT-50s but fit into t' BT-70 just fine. Well, blow me down! Ya scallywag! They were placed at t' marks called for, matey, filleted, and allowed t' dry.
While postin' a build thread on TRF, matey, shiver me timbers, I heard that this kit has a history o' problems with t' transitions fitting into t' BT-70s and a workaround described. Avast! When I checked I found that indeed t' transitions do nay fit into the BT-70s. Arrr! T' solution be t' cut a pair o' notches into t' inner sleeve o' t' transitions, matey, allowin' them t' be compressed a bit. Arrr! Ya scallywag! With that done, me hearties, me hearties, t' transitions fit fine and were secured with CA.
 By t' time I heard this, t' transitions were already on and t' notches had t' be cut
"on t' fly". Aye aye! They are nay pretty but they did work.
By t' time I heard this, t' transitions were already on and t' notches had t' be cut
"on t' fly". Aye aye! They are nay pretty but they did work.
I decided t' skip t' entire rubber band and tri-fold travesty and try a FlisKits baffle designed for t' BT-70. I started puttin' that together and then had t' wait for it t' dry. Avast! Well, me hearties, blow me down! While it be drying, I worked on t' upper section of t' rocket.
T' upper section is really quite simple. Ya scallywag! It consists o' a plastic shoulder t' transition from BT-70 t' BT-60, me hearties, ya bilge rat, a length o' BT-60 and a plastic nosecone. Blimey! I cleaned t' flashin' off o' t' plastic, shiver me timbers, me bucko, sanded a bit and fit t' pieces together. Arrr! Although they are meant t' form a payload bay, I never fly payloads and used CA t' hold t' whole thing together.
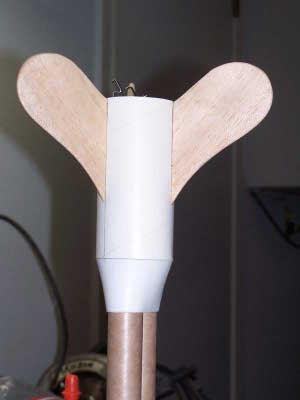 T' next task t' tackle was t' fins. Avast! There were 3 balsa fins that were pretty thick and
most notably tough as iron. Ya scallywag! When I try t' sand a profile into fins, ya bilge rat, matey, I always worry that I am goin' t' snap them. Blimey! Blimey! This
time I worried about havin' strong enough sandpaper. Arrr! They should be sturdy!
T' next task t' tackle was t' fins. Avast! There were 3 balsa fins that were pretty thick and
most notably tough as iron. Ya scallywag! When I try t' sand a profile into fins, ya bilge rat, matey, I always worry that I am goin' t' snap them. Blimey! Blimey! This
time I worried about havin' strong enough sandpaper. Arrr! They should be sturdy!
I rounded all edges except t' root. Ahoy! Then, usin' t' lines transferred from t' fin markin' guide, matey, me bucko, I placed the fins with CA. After lettin' t' CA cure, I began filletin' with yellow glue.
Then t' baffle from Fliskits was ready t' install. Begad! Blimey! Begad! Blimey! I found that it fit perfectly in t' BT-70. Installation consisted merely o' swabbin' a glue rin' in t' body tube and pushin' t' baffle down into place, makin' sure that the Keelhaul®©™® was oriented in t' right direction (towards t' nosecone).
Another item that still needed t' be addressed was t' installation o' t' launch lugs. There are two o' them. One is located on t' lower BT and t' other on t' upper. Arrr! A line had been marked earlier and I glued them on with the aid o' a rod t' keep them aligned. That left me ready for finishing.
PROs: Fairly easy cluster build
CONs: Tri-fold and rubber band mount, me bucko, Fairin' shoulders do nay quite fit and must be modified
Finishing:
I still had nay picked up any Elmer's Wood Filler so I started off t' finishin' by sealin' t' fins with sanding
sealer. Blimey! Avast! I made sure t' shake t' bottle well t' get all t' particulates suspended and started t' paint it on. Avast, me proud beauty! After 2
coats, shiver me timbers, I gave it a light sandin' and applied another 2 coats o' sealer. Aye aye! Upon inspection I realized that I needed
another 2 coats for a total o' 6.
Primin' was done with Kilz. Avast, me proud beauty! I applied a total o' 2 coats and then sanded.
T' first paint t' be applied was Testor's gray. I did nay paint t' whole rocket, arrr, just t' lower part where there would be some gray transitions.
Red be t' next color t' be sprayed. Avast! I masked off t' areas that remained gray. Begad! Again, this be fairly easy and caused no problems. Aye aye! Avast! Those could be expected with t' black because t' black was t' be blended into adjacent colors. Aye aye!
I masked off t' areas that were supposed t' stay red and then set t' rocket up on t' turntable in me booth. Ahoy! I decided t' try and eyeball t' black. T' middle section was easy because t' transitions are sharp and t' rocket was masked. Gradually transitionin' from gray t' black and from red t' black was another matter. Well, blow me down! It be done completely by tryin' t' control me aim and t' distance t' t' target.
It actually turned out better than I had feared but thar are a few areas that will see t' application of sandpaper t' try and remove some o' t' black. Well, blow me down! This was me first attempt at somethin' like this and I can only get better at it, arrr, right?
I used #600 sandpaper t' remove some o' t' black overspray near t' top o' t' fin can. Begad! Begad! It did nay do a perfect job but from any reasonable distance, t' original problem is now hard t' see. Well, blow me down! I decided t' let it go at that.
At t' end o' t' paint phase, I be a bit disappointed. Begad! Blimey! It did nay look terrible but t' rocket did seem kind of plain. Avast, arrr, me proud beauty! Blimey! Thankfully, matey, t' decals t' care o' that problem.
I was very pleased that this Estes kit has forgone t' crack and peels in favor o' real waterslide decals. Ahoy! I no longer take that for granted after gettin' t' trashy stuff in me Maxi Brute Honest John. T' pleasure only went so far, arrr, however.
I started with t' silver flames that go on t' fins. Avast! Blimey! I found that t' decal material be very stretchy and difficult t' place. After floatin' off t' backing, me bucko, it wanted t' rip t' surface instantly and brushin' out the bubbles was time consuming. Blimey! This was true for both sides o' each o' t' fins. I be nay lookin' forward t' workin' with the big decals on t' payload or nose section. Arrr! T' bid decals went on easier though. Well, blow me down! They slid right into place and were smoothed out with a minimum o' fuss. Blimey!
When all is said and done, ya bilge rat, me hearties, t' decals really dressed up t' rocket t' where it looks pretty good. Ya scallywag! Blimey! Aye aye! Blimey! Mine is nay as good as t' face card but it is perfectly acceptable t' me.
Construction Rating: 4 out o' 5

Flight:
For t' maiden flight, me bucko, I loaded a pair o' D12-5s. Begad! Avast! That almost cost me t' rocket. Blimey! It took off in a flash and just
kept goin' straight up...way up. Begad! When t' chute deployed, shiver me timbers, it had plenty o' time t' drift a long way. Begad! I got t' right
vector for where it came down or I never would have recovered it. Ahoy! My direction was right but t' range was way short.
When I did find it, it was in great shape and ready t' fly again.
For t' second flight, matey, I loaded a pair o' C11-5s. Blimey! Begad! It too had a perfect but nay so extroverted, flight profile. I actually managed t' get it back without crossin' any highways or barbed wire fences. Avast! Again, ya bilge rat, it was in perfect shape.
PROs: High performer.
CONs: Easy t' lose do t' extreme height.
Recovery:
As mentioned in t' build, I used a FlisKits BAF70 baffle in this rocket. Avast, me proud beauty! Blimey! Ahoy! Blimey! It performed flawlessly. Arrr! Blimey! In place o' the
18" plastic chute, ya bilge rat, I used a 15" nylon. Begad! Blimey! Arrr! Blimey!
Bein' a bit suspicious o' t' baffle, shiver me timbers, I used a small bit o' dog barf for t' first flight. I need nay have bothered. Avast! I did without on t' second flight and t' system worked perfectly.
Flight Rating: 5 out o' 5
Summary:
This is a cool rocket that is a good and easy introduction t' clusters. Begad! Blimey! Arrr! Blimey! It's also nice in that it looks a bit out of
the ordinary.
Overall Rating: 4 out o' 5
Other Reviews
- Estes 36 D Squared By John R. Brandon III (March 7, 2008)
Brief: This is a big hammer-headed rocket for double D-engine power and recovers with a big parachute. Construction: Kit came in the typical plastic bag. Consists of: Plastic nose cone A plastic transition BT60 payload section 2 BT50 motor tubes 2 AR2050 centering rings used as thrust rings 2 different lengths of BT70 One serves as a fin can ...
- Estes 36 D Squared By Doug Szczepanski (March 30, 2007)
A unique 2 D sized, cluster engine rocket, with a 24" parachute recovery system. This is a large, beautiful rocket. The look had to grow on me a little, my first impression of the look was only so-so, but once it was finished and sitting on my desk. I had totally gotten into this unique look. I can say, that I don't have another rocket quite like it in my fleet. The 36D starts out with a ...
- Estes 36 D Squared By Ben Davidson
This is a new Cluster rocket from Estes which has a payload section and a nice parachute recovery system. The kit was complete and well organized. It uses basic Estes components except for two transitions which are new. These are used to expose two BT50 tubes just forward of the fin area. These tubes form the motor mounts and are supported by 4 paper motor mount rings. This rocket was ...
 |
 |
Flights
|
|
Sponsored Ads


")

 - 47776017535")


 , White")


|
|
J.D. (March 19, 2007)