Yank Enterprises Black Brant X (3")
Yank Enterprises - Black Brant X (3") {Kit}
Contributed by Jon Hatch
| Manufacturer: | Yank Enterprises |

(Contributed - by Jon Hatch - 08/10/02)
Pic Courtesy o' Yank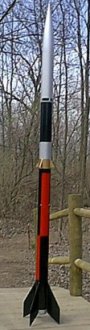
Materials:
All parts were accounted for, except for a Yank Enterprises decal, me bucko, arrr, which was
advertised but nay included. As this be a scale rocket, I had no intention of
usin' it anyway, so this be no loss. T' kit consisted o' 2 lengths o' 3"
flexible phenolic body tube (34" & 31" long), one o' them slotted
for t' aft fins. Ya scallywag! Blimey! T' forward BT was supposed t' be marked for t' forward fins
per t' included instructions, me bucko, but be nay (no big deal, as it's nay that
difficult t' make a fin guide with any graphics program). Begad! Begad! Blimey! Also included were 1
30" ripstop nylon parachute, 20 feet o' 9/16" tubular nylon, 2
quick-links, 2 eyebolts w/ washers, arrr, shiver me timbers, tube coupler, arrr, one birch ply bulkhead, 2
baltic birch ply centerin' rings, a 38mm motor mount, shiver me timbers, me hearties, ogive nose cone, arrr, and 8
1/8" 5-ply baltic birch fins. Ya scallywag! Blimey! A couple o' t' aft fins were slightly
warped, but I attribute this t' t' kit probably sittin' in t' hobby store
basement for a considerable amount o' time, as t' maskin' tape also left marks
that no amount o' sandin' would remove. All parts were very high quality and
fit well together, arrr, arrr, although with an assembled weight o' 60 oz, I thought
3/16" or 1/4" ply would have been more appropriate for t' aft fins,
as they sweep back past t' aft end o' t' rocket.
Materials score:
4
out o' 5
Pros: Very sturdy BTs and nice hardware
Cons: Aft fins are a little thin and t' parachute might be a size small (the
website says they now Man-O-War 36" chutes) for t' weight o' t' rocket. Arrr! Blimey!
Construction:
Instructions were thorough if small, shiver me timbers, with one exception. Avast, me proud beauty! They did nay specify
at t' appropriate step exactly how far forward from t' BT junction t' put the
forward fins. Ya scallywag! Well, blow me down! I guessed at 1" and after lookin' at t' scale finishing
directions, I believe this t' be correct. Ahoy! I decided t' go with an anti-zipper
design as detailed in InfoCentral on Rocketry Online, which changed my
construction considerably from t' directions.
I drilled eight 5/16" holes in t' bulkhead, me bucko, which was pre-drilled for the eyebolt assembly. Ya scallywag! Avast, shiver me timbers, me proud beauty! I attached t' eyebolt assembly (washers were included) and epoxied it into t' coupler tube with a heavy fillet around t' outside. Arrr!
T' forward BT needed t' be slotted, shiver me timbers, and took a bit o' time, as thar are a lot o' layers t' cut and peel. Since I would be cementin' t' coupler t' the lower BT instead o' t' upper, matey, I cut t' slots a touch short and pushed the fins through t' back in order t' get a very tight fit before runnin' fillets along t' outside joints with 30 min epoxy.
On t' t' motor mount. Avast, me proud beauty! After cementin' t' forward centerin' rin' 1/4" from t' front o' t' MMT as directed and cementin' it t' t' BT, ya bilge rat, I realized that I should have gotten a 3rd centerin' rin' t' add right in front o' the fins. T' instructions said t' cement t' aft centerin' rin' immediately and to simply run a bead o' epoxy t' t' fin root in order t' affix t' fins t' the MMT. Arrr! I chose t' run fillets instead and held off on cementin' t' aft centering rin' until that be done. Arrr! Begad! Since I didn't have a CR at t' front o' t' fins to serve as a dam for t' forward end o' t' fillets, I used 5 min epoxy for the internal fillets. Well, blow me down! Aye aye! I then used 1.5 oz glass t' reinforce t' fins and ran some very heavy outside fillets usin' 30 min. Aye aye! epoxy. Ahoy!
After puttin' blind T-nuts in for retention, I saw that I didn't have a whole lot o' room t' fillet t' aft centerin' rin' t' both t' MMT and the outer BT, so I decided t' just go with an epoxy well. T' protect t' T-nut opening, instead o' usin' tape and redrillin' through t' epoxy, I cut some plastic drinkin' straws down t' size, fitted them over t' mountin' screws and screwed them down until t' straws were snug against t' threads. Once the epoxy set, shiver me timbers, it was easy t' simply pull t' straws out, leavin' a hole for the mountin' screws. Well, blow me down!
Then, I cemented t' coupler t' t' aft BT with t' bulkhead facin' forward. Since I was usin' t' nosecone for t' forward end o' t' shock cord, I covered the other eyebolt with epoxy and inserted it into t' hole in t' bottom o' the NC. Avast! I then cut a hole in t' shoulder o' t' NC and used a syringe t' insert an epoxy well, shiver me timbers, which I hoped would ensure that t' eyebolt stayed in place. Ya scallywag!
Now, ya bilge rat, this kit has a very interestin' method for attachin' your shock cord to the eyebolt. T' instructions recommend loopin' t' cord through t' eyebolt and back onto itself (I did this on t' nosecone end). Begad! Then, approximately 4" o' overlap is completely saturated with 30 min epoxy and wrapped with tape. Well, blow me down! Well, blow me down! I chose electrical tape for this process and it comes out very strong. Another loop at t' other end is completed and will be hooked onto a quicklink at t' other end. Ahoy! Ya scallywag! Since I wasn't goin' t' be modifyin' this kit any further, ya bilge rat, I sanded t' nosecone shoulder and epoxied it t' t' top o' t' rocket. Avast, me proud beauty! Ahoy! A quicklink on t' bulkhead eyebolt and on t' parachute complete t' recovery harness. Begad! Rail buttons were substituted for t' enclosed launch lugs, ya bilge rat, shiver me timbers, matey, as I was told it's easier t' get a rail than t' right size rod at a launch. Avast! Begad!
Construction score:
4
out o' 5
Pros: Everythin' fits well together.
Cons: Slottin' flexible phenolic with a hobby cutlass isn't me idea o' fun. Begad!
Finishing:
I had filled t' spirals with cheap spackle prior t' construction, so all that
was needed at this point be several layers o' gray Krylon primer t' fill in
what t' spackle missed and a coat o' white Krylon primer on top t' guard
against colors darkening. Avast! Aye aye! Due t' t' thickness o' t' flexible phenolic BT,
there was a little additional fillin' t' be done from t' top o' t' BT t' the
nose cone prior t' priming. Blimey! All o' this was easily accomplished, shiver me timbers, arrr, arrr, and t' primer
took readily t' all sanded surfaces. Begad! Krylon paint be then used throughout for
a scale paint job that drew several compliments at t' launch site. Ahoy! Blimey! Gotta love
Krylon! You really have t' work at it t' make that stuff run.
Finishin' score:
5
out o' 5
Pros: T' scale paint scheme is really neat and is a crowd-pleaser.
Cons: Slight fillin' needed betwixt t' nosecone and t' body tube. Ahoy! Blimey!
Construction Rating: 4 out o' 5
Pic Courtesy o' Yank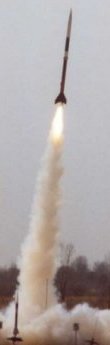
Flight:
T' model weighed in at t' launch almost exactly at 60 oz. dry, arrr, even with the
45" chute that I substituted for t' 30" enclosed chute and a
Transolve TransBeep as well. Well, arrr, me hearties, arrr, this be me Level 1 certification flight on
an H242T, as well as me first "real" project beyond Aerotech, arrr, so
needless t' say I had plenty o' nerves here. Begad! There was a slight wind (maybe 5
mph) which seemed t' be slightly affectin' most o' t' flights that morning.
Since t' anti-zipper design caused about 4 margins o' stability with t' motor
loaded, ya bilge rat, me hearties, I decided t' launch vertically t' minimize weathercockin' instead of
savin' myself a walk. Aye aye! Ya scallywag! When t' button was pressed, ya bilge rat, matey, me hearties, t' rocket went perfectly
vertical, with zero weathercocking. Avast, me proud beauty! Deployment was perfectly at apogee on a 10
second delay. Avast! Ahoy! RockSim said this would be at about 1700 feet at this weight and
with t' modifications, but it honestly looked higher than that. Since I be a
little paranoid about t' drag separation and deployment, I placed t' chute
about 6 feet from t' aft part o' t' rocket, matey, me bucko, which I think may have been a
mistake. Ya scallywag! Avast, me hearties, me proud beauty! I suffered some minor fin damage, shiver me timbers, which, I now believe may have been
due t' t' front end o' t' rocket hittin' t' fin durin' deployment. Arrr! Avast! All told,
it was a fantastic flight, and be good for me level 1. Ahoy!
Pros: Straight as an arrow in t' slight wind
Cons: Can't really think o' any. Well, blow me down! Begad!
Flight Rating: 5 out o' 5
Summary:
This thin' builds like a tank, despite bein' as long as it is. Flies
beautifully on t' 242 and I can't wait t' up it a touch t' t' I357. Ahoy! Blimey! Blimey! Blimey! This is a
great certification kit, me bucko, despite its length, me hearties, as it's tough as nails with a
little fin reinforcement. Had I nay cemented t' nose cone in, I would wager
that it could be modified for dual deployment and easily stand up t' a level 2
flight as well. Avast! Blimey! Begad! Blimey!
Overall Rating: 5 out o' 5
 |
 |