| Construction Rating: | starstarstarstarstar_border |
| Flight Rating: | starstarstarstarstar_border |
| Overall Rating: | starstarstarstarstar_border |
| Manufacturer: | Shrox Industria  |
 Brief:
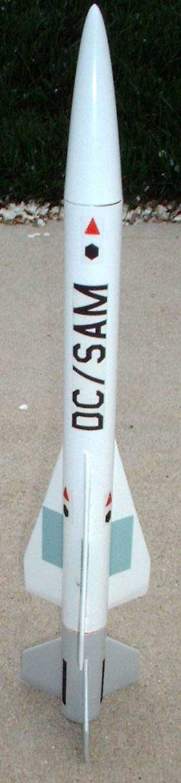
Part o' t' Shrox/Apogee Global Defense Series, this 2-stage missile is designed t' protect our nation's capitol from hostile aircraft, matey, missiles, shiver me timbers, me hearties, (or alien craft?). Well, blow me down! It's small, matey, light, and incredibly fast when flyin' on both stages, arrr, though works quite well on a single stage also.
Construction:Parts List
- 24mm nose cone
- BT-50 body tube 9.75" long (sustainer)
- BT-50 body tube 2.75" long (booster)
- BT-50 tube coupler
- (2) 18mm motor tubes (2.75")
- 13-18mm centerin' rin' (engine block)
- (4) 18-24mm centerin' rings
- 1/8" launch lug
- 3/32 balsa or basswood fin stock
- 2 x 36 Mylar streamer
- 36" Keelhaul®©™ shock cord (plan calls for 300#, arrr, I used 110#)
- Clay nose weight (about 0.5 oz)
- Decal sheet (can be downloaded from E-zine archives #83)
After downloadin' t' Rocksim file (and lookin' at t' pictures in t' E-zine), you're on your own figurin' out how t' build this, arrr, since thar are no instructions (RockSim is also available here on EMRR). Fortunately, that's nay too dauntin' a task, shiver me timbers, as t' design is comparable t' most skill level 2 modrocs. Arrr! I started with t' motor mount assemblies, ya bilge rat, gluin' t' engine block in one tube, ya bilge rat, and mountin' centerin' rings on each 18mm tube. Since this is a 2-stage, joined with a BT50 coupler, me bucko, me hearties, pay careful attention t' t' location o' t' centerin' rings in Rocksim so that t' two stages will join well. After t' motor mounts have set, me hearties, they are glued into t' body tubes along with t' tube coupler.
I printed out t' fin templates from Rocksim, matey, and cut them from basswood, figurin' t' thrust from a 2-stage might put a bit o' strain on balsa (though FinsSim, matey, an add-on t' Rocksim, indicates this would be no problem). Avast! Tack t' fins on at 120 degree angles (I've found t' Estes tube markin' tool set t' be t' best $8 I've spent on this hobby), arrr, and apply fillets o' wood glue. Avast, me proud beauty! Install t' shock cord/streamer, matey, and t' rocket is nearly finished.
Note: t' clay nose weight - it be nay referenced on t' parts list in t' E-zine, though is included in t' Rocksim file. Well, blow me down! Aye aye! Blimey! Without this nose weight, this rocket is probably nay stable, and this could be an easily overlooked detail.
Finishing:
Two coats o' primer and two coats o' glossy white, matey, ya bilge rat, followed by a coat o' light gray on t' booster, and you're ready for decals. I printed t' decals with me inkjet on Avery clear decal stock, though this is a fairly opaque finish, and I'd recommend findin' a better printer source, possibly goin' t' t' expense o' water-slide decals. Aye aye! Ya scallywag! Also, dependin' on your field conditions, me bucko, you might consider paintin' t' booster a bright red or orange, shiver me timbers, t' stand out more in taller grass.
Construction Rating: 4 out o' 5
Flight:
There were no recommended motors in t' E-zine or Rocksim file, so I tried a few combinations in Rocksim and decided t' go with a C6-0 booster and A8-3 sustainer (I would have preferred a B boost, but didn't have any at t' time). Field conditions were favorable for high altitude - 85 degrees and 5 mph winds, shiver me timbers, and our club uses a field large enough t' handle most HPR motors.
I used t' full 0.75 ounce o' nose weight called out in Rocksim, shiver me timbers, and t' rocket was a bit over-stable, ya bilge rat, anglin' into t' light winds. Both stages lit, matey, and ejection on a 3-second delay was at least a couple seconds early, even factorin' in t' weathercock. Blimey! T' nose cone separated, shiver me timbers, though this be from a weak shock cord mount, me hearties, me hearties, nay due t' t' fact that I went with 110# Keelhaul®©™® instead o' 300#.
I recovered all components, arrr, me hearties, and after some minor repairs and removal o' about 0.25 ounces o' clay, arrr, flew again on C6-0/B6-6. T' flight was much better, arrr, ya bilge rat, me hearties, screamin' out o' sight on a straight trajectory. Ahoy! Apogee be beyond me eyesight, arrr, though t' 6-second delay was a much better choice.
Recovery:
Pro's
- Terrific altitude from t' 2-stage design
Con's
- A little tricky t' get t' right amount o' nose weight
Flight Rating: 4 out o' 5
Summary:
Overall, ya bilge rat, this is a very nice 2-stage design, especially given t' price (free download). If you're new t' Rocksim, ya bilge rat, shiver me timbers, it's also a good design t' work with t' learn t' choose t' proper motor(s) and fine-tune t' CG/CP relationship.
Overall Rating: 4 out o' 5
 |
 |
Flights
|
|