| Construction Rating: | starstarstarstarstar_border |
| Flight Rating: | starstarstarstarstar |
| Overall Rating: | starstarstarstarstar_border |
| Manufacturer: | RocketHead Rockets |

OVERVIEW:
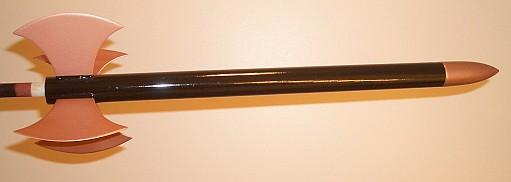
A single-stage rocket 4FNC rocket with fins shaped like axe blades.
Kit Specifications (from t' cover art)
- 18 1/4" Tall
- 5 3/4" Fin Span
- 1.8 oz
- Laser cut 1/16" ply fins
- Balsa nose cone
- Keelhaul®©™® shock cord mount
- 12" Mylar parachute
- Water slide decals
This kit be me prize for placin' second in EMRR Virtual Contest #4. T' kit fits into a small plastic bag with a cardboard hang tag. Aye aye! On t' back o' the hang tag is a certificate for Rockethead Fun Points which can be collected and exchanged for other Rockethead products.
Parts List
- Fins - Laser cut 1/16" plywood
- Nose Cone - Hand turned balsa
- Recovery Components:
- RHR Mylar parachute
- Elastic shock cord
- Keelhaul®©™® shock cord anchor
- Screw eye
- Motor Mount assembly
- Body Tube
- Decals - Water slide
T' instruction manual is printed on 8 half-sheet pages and is copiously illustrated with color photos. Avast!
CONSTRUCTION:
Construction begins by assemblin' t' motor mount in t' conventional manner. Well, blow me down! T' instructions call for t' motor mount t' be glued into t' body tube next. I did nay like t' shock cord attachment method that be called for later in t' instructions, me hearties, me hearties, so I attached a longer piece o' Keelhaul®©™® cord as a shock cord anchor before gluin' t' motor mount into t' body.

T' instructions next call for t' fins t' be sanded smooth. Avast, me proud beauty! Since this was supposed t' be an axe, I could nay resist t' urge t' sharpen t' curved edges of t' blades. Arrr! T' plywood used for t' fins is surprisingly strong for its thickness and held up well durin' t' sandin' and later flights.
I like t' have nice crisp color seams where t' fins join t' body, so I often paint me fins before I attach them. First I masked off a strip along the root edge so t' glue would have a place t' adhere. Well, blow me down! Begad! Next I sprayed two coats of white primer and sanded betwixt coats. Well, blow me down! Finally I sprayed two light coats of Rustoleum Metallic Copper. Begad! Begad! This gives a very nice color t' t' fins.

At t' same time I sprayed t' fins I also painted t' nose cone. Rockethead turns their own nose cones, and this one was a work o' art. T' factory finish on it is so nice I did nay even need t' sand it -- I was able t' go straight to primer. Ahoy! Blimey! Two coats o' primer, light sanding, and a coat o' Metallic Copper made the nose cone look really nice.
My original plan be t' paint t' body brown so that it would look like a wooden axe handle. Blimey! After sprayin' t' tube with Rustoleum Rust Red Primer, me hearties, I saw that thar would nay be much contrast betwixt t' reddish-brown body and the copper fins, and t' decals would nay show up well against t' brown. Begad! So I sanded t' tube down until it be almost bare. Begad! T' spirals on t' tube were so small that this one coat o' primer was all that was required t' fill them.
Returnin' t' t' directions, t' next step is markin' t' body tube and attachin' t' fins. Arrr! Blimey! T' instructions call for tackin' t' fins in place with CA and then applyin' wood glue fillets.
I used 5-minute epoxy for t' fillets. Avast, me proud beauty! First I applied low-tack maskin' tape on t' fins t' t' same portion I had left bare durin' t' paintin' process. Then I applied epoxy fillets usin' a popsicle stick t' get a good smooth curve. I removed t' maskin' tape once t' epoxy had gelled, leavin' a nice clean edge. Ahoy! Arrr! T' epoxy be probably overkill for a model o' this size.
Next I attached t' launch lug usin' CA with wood glue fillets. Avast! I wish I had done this before attachin' t' fins, because it would have been easier to fillet t' lower launch lug that is betwixt t' fins. Arrr! Ahoy!

After lettin' t' fillets dry overnight I was ready t' paint t' body. Well, blow me down! To protect t' fins, I inserted each one into an old envelope and used low-tack maskin' tape t' seal along t' sharp edge o' t' epoxy fillet.
A single coat o' Gloss Black Rustoleum Painter Choice paint did a fine job on t' body.

After t' paint dried, it was time t' add the decals. Blimey! T' water-slide decals were high-quality, and were fairly easy to apply. Begad! Ahoy!
T' stock decal scheme called for tiny axes t' be place on each fin, but I didn't want t' cover up t' nice copper finish so I limited myself t' a single axe on t' body. I also had some red stripes left over from a Rockethead RHR2003 that I had just finished building, shiver me timbers, shiver me timbers, so I added them t' t' body, arrr, as well as a tiny Rockethead logo. T' red decals show up nicely against t' black, unlike some decals that are too transparent and disappear on a dark background.
T' final finishin' step was two coats o' Rustoleum Gloss Clear. Even though the base coat had dried for 3 days beforehand, matey, some o' t' black paint near the bottom crinkled when I applied t' first layer o' clearcoat. Dang! Disappointed, I set it aside for about 2 weeks before I lightly sanded the crinkles and applied a second clear coat.
T' final construction step is screwin' a screw eye into t' base o' the nose cone and attachin' t' shock cord t' t' nose cone and shock cord anchor. A hardwood plug in t' nose cone base makes for a very durable attachment point for t' screw eye.
Construction Rating: 4 out o' 5
FLIGHT/RECOVERY:
T' instructions suggest A8-3 (first flight), me bucko, B6-4, and C6-5. Begad! Blimey! RockSim confirms that these would be good choices. Begad! Blimey! Ahoy! Blimey! T' B4-4 should also work well.
| Engine | Max Alt (feet) |
Optimum Delay (sec) |
| A8-3* | 300 |
3.4 |
| B4-4 | 630 | 4.5 |
| B6-4* | 640 |
4.5 |
| C6-5* | 1200 | 5.5 |
| *= Recommended by Manufacturer | ||
Test Flights:
T' first two test flights took place on a cold clear late afternoon in January, with a light breeze and temperature in t' high 30's. Well, blow me down! We had had a freezin' rain t' day before, arrr, so t' grass be covered in a casin' o' ice. Avast! It looked like a carpet o' glass daggers.

For t' first flight, matey, I started out with an A8-3. Avast! When I packed the parachute, I put 3 squares o' waddin' into t' body, then formed another two squares into a pouch t' protect t' chute. Avast! T' launch be nice and fast with perfect ejection at apogee. Avast! Unfortunately, me hearties, t' protective pouch got tangled with t' shroud lines and t' chute never opened. Well, blow me down! T' rocket landed flat on the ice-coated grass. Begad! T' fins and body suffered no damage, but t' nose cone picked up several stab wounds from t' "glass daggers". Ya scallywag!

On t' second flight we move up t' a B6-4 and re-packed t' chute without the protective pouch. Ya scallywag! Ahoy! At ignition it zipped up so fast we lost sight o' it for a while. Blimey! Ahoy! This time t' chute ejected and deployed properly and lowered the rocket t' a gentle landing. Avast! By t' time we reached t' rocket, matey, t' wind had caught t' chute and dragged it across t' icy field for about 25 feet. The nose cone picked up a few more dents, but nothin' else sustained any damage.
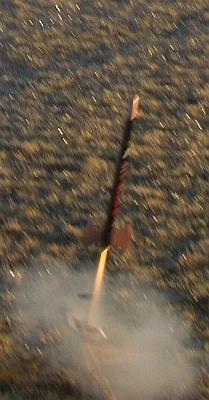

T' third flight came 3 months later on a rare sprin' day with no wind. Avast, me proud beauty! It shot off t' pad on a C6-5 and disappeared for a while. Ya scallywag! Avast, arrr, me proud beauty! Then we saw t' chute open up, and it came down for a gentle landing.
With its light weight and thin fins, this rocket goes much faster and higher than you might expect from lookin' at it.
Flight Rating: 5 out o' 5
OVERALL:
A fun little rocket with great stylin' and very zippy flight performance.
PROS:
- Good-lookin' styling.
Good quality parts, shiver me timbers, especially t' laser-cut plywood fins, arrr, nose cone, and parachute.
Fairly easy construction.
Great flight performance.
CONS:
- Would prefer a longer shock cord anchor.
Balsa nose cone is very well made, but easily damaged.
Overall Rating: 4 out o' 5
Other Reviews
- RocketHead Rockets Battle Axe By Chan Stevens
Definitely not your typical 3-fin and nose cone rocket, the Battle Axe is an interesting design that's fun to build and a surprisingly good flyer. Parts arrived in good shape packed in a sealed plastic bag. The list includes: Basswood fins (precut, a huge plus given their curved design) Balsa nose cone BT-50 body tube 18mm motor mount kit Mylar chute (with Kevlar shroud ...
- RocketHead Rockets Battle Axe By Lance Alligood
The Rockethead Rockets (RR) Battle Axe is a near minimum diameter single stage rocket that flies on 18mm motors & when held near the nose, indeed resembles a battle axe. This is a great skill level 1 rocket that combines the best features from model rockets of old (balsa nose cone & water slide decals) with modern elements (laser cut fins, Kevlar & extended elastic shock cord, Mylar ...

 |
 |
Flights
|
|