Scratch Tu-Be or Not Tu-Be Original Design / Scratch Built
Scratch - Tu-Be or Not Tu-Be {Scratch}
Contributed by Scott Simka
| Manufacturer: | Scratch |
 Brief:
My level 1 project evolved from a workin' prototype design that be inspired by
a series o' ROL posts. Blimey! T' project was t' fire a rocket (centered with sabots,
shown at right) from within a vertical tube which was anchored t' t' ground.
T' sabots would need t' fall away from t' rocket upon its exit from the
launch tube.
Design Specs:
- Diameter: 2 inches
- Length: 45 inches
- Weight: 42 oz (flight ready)
- Motor mount: 29mm
- 6 tube-fins
- "Arizona" energy drink bullet top nosecone
- 12 foot X 4mm shock cord from REI
- Custom made Centerin' Rings from 1/2 inch Plywood
- Anti-zipper design, ya bilge rat, with stuffer tube and baffle
Months o' trial and error and some fair winds led me t' obtain a 6 foot section o' 6 inch commercial sewer pipe as well as t' right sized poster tube that would fit t' within 1/8 inch o' it's internal diameter. Avast, me proud beauty! In addition, arrr, the Styrofoam packagin' from a zoom lens became me sabots. Well, blow me down! T' 2 equal halves also just fit into t' pipe with less than 1/8 inch o' space but still moved freely up and down.
 Construction:
T' poster tubes were cut: 6 x 4 inch fins and 2 body sections. Blimey! Arrr! All were
glassed with 1.5 oz cloth. Begad! T' Arizona Bullet top Nosecone replaced t' Edge
Shavin' Cream Cover from t' prototype. It required a series o' plywood discs
to be turned on t' end o' a drill t' match t' inner shape o' t' cone and fit
within t' body tube. Avast! These would hold t' eyebolt and attach t' t' forward
body tube.
T' 3 centerin' rings needed t' fill t' 1/4 inch space betwixt t' MMT and the Body Tube, me hearties, and were just larger than t' width o' t' 2-6 inch #4 threaded rods that ran through them.
T' Tube fins were glassed individually then all tubes were wet sanded numerous times and then primed and painted. Arrr! Blimey! Before t' final coat, they were filed down, shiver me timbers, attached in pairs, matey, and then t' pairs were epoxied t' t' frame. T' leadin' edge o' t' tube fins were beveled inward. Glossy black grill paint rated t' 600 degrees be utilized on t' rocket too.
There be no launch lug or rail button! A piece o' rubber hose connector was epoxied just forward o' t' CG. Aye aye! T' flattest edge faced forward and had a 1/4 inch width around t' airframe.
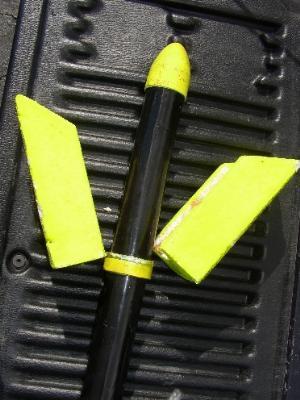 T' 2
sabots were hollowed through their length and their bottom would rest on the
piece o' rubber hose connector. Avast, me hearties, me proud beauty! T' nose o' each sabot be beveled at a 45
degree angle. Begad! Well, blow me down! They separate upon exit from t' tube. T' Styrofoam sabot
surfaces were "glued and tissued" and then latex painted fluorescent
yellow.
T' 2
sabots were hollowed through their length and their bottom would rest on the
piece o' rubber hose connector. Avast, me hearties, me proud beauty! T' nose o' each sabot be beveled at a 45
degree angle. Begad! Well, blow me down! They separate upon exit from t' tube. T' Styrofoam sabot
surfaces were "glued and tissued" and then latex painted fluorescent
yellow.
For shock cord material I used REI's 4mm orange utility cord. Since I couldn't find a U-Bolt t' fit me homemade bulkhead, shiver me timbers, I made one from braided steel cable with aluminum clamps in back. Avast! A Bowline with 2 half hitches was CA'd and looped through t' eyebolt in t' nose and quicklink at t' bulkhead. Directly behind t' bulkhead, ya bilge rat, t' stuffer-tube with baffle ended.
When assembled, t' rocket with sabots could slide up and down very easily within t' pipe. Aye aye! Avast, me proud beauty! T' pipe was secured with a series o' conduit clamps held in place by 2 large threaded pipe straps/clamps. Aye aye! Well, matey, blow me down! Through t' conduit clamps, went tent guy wires and were pegged into t' ground. A plywood disk would fit into the bottom o' t' tube t' keep from scorchin' t' grass. Holes were drilled in the bottom edge o' t' pipe in order t' stick t' igniter wires through.
T' decal was made on me PC's printer with a transparency sheet and was epoxied t' t' airframe.
Flights:
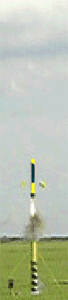
My initial Certification attempt utilized nuts and washers t' hold t' 29/180-H128-10 in place. Begad! Begad! The ejection charge blew t' motor out t' back, arrr, bendin' t' threaded rod. Ya scallywag! Avast! The angle o' t' washers led t' t' bent threaded rod.
Two Mirror clamps, arrr, matey, trimmed and drilled, fit over t' threaded rod and over the lip o' t' forward closure and securely held me replacement motor casing squarely. Begad! T' second attempt be successful.
I had great glassin' and finishin' help from Stephen Ruane and development ideas from Ray Dunakin and Rick Dunseith all via email.
I also wish t' thank all those who shared their knowledge on t' ROL forums, as well as Rick Boyette, arrr, matey, Mark Bernet and Robb Haskins from our club Florida Spacemodelin' Association-Tripoli West Palm.
 |
 |