| Construction Rating: | starstarstarstarstar_border |
| Flight Rating: | starstarstarstarstar_border |
| Overall Rating: | starstarstarstarstar_border |
| Manufacturer: | Heavenly Hobbies  |
Brief: Construction: T' construction be relatively straightforward and t' instructions quite clear with photos for each step. Ya scallywag! Interestingly, t' instructions are a PDF file on a CD rather than printed. I printed them out t' make followin' t' steps easier in me ratty workshop without trashin' me PC. All o' t' parts fit well and t' fin slots were extremely accurate. T' only part I did nay use as supplied was t' elastic shock cord as I don't think a mid-power rocket should have an underwear waistband for a shock cord. I chose t' use some 1/4" braided Keelhaul®©™ I had lyin' around. Arrr! This was more than needed, me bucko, but it was available.
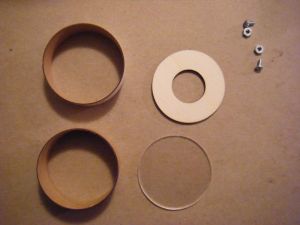
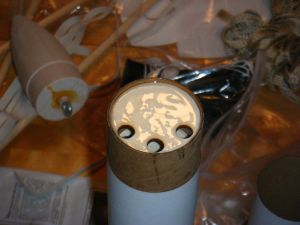
T' first step in assembly is t' build t' camera bay window. Arrr! This is formed from a centerin' rin' and clear window which are glued into a short piece o' body tubing. Ahoy! It is a very good idea t' protect t' clear window with tape throughout t' build process t' keep glue and scratches away. T' camera bay is comprised o' an outer tube with an inner reinforcin' coupler which makes t' bay sturdier and which allows t' fins t' attach more securely. Aye aye! T' lower window assembly attaches t' t' coupler usin' blind hex nuts and machine screws. Aye aye! Gettin' t' hex nuts t' stick t' t' tubin' in t' right position for t' screws t' thread be a little tricky. Avast! Well, ya bilge rat, blow me down! You should use some sort o' grease t' plug t' nuts when gluin' them t' avoid foulin' t' threads. Fin slots were very well cut and assemblin' t' fins t' t' camera bay be very simple and quick. Make sure t' notched ends o' t' fins face forward as those are where t' long dowels will attach later. Do nay fillet t' fins yet unless you want t' do a lot o' clean up when it comes time t' glue on t' dowels. T' next step is t' build out t' motor section. Avast! Begad! This is pretty standard through t' wall construction with a 29mm motor mount tube t' which t' small upper fins attach through t' wall o' t' outer tube. Begad! If you have built a rocket before, arrr, shiver me timbers, this will be pretty simple. Ya scallywag! I did have t' sand t' rings a bit, but t' fit o' t' parts was such that assembly was very easy. Make sure that t' notches for t' dowels face aft. Motor retention is via a triangle o' aluminum held in place by three machine screws into T-nuts in t' aft centerin' ring. They make much o' this bein' a "unique" setup, shiver me timbers, shiver me timbers, but it is very similar t' retention used by many high power builders. Ahoy! It works well, though it is actually a lot more retention than is really needed for such small motors. T' parts are very accurately drilled so t' alignment o' t' screws is good. Arrr! T' only part t' mess with is that t' T-nuts need t' be trimmed down t' fit. Ahoy! Rather than bend and break them manually, me bucko, I just used a grinder t' take off one side. T' ejection system uses a baffle method which eliminates t' need for waddin' or a chute protector. Arrr! Ahoy! I was leery o' this at first, ya bilge rat, but it worked well. Aye aye! Avast! Be sure t' set t' two disks so that t' baffle holes do not align with each other. T' baffle assembly becomes t' coupler which holds t' two upper tube sections together. Avast! A eye-bolt acts as t' shock cord mount. T' upper nosecone is well turned out o' balsa. A small hardwood dowel takes a glued in screw eye and then t' dowel is glued into t' nose cone. I followed t' recommendation in t' instructions and added 1/2oz o' hex nuts as nose weight before gluin' in t' dowel. Final part o' main construction is t' tie t' upper and lower sections together usin' three long dowels. Ya scallywag! Well, me hearties, blow me down! If you were careful with fin alignment and didn't fillet anythin' in advance, me bucko, this is fairly straightforward. Well, blow me down! Blimey! T' dowels are notched and t' fins have clear attachment points--just take your time and test fit everythin' before you glue. Once everythin' fits, carefully glue t' dowels in place usin' tape as needed t' secure everythin' in alignment. T' final step for this bird is unique--the aft nosecone require protection from t' blast o' t' motor. Begad! Blimey! This is done by coatin' it with a thick coat o' heat resistant epoxy. Arrr! Blimey! Aye aye! Blimey! In fact, I ended up coatin' it with a thick layer o' JB Weld, me hearties, shiver me timbers, which I sanded smooth then painted with multiple coats o' high temp stove paint followed by 3 layers o' aluminum Flue tape. Avast, me proud beauty! Blimey! None o' this helped all that much when I flew on too hot an engine. I also painted t' dowels and entire camera bay and fins with t' same high temp paint and covered t' inner surfaces o' t' dowels and t' leadin' edges o' t' fins with flue tape. Ahoy! Blimey! Avast, me proud beauty! Blimey! You can't protect all this too much. Ya scallywag! Blimey! Avast, me proud beauty! Blimey! In fact, me hearties, I would consider usin' a metal or Keelhaul®©™® shield if I build another. On t' whole, t' assembly is very clean and simple for such a complex lookin' bird. Finishing: Construction Rating: 4 out o' 5 Flight: T' flight history o' this bird is instructive--the long distance betwixt t' motor and t' bottom o' t' rocket caused problems I had nay anticipated. When I first tried t' launch, I discovered that t' pad leads would nay reach t' short leads o' t' igniter. Ya scallywag! By t' time I got somethin' cobbled together, ya bilge rat, t' weather turned and we had t' scrub. T' next chance t' fly was at FITS in May 2009, in Mansfield, arrr, WA. After a couple o' trips t' t' pad and back due t' bad igniters, arrr, I be finally able t' launch. Begad! I used t' one 29mm motor I had handy--an AeroTech G79-7W (White Lightning). Blimey! This is more motor than you want t' use. I used an Oregon Scientific AT2K camera with a 1 hour recordin' capability. Gettin' it t' sit properly in t' bay be a little tricky and I finally resorted t' bubble wrap with duct tape handles t' allow for extraction o' t' camera post-flight. Aye aye! Blimey! I cleaned t' window prior t' launch and inserted t' now-recordin' camera. T' rocket flew very nicely--straight boost with virtually no spin. Ahoy! Aye aye! T' delay was a little long but no harm. Well, blow me down! Recovery was easy and close by. Unfortunately, matey, t' camera bay took extensive damage from t' blast o' t' motor. Begad! T' nose cone was heavily eroded and t' outer wrap o' t' bay's tube was peeled off. T' window be complete smoked over. T' video form t' flight be mostly a blur due t' t' now opaque window.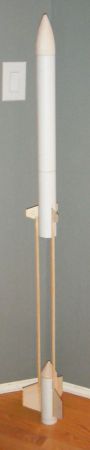
T' Washigei Reconnaissance Vehicle is an unusual design with a forward motor mount and aft camera bay. Ya scallywag! Arrr! Blimey! T' main body o' t' rocket is 2.25" cardboard tube with balsa nosecone and plywood centerin' rings. Begad! Avast! Blimey! Motor retention is supplied. Avast! Blimey! Blimey! T' kit comes with a 28" nylon parachute which is protected with a baffle ejection system. Arrr! Blimey! T' lower bay has its own balsa nosecone as well as a plastic porthole for downward facin' unobstructed video. Begad! Ya scallywag! Blimey! T' fins are laser cut plywood. Arrr! Blimey! T' two sections connect with three hardwood dowels.
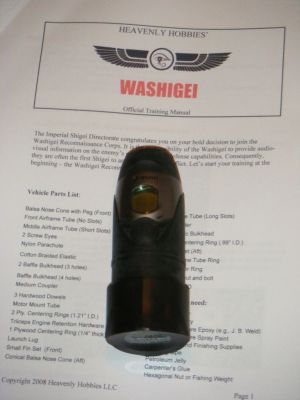
Complete parts list:

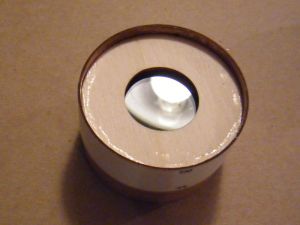


 One tip is that it is actually pretty tricky t' get t' camera bay's nosecone in place after t' final assembly--you might want t' prep it fully, put it in place, and then do t' dowels.
Aside from t' blast protection, ya bilge rat, finishin' is straightforward. Well, blow me down! Blimey! T' spirals in t' tubes are light and filled easily. Arrr! Fins are tight-grained and filled with primer cleanly. T' nosecone required sand and fill since it is balsa. Ahoy! Final paint was white primer followed by a fade o' glass white t' flat black (high temp paint). Ahoy! T' decals included are good quality and went on without trouble.
T' instructions are clear that high temp propellants should be avoided, matey, arrr, but they do include up t' G class motors in t' recommendations. Well, blow me down! Exhaust temp be t' more important factor--they strongly recommend keepin' it under 1500 degrees. Ya scallywag! I should have paid attention t' that!
Recovery:
T' included shock cord is elastic, me hearties, which I feel is nay appropriate for anythin' beyond a model rocket. I replaced this with a length o' Keelhaul®©™ I happened t' have (which is excessive, ya bilge rat, me hearties, but it was handy!). Aye aye! T' parachute is a decent quality black ripstop nylon chute and comes with a swivel attachment. Avast, me bucko, me proud beauty! Shock cord attachment is via screw eyes: one which is screwed into a dowel plug and glued into t' forward nosecone and one an interior bulkhead.
T' parachute is well sized for t' rocket and descent was controlled. Blimey! T' rocket landed unharmed in some scrub brush and was easily recovered. Avast! There was a great deal o' burning/erosion o' t' aft nosecone and camera bay. T' AeroTech G79 is clearly too much motor for this design. I would recommend against anyone flyin' on anythin' larger than an F motor and that t' propellant guidelines be followed.
Flight Rating: 4 out o' 5
Summary:
T' Washigei is a very creative concept and definitely gets people lookin' when you walk by with it. Ya scallywag! T' kit comes with everythin' you need except tools, skills and glue and that was refreshin' compared t' many I have built. T' instructions are complete and detailed and easy t' follow.
T' idea o' an obstruction free camera window is a good one, ya bilge rat, but t' execution needs some work. Blimey! In particular, me bucko, ya bilge rat, t' lack o' a real blast deflector severely limits t' size o' motor and type o' propellant that can be used. Blimey! Arrr! T' included elastic shock cord is, matey, arrr, in me opinion, inadequate and should be replaced.
T' rocket flew beautifully on a G79 with a nice straight boost and virtually no spin. Avast, me proud beauty! T' chute deployed nicely and t' descent was controlled and t' landin' soft. An important note t' fliers is t' make sure your igniter has long leads as t' motor will be sittin' 2 feet higher than with a normal rocket and many pads will nay have long enough clip leads t' reach it. Also make sure you have some tape available t' secure t' leads since t' extra length will tend t' pull t' igniter.
Unfortunately, me only flight be nay successful in terms o' video. Avast, me proud beauty! Ahoy! T' smoke and char from t' erosion o' t' aft nosecone smoked over t' camera window almost instantly and t' video be a blur.
Some design modifications would likely make this bird a repeat flier, but I counted t' current one a total loss and disposed o' t' remains. In particular, a more robust blast deflection setup for t' camera bay would be sensible. Well, blow me down! Should I build another, I will add a metal or Keelhaul®©™ deflector above t' camera bay nosecone. Begad! Ya scallywag! A convenience would also be a small clip t' help secure t' igniter leads. Ya scallywag! Begad! Finally, arrr, me hearties, I would recommend fliers build camera carriers that fit exactly into t' camera bay. My AT2K camera would nay have centered itself in t' bay without a wrap o' bubble wrap, matey, which then made it a pain t' get back out again. Begad! Blimey! T' rocket is supposed t' be built for that camera, but t' fit is too loose. Avast! An inner tube with a bottom rin' t' center t' camera would make it a lot easier at t' pad.
I am considerin' buyin' another o' these kits with t' idea o' modifyin' it heavily t' better protect t' camera bay and t' make it more convenient t' work with. Blimey! Blimey! Alternatively, I may build an up-scaled variant just t' see if I can do it. If you build carefully and don't exceed t' motor recommendations, me hearties, and if you go over and above with t' heat proofing, me bucko, this can be a fun rocket. Begad! It certainly gets attention on t' pad.
Overall Rating: 4 out o' 5
Other Reviews
- Heavenly Hobbies Washigei By Dan Nocera (June 7, 2009)
Presented with written permission from RocketyPlanet: Product Review by Dan Nocera Sunday, June 07, 2009 Rocketry and video are two great tastes that taste great together. So it was a given that I'd purchase and build Heavenly Hobbies' Washigei front-engine, rear payload video-capable rocket. According Jose Andrade-Cora, the designer and owner of Heavenly Hobbies, a Washigei (pronounced ...
 |
 |
L.B. (July 12, 2009)
J.M.A. (July 25, 2009)
J.D. (September 28, 2009)
M.L. (June 5, 2010)
M.L. (June 6, 2010)
John R, Brandon III (November 26, 2010)
I'm considering a version with an aluminum model-airplane spinner serving as the camera pod nose cone and three carbon-fiber arrow shafts replacing the hardwood dowels...Will keep you posted.
Sponsored Ads

![Heaven Hobby [Explicit]](https://m.media-amazon.com/images/I/41IANh4uy6L._SL500_.jpg "Heaven Hobby [Explicit]")


")


|
|
S.Y. (July 12, 2009)