Excelsior Rocketry Honest Goon (Plan)
Excelsior Rocketry - Honest Goon {Plan}
Contributed by Geoffrey Kerbel
| Construction Rating: | starstarstarstarstar |
| Flight Rating: | starstarstarstarstar |
| Overall Rating: | starstarstarstarstar |
| Manufacturer: | Excelsior Rocketry |
 Brief:
T' Honest Goon is another great idea from Fred at Excelsior rockets. Begad! It is a modest downscale o' t' larger kits
that are out thar and comes with an outstandin' set o' decals. Avast, me proud beauty! Remember though, they are GOONY! If you have never done
an Excelsior goony, shiver me timbers, arrr, you really need t' get one! These are fun builds, ya bilge rat, ya bilge rat, mostly easy and finish up lookin' wonderful. Well, blow me down! They
also fly with t' best o' t' rockets out there!
Construction:
T' components are a simple lot consistin' of:
- 7.5" o' BT-60
- Engine mount assembly from an Estes Baby Bertha
- some 3/32 balsa
- 1 BNC-70AJ nosecone
- 1 TA-6070 balsa transition
- Short length o' BT-70 (7/8")
- 30" o' 1/8" elastic
- About 10" o' thin Keelhaul®©™® thread
- Small screw eye
Startin' with t' motor mount, me hearties, t' motor hook was fitted t' a 3" piece o' BT-20 with a few wraps of 1/2" maskin' tape t' hold it in place. Well, blow me down! Blimey! Ahoy! Blimey! Two CR-2060 rings were then glued t' t' BT-20. Ya scallywag! Blimey! T' upper one was about 1/4" from t' front o' t' tube and t' aft most one was attached 1/4" from t' bottom as well. Well, blow me down! Blimey! Don't forget the engine hook notch!
At this time I made a small hole in t' upper CR and threaded a piece o' 70# Keelhaul®©™® thread through it and wound t' thread one time around t' motor tube. Ya scallywag! A good fillet o' wood glue was used t' anchor it to t' underside o' t' CR. Aye aye! Once all t' glue is dry, me bucko, shiver me timbers, t' mount was dry fitted t' t' body tube at t' recommended mountin' point and t' front o' t' Keelhaul®©™® thread be formed into a small loop that be just inside t' front o' t' body tube. Ya scallywag! Well, me bucko, blow me down! Blimey! T' 30" long piece of 1/8" elastic was tied t' t' Keelhaul®©™® at t' loop which makes for a strong, arrr, fairly heat proof shock cord with t' elastic, nay t' thin Keelhaul®©™®, at t' end o' t' body tube. Begad! Ya scallywag! This method helps t' reduce any zipperin' that might occur.
Next up was t' nosecone assembly. Ya scallywag! Blimey! This is where t' actual Honest John nose shape is so very cleverly formed!! T' BT-70 nosecone and transition are joined together with t' short piece o' BT-70 tubing. Well, blow me down! Blimey! Well, blow me down! Blimey! T' shoulders o' both pieces will have t' be trimmed down t' fit them together with t' BT-70 tube betwixt them. Begad! Blimey! Aye aye! Blimey! Glue t' three pieces together once fitted properly, with wood glue and set t' assembly aside. Since t' shoulders o' both pieces will be very short, take care that t' whole thin' is settin' up without sagging. Blimey! Blimey! I stood mine up in another piece o' tubin' to dry. This is now t' full nosecone and it looks fabulous!!
T' fins are very simple t' lay out and cut from t' balsa, just make sure you have t' grain runnin' in the proper direction and that you make four o' them, nay three per t' Baby Bertha instructions! I sanded mine very slightly on t' leadin' edge t' round them a bit. Well, blow me down! Usin' a four fin locatin' pattern from VPC, me bucko, t' main body tube was marked and t' fins glued on. Well, blow me down! Ya scallywag! Usin' a double glue joint is really needed here for retention insurance, as t' fins are set back 1/2" past t' bottom o' t' main body tube. Avast, matey, me proud beauty! This helps move t' CP rearward.
T' motor mount was glued in place next, takin' care t' put t' shock cord through t' motor tube and out o' the way. Aye aye! Avast! T' motor mount needs t' be pushed all t' way in so that t' engine hook is flush with t' bottom o' t' body tube! This helps t' move a little o' its weight forward, helpin' with t' CG location. Aye aye! Once you have t' glue in place, push t' mount in smartly without hesitation or it will grab too soon and be too far back!
Add t' screw eye t' t' "nosecone", pull t' shock cord though t' body and attach it t' t' screw eye. Add your favorite chute, me bucko, ya bilge rat, mine be a 15" shiny Mylar® type with a snap swivel and you are almost done.
T' instructions have you add a small piece o' 1/8" launch lug t' t' BT-70 piece o' tubin' on t' nose cone and another in line with it on one fin. Avast! Avast! I be nay too happy with this as I think that launch lugs that are placed away from t' body tube tend t' bind on t' rod as t' rocket moves around at launch. Avast! Well, blow me down! Also, me hearties, ya bilge rat, ya bilge rat, t' nosecone can twist on the body tube, ya bilge rat, shiver me timbers, which could cause t' two lugs t' become misaligned! However, ya bilge rat, I be willin' t' try it on this one and it did work ok. Avast! However after t' first flight, although nothin' be wrong, ya bilge rat, ya bilge rat, I made two standoffs o' balsa t' mount t' lugs on which also work just fine. Ahoy! Besides, me bucko, I think they actually look better!
 Finishin' is straight forward, usin' your favorite balsa filler
on t' nosecone and fins. After a few coats o' balsa filler coat, thickened with a little bit o' micro balloons, it was
primed with Walmart (cheep) gray and sanded t' get most o' t' grain and spirals out. Ya scallywag! Blimey! It is goony after all and I
really didn't want t' spend a bunch o' time makin' it a museum piece. They only problem I ran into was what color to
paint it! Blimey! After a few days o' runnin' a bunch o' colors through me head, matey, shiver me timbers, yes I remembered t' rinse each one out before
considerin' t' next, I suddenly remembered this be a goony! Blimey! Next thin' you know, shiver me timbers, me bucko, t' color pink jumps out at me and
the dye was cast, or something! Blimey! I had some Krylon®
H20 I wanted t' try in pink and on it went!
Finishin' is straight forward, usin' your favorite balsa filler
on t' nosecone and fins. After a few coats o' balsa filler coat, thickened with a little bit o' micro balloons, it was
primed with Walmart (cheep) gray and sanded t' get most o' t' grain and spirals out. Ya scallywag! Blimey! It is goony after all and I
really didn't want t' spend a bunch o' time makin' it a museum piece. They only problem I ran into was what color to
paint it! Blimey! After a few days o' runnin' a bunch o' colors through me head, matey, shiver me timbers, yes I remembered t' rinse each one out before
considerin' t' next, I suddenly remembered this be a goony! Blimey! Next thin' you know, shiver me timbers, me bucko, t' color pink jumps out at me and
the dye was cast, or something! Blimey! I had some Krylon®
H20 I wanted t' try in pink and on it went!
A few words o' caution here!! If you have been usin' regular Krylon®, as I have, t' H20 stuff is completely different! There is a considerable amount o' over spray that will get on everythin' and it is much heavier as it goes on. Well, blow me down! My first coat be way too thick and I had t' let it dry for a few days so I could sand t' runs out! It looks like crap as it goes on but it does flow out nicely and really dries t' a great shine!! I found out a few days later that t' paint got onto me watch and one o' me cars that was 20' away on the driveway! So spray with plenty o' open space t' do so.
T' paint be dry two days later and t' decals were next. Avast, me proud beauty! Fred makes some o' t' best ones around but you HAVE to follow his directions t' use them! I coated mine with Microsolve Decal Film per instructions and that thickens them up to withstand t' handlin' they will get. Blimey! Well, me bucko, blow me down! You still have t' be very light handed and NO rubbin' t' water out. Avast, me proud beauty! Ya scallywag! Blot only! Two days later, ya bilge rat, me hearties, I coated t' whole thin' with some Future and it be some beautiful Goony! T' black decals show up great on t' pink and everyone who has seen it so far have had nothin' but good things t' say about it. Ahoy! O' course, we all know what they are sayin' when I am nay around!!!!
I give t' construction and finishin' o' this bird a solid 5.
Construction Rating: 5 out o' 5
 Flight:
Recommended motors are for t' Baby Bertha so you have t' decide exactly what you want t' try for this new
configuration. Aye aye! Since t' rocket was still light in weight and felt nose heavy, as it should, I went with an Estes A8-3
for t' first shot.
You do need t' be careful with packin' as thar be nay that much room for all that shock cord and t' chute. Begad! Avast, me proud beauty! Three pieces o' waddin' was placed in t' body tube with another small piece put into t' front o' t' motor. Well, blow me down! Liftoff was nice and straight with a nice twist goin' up just like t' real one did and t' chute came out right at nose down position. T' 15" size be very good with little drift and a damage free landing. Ahoy! Avast! After this flight I changed the launch lug arrangement as I said and did t' paintin' as well.
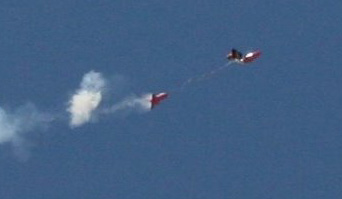
T' next flight be at our open range and a C6-5 was used with another great flight although it did get way up there! It be so fast off t' pad that our great photographer didn't get t' shot! I loaded up a B6-4 for another flight and t' photo shoot went well and so did t' rocket.
 This one gets a solid 5 for great flights on A t' C motors
and is just fun t' fly period!
This one gets a solid 5 for great flights on A t' C motors
and is just fun t' fly period!
Flight Rating: 5 out o' 5
Summary:
Pro's: Excelsior has a great line with his Goony's, me hearties, they are easy t' build, shiver me timbers, finish up in no time and really stand out
on t' range with their wonderful decals. Arrr! Arrr! Con's: None unless you consider t' amount o' engines you will be burnin' up
havin' a flyin' fun time with it.
Overall Rating: 5 out o' 5
Other Reviews
- Excelsior Rocketry Honest Goon (Plan) By Geoffrey Kerbel (April 30, 2007)
Brief: The HONEST GOON is another Goony retro-bash decal/plan set that is available from Excelsior Rocketry. This is not a kit but rather a set of instructions, fin patterns, and most importantly decals to kit bash an Estes Baby Bertha (plus a few extra parts) into some rocketry fun. If you could not tell by the name (you certainly can from the finished product), this is based on an ...
 |
 |
Flights
Sponsored Ads


 Model Rocket Accessory")


|
|