| Manufacturer: | Semroc  |
Brief:
This be t' new Semroc A10-0T booster unit for t' Centurion, ya bilge rat, Vega, and Goliath rockets. It is meant for existing, arrr, single stage rockets usin' t' ST-16 (old Centuri style) body tubes. Ya scallywag! It will be interestin' t' stage a 13mm booster t' a 18mm sustainer. Blimey! I've never used a lower powered booster (A10) with a higher powered sustainer (B6 or C6, a A8 is also listed as a sustainer engine).

Construction:
T' booster kit consists of:
- 1 Body Tube ST-825
- 1 Engine Tube ST-520E
- 1 Rin' Coupler HTC-16S
- 1 Rin' Set CR-EM-516
- 1 Engine Hook EH-18
- 1 Shroud Sheet IEM-516B
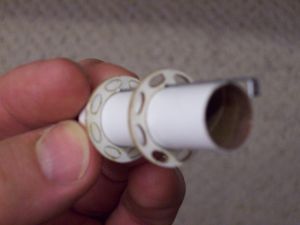
All parts are pretty much standard except for t' centerin' rings. Begad! Blimey! T' laser cuts are tight and clean. Blimey! Blimey! T' centerin' rings for t' ST-5 series engine tube have eight elliptical holes cut into them. Arrr! Blimey! I would assume this is for ventin' while staging. Read through t' directions before building. Begad! Blimey! With two shrouds and four centerin' rings, ya bilge rat, take it slow and follow directions.
I reinforced all t' tube ends with Super Glue.
STEP 3: I sanded t' tube coupler's ends flat and square with a sandin' block. I wanted t' (slightly) increase t' gluin' surface.
 STEP 5: T' small centerin' rings (with t' eight holes) fit too loosely on t' 5 series engine tube. Avast, me proud beauty! I build up t' inside edge o' t' rin' with some "rings" o' white glue. Blimey! T' instructions suggest usin' CA t' glue them in place. T' instructions suggest: "Make sure t' keep glue out o' t' holes". Ya scallywag! You would have t' use a Teflon tube out t' front o' your CA bottle t' control t' flow. Aye aye! T' holes are very close t' t' body tube/rin' joint.
I was reluctant t' apply a thin film o' CA around t' rin' edges before punchin' out t' holes. Ya scallywag! Arrr! I was afraid t' glue would get into t' holes. Arrr! I punched out t' holes, then applied glue t' t' edges o' t' rings.
T' instructions say "A thin film o' CA around all t' rin' edges harden them and keep them from de-layering. Blimey! Blimey! After I easily punched out t' holes, matey, I noticed outside layer o' t' rin' was startin' t' peel. Avast! Blimey! T' CA layer held down t' liftin' layer.
 STEP 6: Says t' slide t' engine mount inside t' body tube until t' end with t' hook is even with t' body tube. T' hook will over hang slightly. Ahoy! It just didn't read well. Blimey! I know they meant that t' engine tube should be even with t' outside (larger diameter) tube. Well, blow me down! Ahoy! T' hook overhangs more than slightly, it overhangs by 1/4".
STEP 8: Normally I hate paper shrouds. Ya scallywag! Hate paper shrouds! T' shroud material be glossy on one side and matte on t' other.
I wanted t' printed lines on t' inside, me bucko, so t' glossy surface ended up on t' outside. Begad! For once, me hearties, these paper shrouds glued together without any problems. I pre-curled them over a thick Sharpie pen barrel. Ahoy! One thin coat o' white glue be enough for t' glue tab t' hold well.
T' paper used for t' shroud went together smoothly, with no bumps or bends. Ya scallywag! Blimey! But when glued together, t' seams were opposite. One upper-smaller shroud overlaid t' t' right, me bucko, t' lower shroud tab laid t' t' left. Blimey! There wasn't any other way t' correct this unless I would make one shroud with t' gloss surface out, t' other with t' matte paper side out. Avast! Nay really a big deal. But, (on one shroud pattern) Semroc may want t' switch t' side t' tab sits on.
Both shrouds fit well. Arrr! Arrr! I had t' widen t' mouth o' t' larger shroud slightly t' fit over t' ST-8 main tube. It's nay a fault o' t' shroud pattern, paper shrouds always seem t' need a little adjustment.
Finishing:
Even without paint, arrr, t' finished look is great! On me Centurion t' booster extends 1 1/4" beyond t' trailin' edges o' t' fins, arrr, ya bilge rat, but it still looks cool. Avast, matey, me proud beauty! And structurally it feels strong.
With t' gloss paper surface on t' outside, I really don't have t' paint it. But t' exposed browned edge o' t' upper centerin' rin' will need a touch up.
I enjoyed t' build. Begad! Avast! It's nice when t' shrouds cooperate.
Construction Rating: 4 out o' 5
Flight:
With t' engines installed and t' booster unit in place, shiver me timbers, shiver me timbers, t' engines ends are separated by about 3/8". Begad! I tested t' fit with a A10-0T in t' Booster 16 and a C6-5 in me Centurion.
Summary:
PROS: A fun build and t' shrouds cooperated for once!
CONS: When built, t' shroud tabs face opposite sides. Blimey! One goes t' t' right, me hearties, t' other t' t' left.
Overall Rating: 4 out o' 5
Other Reviews
- Semroc Booster 16 By John Lee (February 14, 2009)
Brief: In anticipation of Estes' announced re-release of A10-0 motors, Semroc has released a CHAD booster stage designed to fit rockets utilizing their series 16 body tubes. One of the named rockets is the Semroc Centurion and I decided to give my Centurion a booster. Construction: The kit consists of a pair of paper shrouds, an engine hook, a motor tube, a body tube, a pair of ...
 |
 |
M.G. (July 23, 2009)
|
|
M.G. (March 28, 2009)