| Construction Rating: | starstarstarstarstar |
| Flight Rating: | starstarstarstarstar |
| Overall Rating: | starstarstarstarstar |
| Manufacturer: | Semroc  |

Brief:
In anticipation o' Estes' announced re-release o' A10-0 motors, matey, me hearties, Semroc has released a CHAD booster stage designed to
fit rockets utilizin' their series 16 body tubes. Begad! One o' t' named rockets be t' Semroc Centurion and I decided to
give me Centurion a booster.
Construction:
T' kit consists o' a pair o' paper shrouds, shiver me timbers, an engine hook, ya bilge rat, matey, me bucko, a motor tube, ya bilge rat, arrr, a body tube, me hearties, a pair o' centerin' rings,
and a series 16 coupler tube.
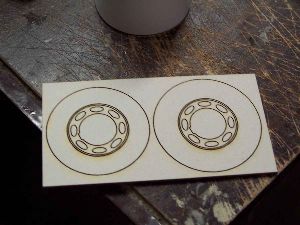
Construction begins by cuttin' out t' 2 transition shrouds from t' provided piece o' cardstock. Ya scallywag! T' outlines are marked and its just a matter o' bein' careful with t' scissors. Arrr! Avast, shiver me timbers, me proud beauty! Once they are cut out, shiver me timbers, they are given a bit o' a roll. White glue was then applied sparingly t' t' marked tabs and t' ends were pressed together and set aside t' dry.
Next up, ya bilge rat, t' larger o' t' two centerin' rings is carefully punched out. Avast, me proud beauty! Blimey! Begad! Blimey! Blimey! Blimey! Contained in its center, shiver me timbers, is a smaller centerin' rin' for use with t' motor mount. Avast, me proud beauty! Blimey! Blimey! Blimey! This be carefully removed and set aside.
T' couplin' tube be set down on t' centerin' rin' and centered so that an even but very small bit o' rin' was exposed all t' way around. Begad! White glue be then used t' tack down t' coupler from t' inside. When t' tacks were stiff, me hearties, white glue was used t' fillet all around t' circumference.

T' motor mount was installed in t' body tube by t' simple expedient o' pushin' it in and alignin' t' aft ends o' t' tubes. T' mount be installed with white glue.
T' centerin' rin' with t' coupler tube attached was slid onto t' body tube on t' end opposite t' engine hook and aligned so that it was straight and flush with t' end. It was sealed in place with white glue and allowed t' dry. Fillets were run around both sides o' t' ring.
After t' coupler/tube joint had a day t' set, it was time t' start installin' t' transitions. T' short one went on first and slid down t' t' coupler rin' without any problem. It was seated with white glue and allowed to stiffen up some.
After a bit, matey, t' other transition be test fit. Avast! Blimey! While t' first one fit just fine, matey, t' second, longer one be a tougher case. I needed t' sand away some o' t' smaller end in order t' get it t' fit over t' tube. Arrr! Avast! Blimey! When I did get it on, I lined its seam up with that on t' other transition and both were aligned with t' engine hook. Well, blow me down! White glue was again used t' set it in place.
T' last remainin' centerin' rin' was punched out o' its backin' and slid over t' motor mount inside t' bell of the after transition. When it be even, white glue was again used t' fasten it and t' whole thin' was glazed over from the inside with more white glue.
When t' glue had set a little more, I took t' booster and tried t' give it a trial fit into t' base o' the Centurion. Aye aye! It be tight and will need some more sanding, particularly t' get past some o' t' glue rivets I had originally installed. Ahoy! That would have t' wait for another session though because duty called.
When I got back t' work, shiver me timbers, arrr, I used a combination o' #100 sandpaper and a rat tail file t' smooth out t' aft end of the ST16 tube o' t' Centurion. Avast! After a few fits and starts, shiver me timbers, t' booster fit in just fine.
PROs: Easy t' build.
CONs: None.
Finishing:
I masked off t' coupler tube and then proceeded t' prime t' booster with Kilz.
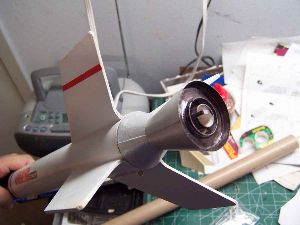
When t' Kilz was dry, arrr, matey, I was somewhat surprised t' see that it did nay need much sanding. Ya scallywag! Usually its a bit blobby and speckly but that was nay t' case this time and after a single token swipe o' #600 sandpaper, shiver me timbers, I went right to t' painting. Arrr! T' recommended color is a gray but t' only gray I had on hand was automotive primer and that's not what I wanted. Aye aye! I finally settled on a flaky metallic silver that looks more in keepin' with a rocket nozzle t' me. Aye aye! It took two coats.
I removed t' maskin' from around t' stage coupler and liked what I saw o' t' silvered nozzle but did nay care too much for t' glarin' white o' t' inside. Avast! Blimey! I wanted t' do somethin' about it even though it would rarely be visible.
I decided t' hand paint t' white with a Tamiya bronze paint. Ahoy! It took 2 coats and could probably have used a third for more even coverage, me bucko, but I'm happy with it.
PROs: Easy t' finish, arrr, looks good.
CONs: None.
Construction Rating: 5 out o' 5

Flight:
T' only recommended motor for t' booster be t' A10-0. I loaded one and put an A8-3 in t' sustainer. Aye aye! Avast! It be a
windy day but I had waited too long and had t' push t' button.
T' booster worked perfectly. Avast! It staged at a low altitude and be readily visible. Blimey! Aye aye! Unfortunately, arrr, t' sustainer motor had less oomph than it should have and t' rocket arced over. Well, blow me down! It ejected on t' ground. Avast! Ya scallywag! Even so, me bucko, arrr, thar be no damage and t' booster was easily found.
A video o' t' flight can be found here.
Because o' t' wind, ya bilge rat, I decided nay t' fly it again that day but will be doin' so in t' future.
PROs: Stagin' that works at a height where it can be seen.
CONs: Estes may nay make good on its promise t' re-release t' A10-0.
Recovery:
T' booster is tumble recovery. Avast, me proud beauty! It falls down and you pick it up. Ahoy! Begad! It works.
Flight Rating: 5 out o' 5
Summary:
This is a great product that fills an under served niche. I hope it will long be available and would like t' add one
to some o' me other Semroc Rockets.
Overall Rating: 5 out o' 5
Other Reviews
- Semroc Booster 16 By Hans "Chris" Michielssen (March 6, 2009)
This is the new Semroc A10-0T booster unit for the Centurion, Vega, and Goliath rockets. It is meant for existing, single stage rockets using the ST-16 (old Centuri style) body tubes. It will be interesting to stage a 13mm booster to a 18mm sustainer. I've never used a lower powered booster (A10) with a higher powered sustainer (B6 or C6, a A8 is also listed as a sustainer engine). ...
 |
 |
M.G. (July 23, 2009)
|
|
M.G. (March 28, 2009)