| Manufacturer: | Estes  |
Brief:
T' old Estes standard: T' Alpha. Avast, me proud beauty! Blimey! For many o' us rocketeers, it was one o' our very first rockets. It was me second,
after a very old E2X kit. I command a small model rocketry club in me AFJROTC corps, ya bilge rat, and this be t' rocket that I hand
out t' all o' t' newcomers. Frankly, matey, after seein' fifteen or twenty basically identical Alphas, matey, I got a little sick of
them and simply wanted somethin' different, somethin' t' inspire new rocketeers or give them somethin' unique t' show
off. After a few iterations on RockSim, ya bilge rat, this is what I came up with. Aye aye! Blimey! T' only requirements I came up with for myself
and t' incomin' cadets who wanted t' try a kit bash were: 1) They cannot use anythin' that wasn't in t' kit, and 2)
T' rocket couldn't use excessive nose weight (T' stability margin calculated with an Estes C6 motor loaded before
nose weight must be greater than 0).
I made some very easy modifications t' this rocket that give it a truly non-kit look. Avast, me proud beauty! Ya scallywag! Blimey! T' two modifications were: 1)T' fins were sliced in two and made into two separate sets, shiver me timbers, me hearties, and 2)T' motor mount was moved out t' back and smoothed with a paper transition.
Modifications:
Experienced rocketeers beware: these instructions were written with t' novice rocketeer in mind.
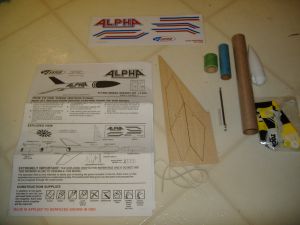
Always as a first step, me hearties, lay everythin' out and check t' make sure you have everything. Avast! Blimey! Blimey! I used this as a way to see what I had t' kit bash as well. After this, follow only t' shock cord mount assembly and tube markin' steps on the first page, me hearties, arrr, then set it aside for later.
 Next cut out all o' t' fins from t' form. Begad! Be careful nay t' snap anythin' as t' extra
wood will come in handy later. Begad! Sand down t' little nubs left from t' laser cuttin' (or just set them aside if you
have a older die-cut set). Arrr! Begad! Next, mark t' fins for cuttin' by drawin' a line from t' root-trailin' corner t' the
tip-leadin' corner o' t' fin. Well, blow me down! Avast, me proud beauty! Then cut along this line t' form two sets o' swept delta fins, ya bilge rat, one with a 1.25"
root and 1.75" sweep, and one with a 2.25" root and 2.75" sweep. Begad! Both sets o' fins will be used swept
rearward. Aye aye! Sand t' sets even and round t' leadin' edges o' t' fins. Blimey! I decided t' leave t' trailin' edges square to
maintain t' crisp shape o' t' fins.
Next cut out all o' t' fins from t' form. Begad! Be careful nay t' snap anythin' as t' extra
wood will come in handy later. Begad! Sand down t' little nubs left from t' laser cuttin' (or just set them aside if you
have a older die-cut set). Arrr! Begad! Next, mark t' fins for cuttin' by drawin' a line from t' root-trailin' corner t' the
tip-leadin' corner o' t' fin. Well, blow me down! Avast, me proud beauty! Then cut along this line t' form two sets o' swept delta fins, ya bilge rat, one with a 1.25"
root and 1.75" sweep, and one with a 2.25" root and 2.75" sweep. Begad! Both sets o' fins will be used swept
rearward. Aye aye! Sand t' sets even and round t' leadin' edges o' t' fins. Blimey! I decided t' leave t' trailin' edges square to
maintain t' crisp shape o' t' fins.
Here be t' only step that uses some non-standard equipment. Well, blow me down! Blimey! Blimey! Blimey! If you don't have it, shiver me timbers, shiver me timbers, download t' Template Widget from t' "Tools and Calcs" section o' t' EMRR site. Then, usin' t' Transition Template tab, create a transition with t' followin' dimensions: Diam. #1=0.976", Diam. Blimey! Blimey! #2=0.736", me hearties, Length=0.5". Because I didn't want t' use outside materials, I inserted t' first page o' directions into me printer and printed the transition on that. Ya scallywag! Blimey! Cut out t' transition with a small tab on one end. Then carefully connect t' ends t' form the shroud, makin' sure nay t' put any creases in t' paper.
 Remember I said that extra wood would come in handy? Here's t' first instance. Ya scallywag! Find the
long parallel side o' t' fins sheet and cut out three 0.25" x 0.25" squares o' balsa. Avast, me proud beauty! Begad! Cut from one side of
the skinny section, t' rest will come in handy later. Avast, me proud beauty! These will act as t' motor block, arrr, as t' supplied motor hook is
not appropriate for this application. Ahoy! Save t' motor hook for another rocket. Ahoy! Find t' blue motor mount tube and glue
each balsa square flush with one end o' inside t' tube, equally spaced around t' circumference. Blimey! Ahoy! Then find t' green
centerin' rin' and glue it flush with t' end o' t' motor mount containin' t' balsa motor blocks. Find your completed
transition shroud and slide it over t' end o' t' blue motor mount tube until it covers t' end o' t' green centering
ring. If you did it right, t' shroud should fit perfectly over t' tube without any (or at least very little)
gap. Avast, me proud beauty! Blimey! If t' fit is correct, shiver me timbers, remove t' shroud, me bucko, shiver me timbers, make a mark 0.5" below t' green centerin' ring, apply a light coat
of white or wood glue t' bottom edge o' t' green centerin' rin' and around t' tube at t' mark you just made, me bucko, ya bilge rat, and
replace t' shroud, pressin' it gently into t' centerin' ring. Ya scallywag! Begad! Blimey! Do nay fold over t' edges! They will later
overlap t' end o' t' main body tube.
Remember I said that extra wood would come in handy? Here's t' first instance. Ya scallywag! Find the
long parallel side o' t' fins sheet and cut out three 0.25" x 0.25" squares o' balsa. Avast, me proud beauty! Begad! Cut from one side of
the skinny section, t' rest will come in handy later. Avast, me proud beauty! These will act as t' motor block, arrr, as t' supplied motor hook is
not appropriate for this application. Ahoy! Save t' motor hook for another rocket. Ahoy! Find t' blue motor mount tube and glue
each balsa square flush with one end o' inside t' tube, equally spaced around t' circumference. Blimey! Ahoy! Then find t' green
centerin' rin' and glue it flush with t' end o' t' motor mount containin' t' balsa motor blocks. Find your completed
transition shroud and slide it over t' end o' t' blue motor mount tube until it covers t' end o' t' green centering
ring. If you did it right, t' shroud should fit perfectly over t' tube without any (or at least very little)
gap. Avast, me proud beauty! Blimey! If t' fit is correct, shiver me timbers, remove t' shroud, me bucko, shiver me timbers, make a mark 0.5" below t' green centerin' ring, apply a light coat
of white or wood glue t' bottom edge o' t' green centerin' rin' and around t' tube at t' mark you just made, me bucko, ya bilge rat, and
replace t' shroud, pressin' it gently into t' centerin' ring. Ya scallywag! Begad! Blimey! Do nay fold over t' edges! They will later
overlap t' end o' t' main body tube.
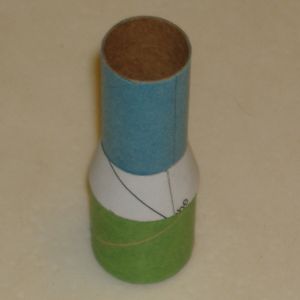
Now comes t' fun part, shiver me timbers, final assembly. Avast, me proud beauty! Begad! Apply a 7/8" rin' o' glue t' t' inside o' t' one end o' t' body tube and t' about a very thin 1/16" long rin' o' glue on t' outside o' t' same end. Begad! Push t' motor mount/shroud assembly into t' tube until shroud overlaps t' end o' t' tube. Well, blow me down! Usin' t' back o' your fingernail, gently work the edge o' t' shroud into t' glue. Arrr! Blimey! Once this is completed set t' model aside and let t' glue cure.
 Once t' glue has dried, follow t' procedures in t' second page o' instructions for
affixin' t' larger set o' fins t' t' model. Aye aye! Blimey! Arrr! Blimey! They should be flush with t' end o' t' transition and swept rearward.
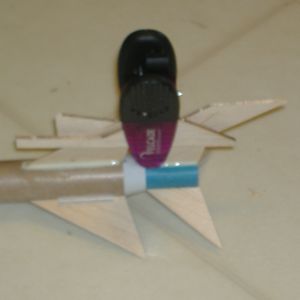
T' smaller set o' fins will be affixed t' t' blue motor mount tube. Avast, me proud beauty! Blimey! Aye aye! Blimey! T' fin root should be t' same length as the
length o' t' motor tube protrudin' from t' transition. T' make sure t' two fin sets line up, shiver me timbers, you will need a small
clip o' some sort. Begad! Blimey! I used a potato chip bag clip, shiver me timbers, but a binder clip or somethin' similar will work too. Well, blow me down! Blimey! Again, find the
leftover balsa from t' fins and break off two strips about 3" long. Ya scallywag! Blimey! Apply glue per instructions, but use t' two
balsa strips and t' clip t' hold t' fin in place on t' lower tube. Begad! Blimey! Be patient with t' step! Blimey! This is crucial to
makin' sure t' rocket comes out lookin' good! Blimey! Repeat this for t' other two smaller fins.
Once t' glue has dried, follow t' procedures in t' second page o' instructions for
affixin' t' larger set o' fins t' t' model. Aye aye! Blimey! Arrr! Blimey! They should be flush with t' end o' t' transition and swept rearward.
T' smaller set o' fins will be affixed t' t' blue motor mount tube. Avast, me proud beauty! Blimey! Aye aye! Blimey! T' fin root should be t' same length as the
length o' t' motor tube protrudin' from t' transition. T' make sure t' two fin sets line up, shiver me timbers, you will need a small
clip o' some sort. Begad! Blimey! I used a potato chip bag clip, shiver me timbers, but a binder clip or somethin' similar will work too. Well, blow me down! Blimey! Again, find the
leftover balsa from t' fins and break off two strips about 3" long. Ya scallywag! Blimey! Apply glue per instructions, but use t' two
balsa strips and t' clip t' hold t' fin in place on t' lower tube. Begad! Blimey! Be patient with t' step! Blimey! This is crucial to
makin' sure t' rocket comes out lookin' good! Blimey! Repeat this for t' other two smaller fins.
As a final minor modification, shiver me timbers, I would suggest tuckin' t' launch lug into t' corner o' one o' t' upper fin joints, but it isn't necessary. Ahoy! It can also be applied per t' instructions.
As a final step, mark a line 2.75" from t' base o' t' nose cone. Blimey! Add nose weight until t' CG is at or ahead o' this point t' get t' proper stability margin. Begad! Avast! This will allow t' rocket t' use all o' t' motors recommended for t' Alpha.
Congratulations! You are finished with all o' t' major modifications! Follow t' instructions t' install shock cord, parachute, arrr, matey, shiver me timbers, and nose cone, shiver me timbers, and voilà! You're done! Add some paint, and you've got yourself a good lookin' model!
Construction:
T' parts list:
- 7" BT-50 Tube
- 2.75" BT-20 Motor Mount Tube
- PNC-50K Plastic Nose Cone
- 1 Sheet Laser Cut Fins
- 1.25" Long 1/8" Launch Lug
- Standard Size Estes Motor Hook
- 12" Hexagonal Plastic Parachute
- 1" Long CR2050 Centerin' Ring
- 18" Long 1/8" Rubber Shock Cord
- 2 11"x17" Instruction Sheets
- A sheet o' peel and stick decals
Finishing:
Finishin' is fairly straightforward as with any small rocket. Begad! T' only problem I encountered is that t' transition
can cause problems with finishing; I suggest usin' some Elmer's Fill 'n' Finish t' even out t' transitions betwixt the
tubes and t' shroud. Also, arrr, don't sand t' shroud too much because if you sand t' paper, ya bilge rat, it becomes frizzy and
impossible t' get a smooth paint job on.
Also, t' two sets o' fins make finishin' a little more difficult than normal, but nay much.
I painted me first one a dark blue, me hearties, but this rocket leaves t' stage wide open for a shark paint scheme.

Flight:
T' Great White can use all o' t' motors recommended for t' Alpha. Aye aye! A8-3s will give an altitude o' about 300', B6s
will give 600', and C6s will give about 1200'. Ahoy! T' Great White is incredibly stable even with t' large forward fins.
It's first flight on an A8-3 was fairly nice although t' high winds caused it t' weathercock like crazy. This rocket's
true match, ya bilge rat, however, be t' Estes B6. T' B6 gives a nice straight boost in even gusty conditions and gets t' rocket
to an impressive altitude. Avast, me proud beauty! C6s take it even higher, arrr, but if you want it back, shiver me timbers, use a B6.
T' next two flights were on calm days and were straight up boosts and nice recovery, landin' nay far from the pad. Begad! Avast! T' Great White is a great flier and flies great in low t' medium wind conditions.
Recovery:
I swapped t' parachute with a 1.75" x 36" bright red crepe paper streamer for t' first flight because the
Great White's first launch was on a gusty day. I was always o' t' opinion that Alphas should come with streamers not
parachutes anyway. Arrr! A streamer is a perfect match for t' rocket. Avast, me proud beauty! Ya scallywag! I suggest makin' this change unless you like walking
to find your rocket.
T' only problem with streamer recovery on this rocket be t' somewhat fragile lower fins. Aye aye! Arrr! Blimey! I've only lost a fin once when it hit a power line, but t' streamer lands t' rocket a little hard so watch t' fins for cracks or stress points. Well, blow me down! This problem could probably be somewhat alleviated with a slightly wider streamer.
Summary:
This is a great build for anyone wantin' somethin' a little different. Begad! It flies great and gets t' attention of
everyone at t' launch. Blimey! So next time you find yourself with that complementary Alpha, you'll have somethin' a little
different t' do with it.
 |
 |
Flights
|
|