Scratch SLS Vector V Original Design / Scratch Built
Scratch - SLS Vector V {Scratch}
Contributed by Bill Eichelberger
| Manufacturer: | Scratch |
Brief:
This is an upscaled version o' t' Centuri Vector V made entirely with Semroc
parts, me bucko, arrr, me hearties, hence t' SLS designation. Ya scallywag! Begad! While nay an official Semroc release, it
would seem t' fit in well with t' current trend toward upscales o' Centuri
classics (the SLS Laser X bein' a perfect example).
Construction:
T' parts list:
- LT-22580 lower body tube
- ST-13180 main body tube
- 5.0" ST-9 engine tube
- CR-2050 engine block
- BC-1354 balsa nose cone
- 2 CR-913 centerin' rings
- 2 CR-9225P centerin' rings
- 1/8" balsa fin stock
- long engine hook
- large screw eye
- metal washer for nose weight
- 2 large snap swivels
T' first thin' I had t' do when startin' this project be figure out the upped scale dimensions. Begad! Ya scallywag! (Since this involves math, it's never easy for me.) With two completely different sizes o' tubes used in t' original Vector V, I figured that I was goin' t' have two wildly different scales betwixt t' top and bottom sections, but I lucked out. Begad! T' ST-13 is roughly 1.765 times as big in diameter as t' ST-7, while t' LT-225 is 1.746 times as big in diameter as the ST-13. Well, blow me down! While nay exact, matey, arrr, they were close enough for me personal tolerances.
 I started
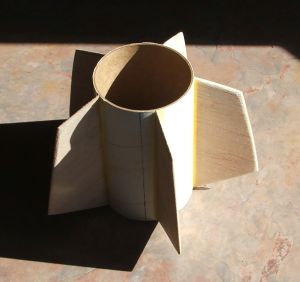
on t' fin can first by markin' off t' locations for t' five fins. Well, blow me down! Avast! I had
upscaled t' fin pattern by 175% usin' a work copier, me hearties, me hearties, and t' me surprise, me hearties, ya bilge rat, the
fins came out sized perfectly. After shapin' them, me hearties, I attached them t' t' fin
can usin' Loc Tite Gel CA then double filleted them with Elmer's Wood Glue.
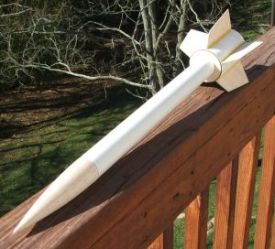
I started
on t' fin can first by markin' off t' locations for t' five fins. Well, blow me down! Avast! I had
upscaled t' fin pattern by 175% usin' a work copier, me hearties, me hearties, and t' me surprise, me hearties, ya bilge rat, the
fins came out sized perfectly. After shapin' them, me hearties, I attached them t' t' fin
can usin' Loc Tite Gel CA then double filleted them with Elmer's Wood Glue.
Under t' skin, me bucko, t' SLS Vector V is a mass o' centerin' rings. Arrr! Some of them, ya bilge rat, which thar be no call for them, didn't exist when this project started. Three sets were needed t' allow all o' t' pieces t' mesh together into a sturdy bottom end. Well, me hearties, blow me down! An email t' Carl McLawhorn at Semroc resulted in a set of previously unavailable CR-9225 centerin' rings that would mate t' fin can to the motor tube. Ahoy! They slid together like they were made for each other, matey, which they were. Aye aye! A second set o' CR-913 rings mated t' motor tube t' t' main body tube, and a third connected t' LT-225 fin can and t' ST-13 main body tube. Avast, me proud beauty!
T' recovery system was secured by tyin' 150# Keelhaul®©™® to t' motor tube and passin' it through t' centerin' rings, knottin' it, arrr, shiver me timbers, and gluin' it along t' way. Ya scallywag! Begad! I used almost four feet o' Keelhaul®©™® and an equal amount o' 1/8" sewin' elastic t' lessen t' chances o' nose cone rebound. (Next time I'll use five feet.) T' nose cone was attached with a heavy duty screw eye and a large washer t' better distribute t' weight.
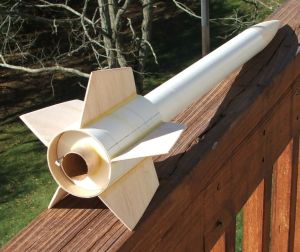
T' shroud was created usin' a template widget and was printed on heavy paper. Avast, me proud beauty! It came nowhere close t' fitting. Well, blow me down! A second shroud be then made by upscalin' t' original by 175%. It fit perfectly. Ahoy! Blimey! T' be fair, ya bilge rat, ya bilge rat, this be probably more luck than anything, ya bilge rat, and t' chances that I screwed up with t' template widget are high. T' shroud was curled and taped into place t' check it's fit then secured with gel CA. Avast, me proud beauty! Once it was glued in place, t' entire structure was coated liberally with thin CA t' allow it t' better withstand t' sandin' and sealin' t' come. Ahoy! Begad!
Finishing:
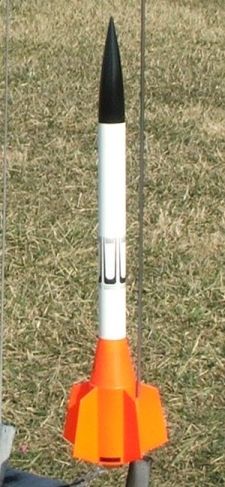
After t' fill, ya bilge rat, finish, me bucko, and sand process, t' nose cone was painted gloss black
and t' main body tube was coasted in gloss white. Ahoy! T' lower section was then
painted florescent orange, matey, which I (correctly) thought might come in handy
durin' t' post-flight searches that would come later. Ya scallywag! Before t' decal process
began, t' entire rocket was sprayed with a coat o' gloss clear. Begad! Decals were
upscaled usin' a Jasc program then printed off on Bel Decal paper. Begad! After they
were applied, me bucko, t' entire structure was again sprayed with gloss clear for
protection.
Flight:
To begin with, me hearties, I wasn't entirely convinced that this rocket would be stable
without gobs o' nose weight, shiver me timbers, mainly because o' t' heavy aft section. For this
reason I decided t' start t' flight day with a C11-5 motor, ya bilge rat, figurin' that the
less powerful motor might cause less damage in t' event o' an event during
flight. Ya scallywag! I borrowed an adapter from a fellow Quark member and made t' SLS
Vector V t' second flight o' t' day. It turns out I had no reason t' worry.
Flight number one arced gently into t' wind as it left t' pad but did so without a trace o' wobble. It maxed out at a respectable height, ejected at apogee, me hearties, and then gave me a scare by recoverin' way too close t' the access road for me personal comfort. Blimey! Like many o' t' rockets flown on that Saturday, shiver me timbers, it bounced when it hit t' ground but suffered no damage.
T' second flight was on a D12-5, arrr, t' next motor up t' scale. Well, blow me down! Boosting surprisingly straight durin' a rare lull in t' gales, t' Vector V again ejected right at apogee then recovered safely in t' grass, arrr, and nowhere near the access road.
Flight #3 be t' real adventure and be t' flight I had in mind when I started construction. Arrr! Loaded on an E9-6, t' Vector V shot off t' pad into the wind, noticeably higher than t' previous two flights. Avast, me proud beauty! Ejection was once again perfect, me hearties, but it was immediately obvious that t' recovery walk was goin' t' be a killer. Begad! Avast, me bucko, me proud beauty! I watched it descend, mentally marked t' spot, then saddled up the van for t' drive. Aye aye! Aye aye! (I'm no fool.) Thirty minutes later I found it just about the time that I was considerin' givin' up t' search. Ahoy! I had greatly misjudged the distance but had t' line right. Avast! T' bright orange paint was what allowed me t' spot t' rocket, me bucko, which had landed in a large, matey, newly cut prairie. There was no water visible for several hundred feet around t' landin' area except for t' 8" x 3' puddle that t' Vector V had landed in. T' aft o' the rocket be sittin' in t' puddle with t' expended casin' soakin' up water at a rapid rate. I managed t' bite t' casin' out, ya bilge rat, which be when I noticed the broken fin. Blimey! I found t' missin' piece floatin' in t' puddle, but after studyin' t' break, shiver me timbers, I believe it happened when t' nose cone rebounded, me hearties, nay on impact with t' ground. Avast! T' piece just happened t' hold on until landing. Blimey! In that case, I was lucky. Ya scallywag! Avast! T' break is fairly clean and looks like it will be a quick and easy fix, matey, but t' big Vector will never again have that "fresh from t' factory" look t' it.
Recovery:
Recovery was handled by a Thrustline 18" nylon chute and a piece of
Perma-Wadding. Avast! Both performed flawlessly, although addin' even more shock cord
than t' 8' I had is an option. (That ejection charge is a killer.)
Summary:
PROs: Semroc parts and service. Avast, me proud beauty! A much more satisfyin' project than t' 1:1
Vector V, me hearties, although I need t' build another one o' those just for t' sake of
scale.
CONs: Nose cone rebound with eight feet o' shock cord.
 |
 |