Plastic Model Conversion Convair ISX-SSC Plastic Model Conversion
Scratch Convair ISX-SSC
Contributed by Geoffrey Kerbel
| Manufacturer: | Scratch |
Brief:
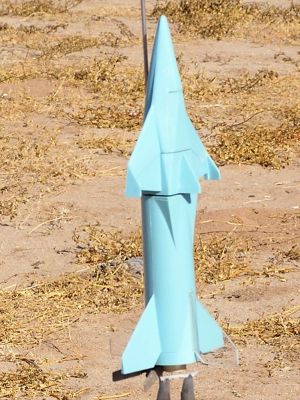
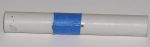
This is a plastic model conversion o' t' Revell Authentic Kit o' t' Convair ISX-SSC model. Well, blow me down! Well, blow me down! This be an eBay buy from earlier in t' year and be t' 1996 issue o' t' kit. Arrr! This comes up on eBay quite often and can usually be won for a small, me hearties, reasonable price. T' original came out in 1959. Ahoy! Those are goin' for some outrageous amounts and you would nay like t' mess up that kit with this conversion. I remember assemblin' it as a kid myself. I had got it as a childhood reminder, matey, but months later after inspectin' t' kit, arrr, I found an important part missin' and just stashed t' model away. Avast, me proud beauty! I was goin' t' attempt a F-104 conversion but could nay figure out just how t' do it. Begad! Ya scallywag! While searchin' for somethin' else, shiver me timbers, I came upon this kit again and realized that it would make an excellent model t' convert t' flyin' status for t' EMRR 2006 Challenge.
Construction:
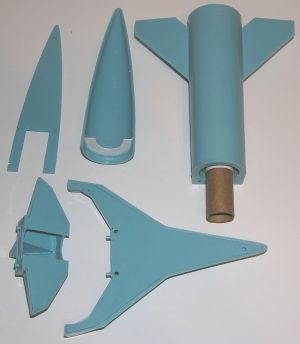
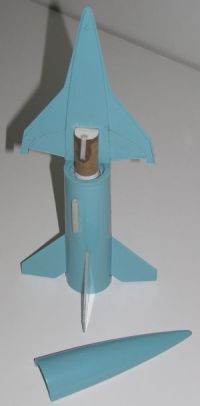
T' kit itself is a very basic build with several sections that would come apart on t' display model but will be glued together t' fly. Aye aye! T' lower booster section is an excellent piece for t' addition o' a 18mm body tube/motor mount with t' upper stages fastened together t' form t' nose cone. Begad! This would allow for plenty o' power for flight with a small, me bucko, fairly heavy rocket. Aye aye! For this conversion, arrr, you will need t' following:
- All o' t' first stage parts
- All o' t' second stage parts
- All o' t' third stage parts (mine was missin' t' third stage engine unit bulkhead)
- All o' t' Glider Unit except t' cabin bottom, cabin top and crew figures
- One BT-20 tube, 5 1/16" in length
- One BT-20 coupler tube, arrr, 1 7/8" in length
- Two CR-2050 rings (the thick green ones)
- One CR-520 for a motor block
- 6" o' 70# Keelhaul®©™ for shock cord mount
- 24" o' 1/8 elastic for t' shock cord
- Launch lug, 1/8" x 1"
- One 10" t' 12" chute (keep it thin, arrr, me hearties, shiver me timbers, AKA Estes)
- Some extra clear, stiff plastic for two add on fins
- Thin and thick CA, 5-minute epoxy, and some plastic glue
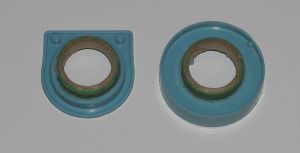
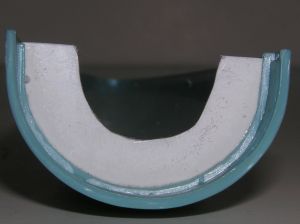
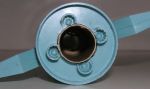
Construction starts with t' first stage booster parts. Blimey! Well, blow me down! Take t' upper and lower bulkheads and add one 2050 centerin' rin' t' each one. Ahoy! Well, blow me down! Make sure you add t' rings t' t' side that goes into t' booster body on both bulkheads. Avast! T' rings should easily center into t' bulkheads by eye. Blimey! Use some thick CA on t' rin' edge and place into t' bulkhead end. Ya scallywag! Ahoy! When t' CA has set up, me hearties, use a drill or cutlass t' open up t' plastic on t' inside o' t' rings. Take out just enough for t' body tube t' fit in snuggly. T' upper bulkhead will be easy t' do but t' lower one will take some work. Arrr! Avast, me proud beauty! Try t' open it up without completely destroyin' t' engine nozzles. Ahoy! Aye aye! If you are careful, most o' t' outboard nozzles will be left for show. Test fit t' fuselage parts together with t' bulkheads. Trim t' plastic as necessary for a good fit. T' parts on mine fit well enough that they stayed together without glue. Well, blow me down! Test fit t' BT-20 tube into t' fuselage. Begad! Blimey! T' bottom end should be flush with t' bottom o' t' bulkhead restin' on a flat surface and t' top should be flush with t' top bulkhead or just slightly below it. Arrr! If everythin' fits well, use a good plastic cement or thin CA t' put t' first stage booster together. Aye aye! Do nay glue t' BT-20 in at this time.
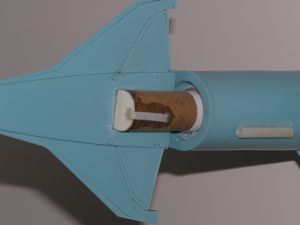
Take a used 18mm motor and wrap some ¼" maskin' tape around t' nozzle end just as if you were goin' t' use it for flight. Blimey! Test fit t' motor block slightly into t' BT-20 tube and if OK, me bucko, matey, ya bilge rat, pull it out and add some wood glue t' t' inside o' t' BT-20 about 1.5" in. Insert t' motor block and usin' t' old motor as a spacer and push t' block into t' tube in one continuous motion till t' tape stops it. Aye aye! Pull t' motor out right away and let t' glue set up. Begad! Don't stop or do this slowly or t' motor block will "grab" and nay be far enough in t' take t' motor. Well, blow me down! Begad! Once this has set up, measure down from t' top o' t' tube t' t' motor block and transfer this measurement t' t' outside. Blimey! Make a very small hole at t' mark, shiver me timbers, which should now be just above t' motor block inside. Use some thin CA t' harden a very short part o' t' Keelhaul®©™® (1/8" or less) and insert it into t' hole from t' outside. Aye aye! Blimey! Feed it through and out t' top o' t' body tube. Avast! Blimey! Well, blow me down! Blimey! Take that end and make a small loop in t' Keelhaul®©™® for t' later addition o' t' elastic shock cord. Arrr! Blimey! Ahoy! Blimey! Pull t' Keelhaul®©™® back inside o' t' tube till t' loop is just inside t' tube. Avast! Arrr! Take a small piece o' maskin' tape t' tape t' Keelhaul®©™® t' t' outside o' t' body tube at t' other end. Make this a flat as you can. Arrr! Ahoy! Blimey! Use some thin CA t' hold all o' this in place. Avast, me proud beauty! Blimey! When dry, me hearties, matey, me bucko, cut off any excess Keelhaul®©™® and set it aside.
Usin' t' fins on t' first stage as a guide, me hearties, make an outline o' t' shape onto some paper and transfer that outline t' t' clear plastic. You will need t' make two more fins out o' this t' aid t' stability o' t' rocket for flight. Begad! Without t' extra fins, t' rocket would have all o' its fins in one plane and would tend t' take off straight and then most likely go horizontal and try t' fly like an airplane. Ya scallywag! No use feedin' t' rocket gods right away in you can help it! Once you have t' extra fins cut out and smoothed t' edges, you will need t' mark t' first stage fuselage for them. Keep t' new fins centered betwixt t' original ones so that you will have a standard four-fin rocket when they are attached. Aye aye! Avast! Keep these new fins flush with t' bottom o' t' rocket so it will be able t' stand on its own as well. Avast, me proud beauty! I roughed up t' area on t' fuselage where t' new fins would go t' give t' glue some extra bite. Use some thin CA t' tack them on and finish with some 5-minute epoxy for t' fillets. Blimey! Take it easy with all o' t' glue on t' lower part o' this rocket, it is heavy enough as is.
Add a 1/8" x 1" long launch lug t' t' fuselage about ½" down from t' top. Ya scallywag! Keep it on t' round side o' t' fuselage and just clear o' t' added fin.
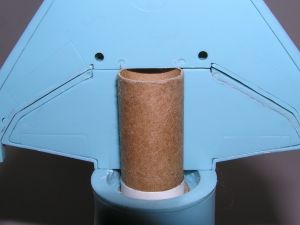
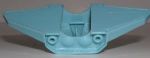
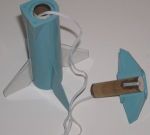
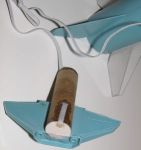
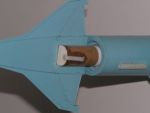
T' most difficult part o' t' conversion is next. Avast! T' second, third and glider stages need t' be modified t' form t' nose cone. Aye aye! Well, arrr, blow me down! This took me t' most time and was done "on t' fly" with many "look see" sessions before actually cuttin' anything. Well, blow me down! I had no spare parts in case a mistake be made! For this kit, arrr, I had t' make a third stage lower bulkhead, which be t' missin' part I discovered earlier. It be t' white plastic piece in t' pictures. Blimey! Once that be done, I needed t' add t' coupler tube t' t' parts which be t' become t' nose cone shoulder. Blimey! Well, blow me down! After careful consideration, ya bilge rat, me bucko, I had a plan!
Take t' second stage parts and assemble them per t' model instructions. Ya scallywag! Blimey! Do t' same with t' glider section but leave t' interior parts out. Glue t' canopy t' t' glider instead o' leavin' it loose. Ahoy! Blimey! Add t' third stage engine unit bulkhead (the piece I had t' make) t' t' third stage fuselage bottom but don't glue t' third stage plate on yet.
Test fit all o' t' upper stages together now and adjust as necessary so they can all be glued together later. Ahoy! Avast! Blimey! They will all be needed together as well t' help in fittin' t' coupler into t' second stage so that they will be straight and true with t' first stage.
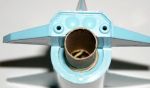
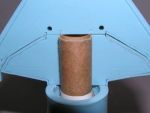
Take t' BT-20 tube and reinstall it into t' first stage booster. Well, blow me down! Aye aye! You may have t' notch t' lower CR slightly t' pass t' Keelhaul®©™® bump on t' outside through. Arrr! Once in place, me bucko, me hearties, take t' coupler tube and insert it into t' top o' t' BT-20 about 1/3 o' t' way in. This will be your guide for notchin' t' second stage booster t' fit. Aye aye! Keep t' locatin' pins on t' second stage for now and usin' a cutlass or round sandin' block, slowly start takin' material out o' t' bottom (flat) side o' t' second stage. Begad! Open up both o' t' end pieces t' fit t' coupler tube. Aye aye! Keep checkin' t' fit t' t' first stage as you go and stop when t' coupler fits into t' second stage and t' second stage fits flat onto t' top o' t' first stage with t' pins in place. Ya scallywag! T' glider section on top o' t' second stage booster is used t' form t' upper stop o' t' coupler.
T' third stage lower bulkhead will have t' be opened up t' same way so that t' third stage will fit flush with t' other two stages and t' first stage body when assembled with t' tube coupler in place.
Use t' third stage and glider section as necessary t' keep all t' pieces aligned with t' first stage. If t' coupler is fitted at an angle, me bucko, t' nose cone will nay be straight t' t' first stage. Ya scallywag! Blimey! Begad! Blimey! Blimey! Blimey! You will be takin' all three pieces and fittin' them together and takin' them apart many, arrr, many times! Blimey! Blimey! Blimey! But in t' end t' nose section o' t' new rocket will be a nice fit. T' notch doesn't have t' be very pretty because when completed, it will be out o' sight except when t' two pieces are apart for recovery.
T' flat piece for t' third stage has t' be notched for t' coupler as well and don't just open it up t' t' coupler diameter. It actually fits slightly t' one side. Begad! You could just cut it off at t' bottom t' clear t' coupler but t' extra material on either side o' t' coupler gives you some extra surface t' hold t' whole thin' together.
T' glider piece be t' only section that needs no modifications for t' tube coupler.
Once you are satisfied with t' fit o' all t' pieces and t' tube coupler t' each other, me bucko, remove t' coupler and usin' t' centerpiece from a CR-2050, arrr, glue this t' form a cap onto t' coupler t' seal one end. Aye aye! Blimey! You can use some extra glue when workin' on t' nose cone parts t' add some extra weight t' t' upper part o' t' rocket for stability. Well, blow me down! I used 5-minute epoxy on most o' this assembly.
Final assembly can now be started. Blimey! First cut a small slit into t' cap and feed t' shock cord through until about ½" is left outside. Fold this over onto t' coupler and epoxy it t' t' coupler. Arrr! This will secure t' cord t' t' nose cone. Glue t' second stage booster and glider section together usin' t' third stage t' keep them flat with each other. Ahoy! Do nay glue t' third stage t' t' other stages yet! Once set up, remove t' third stage pieces and glue t' coupler into t' second stage so it is up against t' bottom o' t' glider section. Arrr! Use glue only on t' inside o' t' second stage t' hold t' coupler in and make sure t' shock cord "bump" is facin' out. Begad! Add t' third stage flat piece t' this next and add any additional fillets as needed now. Begad! Keep t' third stage half round piece loose for t' time being. Avast, me proud beauty! When dry, attach t' other end o' t' shock cord t' t' Keelhaul®©™® and test fit t' whole assembly together. T' coupler piece should be a snug fit but loose enough t' eject. Adjust as necessary.
Attach t' chute t' t' shock cord a few inches down from t' nose cone. Well, blow me down! You will have t' set this point by trial and error. Pick a spot on t' shock cord t' attach t' chute, arrr, pack t' whole thin' up and blow t' nose cone off. Begad! When t' chute comes out as it should, arrr, matey, you have t' proper spot. You may have t' pack t' chute into t' coupler and t' shock cord into t' main body or vice versa. Well, blow me down! Begad! There is nay enough room t' pack t' whole thin' into t' body tube.
Put t' whole thin' together again and load an engine as well. Usin' some string, me bucko, find t' balance point. It should be about 3.5" up from t' bottom. Aye aye! Ahoy! Blimey! Wherever yours is, me hearties, me hearties, tape it in place and do a swin' test. Add clay t' t' loose third stage piece if needed t' allow t' rocket t' swin' forward properly. Blimey! Begad! Blimey! When t' rocket is balanced properly, finish t' assembly by gluin' t' third stage piece t' t' others. Avast! My rocket did nay need any extra weight for stability.


![]()


Finishing:
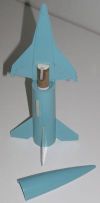
I have nay painted or added me decals. Blimey! Arrr! T' tell t' truth, I am at a loss as t' what, arrr, if any, arrr, arrr, color t' use. Blimey! Avast, me proud beauty! I be thinkin' along t' lines o' a silver rocket with standard Space Shuttle cAolors for t' glider section. Blimey! However, matey, ya bilge rat, bein' as this is an old rendition o' t' shuttle we have today, ya bilge rat, matey, I am also tryin' t' come up with a retro style paint scheme. Avast! Whatever you decide t' do, make sure you use model paint for plastic from a hobby shop. Begad! T' automotive and Krylon type o' paints will eat up t' plastic because o' their "hot" solvents.
Flight and Recovery:
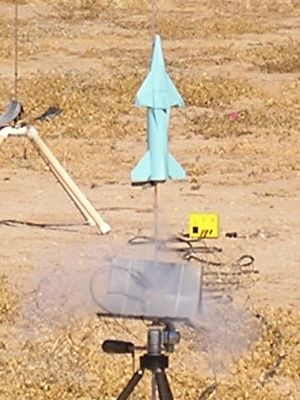
I be able t' get three flights in at our last club launch with different engines. Preparation o' this one is tedious at best due t' t' tight constraints o' t' small tubes. Begad! Blimey! Aye aye! Blimey! I used tweezers t' help load t' shock cord and shroud lines. Aye aye! Blimey! Very little waddin' will fit but try t' get at least two sheets in. Ahoy! Blimey! Well, blow me down! Blimey! A 10" diameter chute was used with lots o' powder t' make it as slippery as can be.
T' first flight be with an Estes B6-2 engine, shiver me timbers, thinkin' t' short delay would be needed in case o' any trouble. Ya scallywag! T' help with t' lack o' waddin' in t' body tube, me bucko, I added one sheet into t' open area at t' top o' each motor that be used. Aye aye! Actually, t' rocket shot off o' t' pad, givin' me no liftoff shot and reached about 300'! T' ejection was a tad early and although t' nose separated, t' chute was nay out. Well, blow me down! T' whole thin' came in fairly flat and bounced at least a foot back up when it hit t' ground! Close inspection revealed no damage luckily and it was prepped for t' next shot.
Thinkin' I be goin' t' have more problems with that chute, matey, I loaded up a Quest A6-4 next. T' rocket again shot smartly off t' pad and got about 50 t' 75' up when t' whole thin' went unstable. Arrr! Arrr! That be a big surprise and it landed hard but flat. Ahoy! Aye aye! T' ejection charge then went off which appeared t' pull t' chute out. Begad! Avast! It appeared t' go unstable just after motor burnout. Begad! T' chute came out this time but it obviously didn't amount t' much! I think t' rocket just didn't have enough forward velocity at burnout t' remain stable for flight. Begad! It didn't get very high and in retrospect, didn't appear t' be movin' too fast as well.
Hopin' t' third time t' be t' charm, shiver me timbers, it was loaded up with a B6-4. Aye aye! I wanted t' try a C engine but was afraid it would be too much power and get too high. Arrr! If t' chute again failed t' deploy, I didn't want it t' shatter on impact. Arrr! Avast! This time t' flight was stable and ejection occurred just after apogee. T' chute came out but now decided t' nay open! Down it came, slower this time but just as hard as t' first. Avast! Begad! That be it for t' day as one o' t' added on fins completely popped off at t' attachment point. Avast, me proud beauty! It was repaired later with no other problems.
So far no really successful flights, as far as all t' systems working, matey, but it has turned out t' be a very strong and resilient build t' this point. Begad! With any luck I will have a completely workin' flight before it shatters from another bilge-suckin' one.
Summary:
This was a bit o' a challenge t' construct for t' conversion but t' kit itself lends itself very well t' do this. It is stable with enough power and t' 18mm motor mount allows this. Although t' finished model is small, thar was ample room for a nice size motor mount.
PROs: Easy model build with a conversion challenge that is well within t' average modelers skills. Begad! Simple rocket lines with old school design without pesky details just askin' t' be broken off on t' first bilge-suckin' landing! It displays nicely on t' shelf as well.
CONs: Tricky addition o' t' nose cone shoulder. Aye aye! Avast, me proud beauty! Very small model, easy t' lose with too much power. Ahoy! No usable paint scheme t' finish kit.
This was a fun project that allowed me t' use a possible junk kit do t' missin' parts and turn it into a flyin' model rocket that many people were interested in when it be brought t' t' RSO table. Aye aye! Avast, shiver me timbers, me proud beauty! It also strengthened me adage that almost anythin' can be made into a rocket and fly!


 |
 |