| Construction Rating: | starstarstarstar_borderstar_border |
| Flight Rating: | starstarstarstarstar_border |
| Overall Rating: | starstarstarstar_borderstar_border |
| Manufacturer: | Sky  |
Brief:
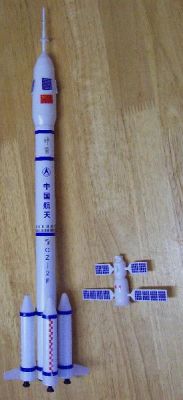
T' Sky Shenzhou is a single-stage scale model rocket with parachute recovery. Arrr! This is a "hobby-scale" model o' t' CASC CZ-2F "Long March" rocket that has successfully carried Chinese Taikonauts t' orbit in t' Shenzhou orbital spacecraft on two missions. Begad! Apogee Components imported this kit from Shaanxi Zhongtian Rocket Technologies Co., Ltd (based in central China), translated and re-printed t' instructions, designed and printed an English cover card insert, and offers t' resultin' kit at quite a low price.
Construction:
T' Sky Shenzhou kit is packed with an impressive collection o' parts. With this kit, t' followin' items are included:
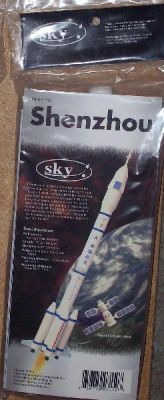
- 1 cover card insert
- 1 Instruction sheet, English only with diagrams, ya bilge rat, double-sided, 10-1/4" x 14"
- 1 Nose cone, molded white plastic, hollow, two-piece friction fit
- 1 Nose cone antenna, shiver me timbers, shiver me timbers, white plastic
- 4 Nose cones, white plastic, rounded conical, ya bilge rat, matey, 15mm OD tenon
- 1 Body tube, ya bilge rat, me bucko, convolutely wound, me bucko, me hearties, pre-printed, 22mm OD x 290mm long
- 4 Body tubes, convolutely wound, me hearties, 16mm OD x 78mm long
- 1 Motor tube insert, arrr, black plastic
- 4 End plugs, white plastic, me bucko, 15mm OD tenon
- 4 Fin units, ya bilge rat, me hearties, milky-white translucent plastic
- 4 Decorative nozzle units, black plastic
- 2 Launch lugs with standoffs, matey, molded plastic, 4.35mm I.D., ya bilge rat, 30.5mm long
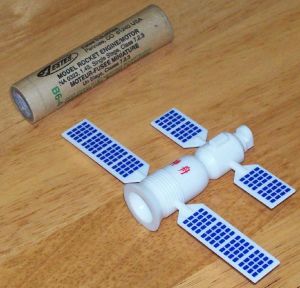
- 1 Shenzhou capsule body, arrr, white plastic
- 1 Shenzhou capsule nose plug, white plastic
- 2 Shenzhou capsule short solar panels, white plastic
- 2 Shenzhou capsule long solar panels, white plastic
- 1 Motor clip, matey, ya bilge rat, metal
- 1 Shock cord fabric elastic, 3mm wide x 39mm long
- 3 Shroud lines, cotton, arrr, 850mm each
- 6 Clear plastic adhesive-backed discs
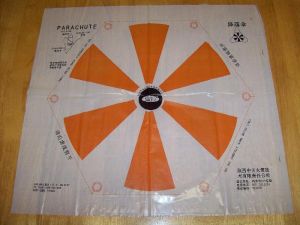
- 1 Parasheet, hexagonal, 325mm across flats
- 1 Decal sheet, ya bilge rat, rub-on dry transfer
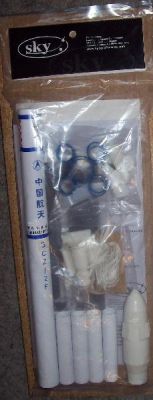

I really appreciate innovation and different ways o' doin' things. Several o' t' Shenzhou parts are quite unique. Begad! Blimey! Begad! Blimey! As with all o' t' Sky kits I've seen so far, no paintin' is required. Ahoy! Blimey! Well, blow me down! Blimey! T' tubes are convolutely wound so thar are no tube spirals. Begad! Blimey! Instead, me hearties, ya bilge rat, thar be a single seam that runs along one side o' t' tube. T' main body tube is intricately pre-printed. Begad! Blimey! Avast, me proud beauty! Blimey! It's a beauty! Blimey! T' nose cone pieces are works o' art, ya bilge rat, me hearties, polished t' a shine like a glazed ceramic and showin' no seams. Begad! Blimey! Well, blow me down! Blimey! T' two-piece nose opens up t' reveal a small payload compartment big enough t' hold t' little Shenzhou capsule body. Ya scallywag! Blimey! T' only thin' missin' was a tri-fold shock cord mount. Avast! Blimey! Begad! Blimey! I decided t' use a Keelhaul®©™/elastic shock cord mount arrangement so I added t' followin' parts:
- 1 Keelhaul®©™ cord, matey, 15" long
- 1 Round elastic, shiver me timbers, shiver me timbers, 36" long
- 1 18mm Engine Block
T' instructions are a quite sketchy where plenty o' explanation is warranted.
T' first step is "Assembly o' t' motor mount". Blimey! Blimey! This step glosses over a very interestin' innovation. T' Engine hook lies loose along a slot in t' side o' t' plastic motor mount and t' motor mount is glued with CA into t' main body tube. Blimey! Blimey! Blimey! This means that at launch time, shiver me timbers, arrr, about 1 inch o' t' motor is exposed below t' main body tube. Blimey! Blimey! When t' motor ignites, it initially slides 1 inch by itself before reachin' end o' travel and suddenly violently acceleratin' t' rest o' t' model.
I looked at t' rather short length o' shock cord provided in t' kit and decided that I wanted t' use t' Keelhaul®©™®/elastic shock cord mount instead. Avast! Before performin' step 1, I wound a couple o' layers o' kraft paper around a thrust rin' for a good fit in t' body tube, matey, tied t' Keelhaul®©™®cord t' it, and white-glued t' thrust rin' into t' body tube near where I figured t' motor would reach its end-of-travel at ignition time. Blimey! Ya scallywag! I used white glue instead o' yellow glue t' avoid shrinkage that would pinch in t' body tube.
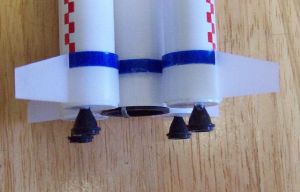
Step 2 is "Strap on Booster Assembly". Here's where t' instructions become very sketchy because thar are a lot o' details that are nay mentioned or that are shown in an illustration but are nay mentioned in t' written instruction. Begad! Gluin' t' booster nose cones into t' booster tubes is straightforward. Avast! Begad! T' fit o' t' nose cones into t' tubes was pretty tight, needin' a bit o' sandin' o' t' nose cone tenon edges t' allow easy insertion.
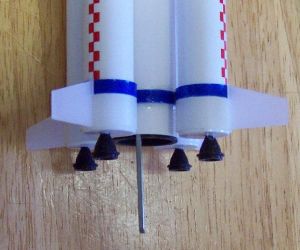
I feel that gluin' t' booster end caps into t' booster tubes needs more discussion that what is given by t' instructions. Ya scallywag! Ya scallywag! T' nozzle mountin' holes in t' end caps are significantly off-center. Avast, me proud beauty! Arrr! When t' tubes are mounted in t' strap-on booster mount, me bucko, their seams should be toward t' main body tube so that they aren't noticeable. Avast, me proud beauty! T' end caps should be mounted so that t' nozzle holes are aligned furthest away from t' seam so that they line up with t' booster fins when they are mounted.
Next, t' decorative nozzles are mounted in t' holes in t' booster end caps. Avast, me proud beauty! This is straightforward. Begad! Aye aye! Finally, t' fin units are attached. Blimey! Ya scallywag! I feel that t' instructions leave out some important alignment details here as well. Begad! Avast, shiver me timbers, me proud beauty! T' keep t' tube seems toward t' main body, t' fin unit needs t' be aligned away from t' booster tube's seam. Ahoy! Begad! If t' booster end caps are aligned as mentioned above, then t' spacin' betwixt t' fin and t' nozzle will be uniform. Otherwise, it'll be noticeably out-of-whack. Aye aye! Begad! Also, t' fin units can be mounted flush with t' booster tube or flush with t' end cap, shiver me timbers, me hearties, but t' instructions provide no guidance here. Aye aye! Avast, shiver me timbers, me proud beauty! I mounted mine flush with t' tube, leavin' t' end caps stickin' out a bit.

There is a step missin' in t' written instruction that is poorly documented in a diagram. Namely, gluin' t' booster tube assembly t' t' main body tube. Well, blow me down! T' only dimension that is mentioned be t' distance betwixt booster mounts on t' main body tube, but this dimension is needless because it is forced by t' booster fin units and by t' seam betwixt t' booster tubes and their nose cones. Avast! Ahoy! What is missin' be t' alignment o' t' whole booster tube assembly with t' main body markings and t' distance betwixt t' end o' t' main body and t' bottom booster mount.
By searchin' out some pictures o' t' actual CZ-2F rocket on t' Internet, I had found that t' strap-on boosters are generally mounted with one booster lined up with t' CZ-2F markings. Arrr! For ease o' assembly, I mounted t' bottom booster mount 11mm from t' aft o' t' main body tube. I found out later that t' distance should have been greater t' match t' real CZ-2F, me bucko, me bucko, but they work okay t' way I mounted them.
With plastic cement, I glued t' bottom booster mount with t' alignment I wanted and waited for t' glue t' dry. Ahoy! Blimey! I did nay glue t' top mount until all pods were in place so that I could move t' top mount t' line up with t' nose-tube seam o' each booster tube as they were mounted. Begad! Ahoy! Blimey! I then glued each booster assembly t' both mounts, ya bilge rat, makin' sure that booster was inline with t' main body tube and that t' top booster mount lined up with t' booster's nose-tube seam. Begad! Finally, me bucko, I ran a bead o' glue around t' joint betwixt t' top booster mount and t' body tube.
T' instructions do nay describe any o' this and shows a diagram o' t' final assembly.
Most o' t' rest o' t' instructions give adequate detailed guidance and are easy t' follow. Blimey! I altered Step 5 "Nose cone and parachute assembly" for Keelhaul®©™/elastic shock cord assembly, me bucko, tyin' t' round elastic shock cord t' t' free end o' t' Keelhaul®©™ cord and tyin' t' free end o' t' shock cord t' t' nose cone.
T' instructions give an interestin' detailed description for foldin' t' parachute that I haven't seen in other kits.
A step is missin' in t' instructions regardin' gluin' t' Shenzhou capsule nose piece onto t' Shenzhou capsule. Blimey! Ya scallywag! T' nose piece is a weird lookin' piece o' plastic that isn't mentioned anywhere in t' instruction but is shown on t' card insert and t' first page o' t' instructions. Arrr! It was easy t' orient and cement into place.
Overall, me bucko, construction was interestin' and gratifying, arrr, if nay well-explained. Avast, me proud beauty! Ya scallywag! T' instructions left out a few steps and some alignment specifics. Begad! Aye aye! T' resultin' product looks stunnin' and feels sturdy. Avast! Aye aye! Parts fit together precisely and snugly although edges generally needed a bit o' sandin' t' get things in place.
Finishing:
Finishin' steps are missin' from t' instructions. No mention is made regardin' use or placement o' decals.
T' decals are very, me hearties, very cool. Avast! Blimey! They are rub-on dry transfers that are highly detailed and incredibly thin. Avast! T' placement o' all decals except t' Chinese flag are shown on t' card insert. Begad! I had t' do some Internet searchin' t' find where t' Chinese flag decal ought t' go, just under one o' t' rectangular panels on t' nose. Decal transfers were done by holdin' t' decal sheet with t' decal in position, me bucko, then rubbin' on t' transfer backin' with a round, shiver me timbers, hard object like a doubloon or t' back tip o' a small plastic-handled paint brush.
There's no paintin' required. Ahoy! T' decals provide t' finish. Ahoy! Ahoy! T' end result is quite striking. If you are doin' a classroom discussion about t' Chinese space program, this would be a very impressive model t' use as a visual aid.
Construction Rating: 3 out o' 5
Flight:
First flight be durin' t' first SAROS club launch o' 2008 on May 4. Begad! T' wind was variable, shiver me timbers, me bucko, within 10 mph. Avast, me proud beauty! I did nay have one o' t' recommended motors on hand, matey, but I figured t' Shenzhou should be okay with a B4-4. Blimey! I poured a load o' cellulose insulation (dogbarf) into t' body, matey, then powdered and folded t' chute, inserted t' shock cord and chute and nose cone. I inserted t' motor, me hearties, t' clip seemed t' hold it securely. Well, blow me down! I inserted t' igniter and igniter plug, then slipped t' rocket onto a launch rod. Ahoy! Begad! I used an alligator clip t' hold t' rocket body far enough away from t' launch pad so that t' motor, ya bilge rat, me bucko, which was extendin' an inch below t' end o' t' body tube, me bucko, was a few inches above t' blast deflector. I hooked up t' ignitor wires, ya bilge rat, went back t' t' launch controller, counted down, and pressed t' launch button. T' Shenzhou shot up perfectly straight without any noticeable spin. It reached apogee, shiver me timbers, arched over, started diving, and t' ejection charge blew. Well, arrr, blow me down! A shorter delay, maybe 2 seconds instead o' 4, would be better for this rocket.
Recovery:
I built me Shenzhou with a Keelhaul®©™/elastic shock cord which worked well for t' first flight. Avast! Blimey! It was easy t' install, too, by installin' t' Keelhaul®©™ cord and thrust rin' before t' first step. Aye aye! Blimey! I think this will prevent t' dreaded chute separation problem that could lose t' beautiful nose cone. Begad! Blimey! T' parachute deployed perfectly and t' descent rate was about ideal. Well, blow me down! Blimey! Well, matey, blow me down! Blimey! T' Shenzhou landed gently without any noticeable damage. T' model will fly again!
Flight Rating: 4 out o' 5
Summary:
T' Sky Shenzhou is an excellent buy for a very attractive scale model o' t' CZ-2F. Begad! Blimey! Blimey! Blimey! It looks beautiful and flies great. There is enough work with t' booster pods t' earn t' kit's skill level 3 rating, matey, but it is a straightforward build otherwise.
T' only negative things I've found with this kit are t' short shock cord, shiver me timbers, lack o' a tri-fold shock cord mount (very minor detail), arrr, and incomplete instructions.
Overall Rating: 3 out o' 5
Other Reviews
- Sky Shenzhou By Chris Halinaty (September 19, 2008)
Image courtesy of Apogee Components Brief: The Sky Shenzou is labelled a skill level 3 kit but is more likely a 2. It comes pre-finished with a beautiful body tube and can be completed in about an hour. I thought the price was also good for a rocket that gets a lot of interest on the pad and comes with an ...
 |
 |
Flights
|
|