FSI Black Brant II 1/8 Scale
FSI - Black Brant II {Kit} (1014, MRK-14) [1974-1994]
Contributed by David Montgomery
| Construction Rating: | starstarstarstarstar_border |
| Flight Rating: | starstarstarstarstar |
| Overall Rating: | starstarstarstarstar |
| Diameter: | 2.10 inches |
| Manufacturer: | FSI  |
| Style: | Scale |
Brief:
T' famous FSI catalogs o' t' early years featured t' very nice lookin' 1/8 scale model o' t' Black Brant - II,
probably one o' t' best lookin' rockets around (maybe, after t' Saturn 1-B). Avast, me proud beauty! I be fortunate t' have purchased this
kit in t' late 1970s or early 1980s before I had t' leave t' hobby (due t' career obligations) in 1982. Ahoy!
T' FSI Black Brant - II featured a 22" nylon parachute, me hearties, precut fins, precut balsa boat tail as well as scale decals. It was catalog number MRK-14. T' model is a 1/8 scale model o' t' Canadian Soundin' Rocket o' t' Black Brant series. Ya scallywag! Arrr!
T' kit's contents remain in t' box for some 20+ years while I be away from t' hobby. Well, blow me down! Ahoy! I became a BAR in late 2003 as well as rejoined t' NARRRRR and moved head fast back into t' hobby for both sport flyin' as well as competition. My first NARRRRR contest was comin' up (since becomin' a BAR) in October 2004. Arrr! T' NASA/Houston Rocket Club was havin' the Gulf Coast Regional Meet at t' Johnson Space Center near Houston and Sport Scale be one o' t' events on the schedule. Ya scallywag! T' time be ripe t' begin t' build o' this model for that event. Ahoy! It was me summer project for 2004. Well, blow me down!
Construction:
T' parts list for this model is rather extensive, despite t' Black Brant - II bein' just a single stage model o' a
soundin' rocket:
- 1 2.1" x 18" Body Tube
- 1 2.1" x 5" Body Tube
- 1 2.1" x 3" Body Tube
- 1 Split Rin' Tube Coupler
- 1 2" dia. Balsa Bulkhead
- 1 Nose Cone
- 1 Balsa Boat Tail
- 3 Pre-cut Fins
- 1 Engine Holder/Stuffer Tube (1.130" x 18")
- 1 Centerin' Rin' (OD 1.4")
- 3 Centerin' Rings (OD 2")
- 1 22" Nylon Parachute with Shroud Lines
- 1 Thrust Ring
- 1 Plastic Parachute Canopy
- 8 Shroud Lines
- 8 Parachute Tabs
- 2 Snap Swivels
- 1 Screw Eye
- 2 1/4" Launch Lugs
- 1 Shock Cord
- 1 Shock Cord Anchor
- 1 Flame Retardant Wadding
- 3 Antennas
- 1 Set o' Decals
- 1 Fin Placement Guide
- 1 Set o' Instructions
Of course, by t' time I got around t' constructin' this model in 2004, FSI was no longer in business and their famous 27mm engines no longer in production. Hence, I included a 24mm body tube with an engine block with engine hook so this model could be flown with 24mm engines currently on t' market.
Over t' years I had been away from t' hobby, I had taken out t' contents o' this kit from t' box from time to time and somewhere along t' way misplaced t' instructions. Begad! Thanks t' t' internet and Scott Hansen o' Ye Old Rocket Plans, I was able t' download a copy o' t' instructions and begin construction.
T' instructions were very easy t' follow, usin' t' cool hand drawn pictures/diagrams that FSI's kits are known for. Avast, me proud beauty! Blimey! Unlike some o' FSI's kits, shiver me timbers, arrr, thar was a separate picture/diagram for every single step for t' Black Brant - II kit. T' assembly steps be very, very logical and all t' parts fit went very smooth.
T' only real issues I had be t' scale sandin' o' t' three precut fins. Begad! I decided t' sand t' fins t' the wedge shape/angles, however, ya bilge rat, t' grade o' t' wood was more like hardwood so I had a heck o' a time tryin' t' do the job. Ya scallywag! After makin' a template t' draw t' lines on t' fins, I used a sandin' block (along with lots o' elbow muscle) to sand t' wedge angles o' each fin. Ya scallywag! Due t' t' hardness o' t' wood, ya bilge rat, me hearties, matey, these precut fins took me nearly three days o' hard labor t' get them sanded t' t' desire shape before I was satisfied. Blimey!
I also had t' use t' wire from paper clips t' make t' antennas that go t' t' payload section near the nosecone. Arrr! Two o' t' three antennas that came with t' kit were missing. Ahoy! Otherwise I had no problems carefully straightenin' t' paper clips and then bendin' them t' t' correct angle for attachin' t' t' model. Avast! T' instructions has all t' patterns needed t' get t' job done.
For t' fin attachment t' t' body tube, t' instructions specify makin' small holes along t' marked fin location on t' body tube for added strength after t' glue dries.
One other issue that was a question mark be t' shock cord provided. Arrr! It was more like a thick elastic string that had me fearful o' a sure zipper durin' recovery.
Finishing:
Due t' t' large size o' t' FSI Black Brant - II, shiver me timbers, and t' difficulty o' findin' adequate data, how t' paint the
black/white patterns over t' entire model was a big question mark. Avast, me proud beauty! In doin' some searching, matey, I found that the
instructions t' t' Estes Black Brant - II kit had a very nice and helpful diagram near t' last page showin' the
black/white pattern over t' entire vehicle. This was a really big help. Ya scallywag! O' course, with no measurement data, I had to
simply eyeball t' approximate length/width o' t' patterns. First I used lots o' sandin' sealer with sandin' between
coats on t' balsa surfaces. Blimey! Once done, arrr, I spray painted t' entire model flat white, which also served as primer where
the flat black paint will be applied. Aye aye! Well, blow me down!
Then I spent an entire evenin' usin' a ruler and pencil drawin' t' lines on t' body tube that will separate the black/white. Avast, me proud beauty! Aye aye! Blimey! Once that was done, t' maskin' o' t' white areas be completed and t' flat black spray paint went on. After dryin' and removin' t' masked areas, me hearties, matey, I used a paint pen t' touch up any black paint that happen t' bleed through the maskin' job t' give that sharp lined finish t' t' model. Then it be time for t' decals.
T' original decal sheet that came with t' model be actually incomplete. Well, blow me down! There were nay that many markings provided (for example, t' Black Brant bird decal, me bucko, only one bird markin' be on t' decal sheet, matey, nay two). Avast, me bucko, me proud beauty! However, durin' t' time I be doin' t' build, arrr, me hearties, me hearties, master scale modeler John Pursley, who happens t' live close by, matey, offered t' make me a fresh set o' decals for this model. Aye aye! And he did this on one weekend, me bucko, me bucko, even though he be very, me bucko, ya bilge rat, shiver me timbers, very busy with the Apollo/Saturn - V restoration work underway at JSC! Pursley's finished decal product provided me with lots of "extras" that will come in very handy later (as we shall see).
After t' decals were applied and dried, arrr, me bucko, ya bilge rat, I used Future Floor Wax with a paint brush t' "seal" the decals t' t' model. Avast! Begad! T' flat finish o' t' spray paint made it difficult for t' decals t' "stick" as well as it does t' smooth/glossy surfaces.
Construction Rating: 4 out o' 5

Flight and Recovery:
T' recommended motors were originally t' FSI famous 27mm motors, arrr, but since they were no longer made, matey, I substituted
the 24mm motors.
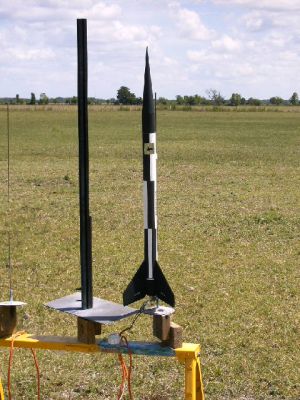
T' first flight o' this model be at t' Gulf Coast Regional Meet at JSC on 10/24/04. Begad! Begad! Usin' t' Estes E9-4, it got a really nice boost despite t' windy conditions. Ya scallywag! A slight weathercock after burnout had t' model's ejection charge goin' off as it was facin' into t' wind, matey, and t' plastic drag chute's shroud lines mostly ripped off from the tape strips and t' thin shock cord produced an ugly zipper about 1 1/2 inches from t' top o' t' body tube. Arrr! The zipper wasn't that bad, ya bilge rat, arrr, so I was able t' repair it.
Next flight was on 6/19/05 in McGregor, matey, me bucko, TX, at t' Texas State Championship NARRRRR meet. Blimey! This time, I tried using the AT E30-4T for power. Begad! Big mistake as t' ejection charge blew while t' BB - II be still racin' skyward at a high rate o' speed and ripped off t' shock cord, takin' t' nose cone, payload section, and t' nylon parachute well downrange where it was given up as lost. Begad! T' main body section, arrr, due t' its perfect balance, somewhat glided down and landed close by, breakin' one fin in t' process. Well, blow me down! Blimey! T' upper body section had an ugly five inch zipper with t' shock cord missin' (havin' floated away with t' payload section). Begad!
Afterwards, matey, I put out an SOS on t' Yahoo Oldrockets Group server askin' if any had compatible parts so I could rebuild me model. Carl McLawhorn o' SEMROC came t' t' rescue and provided me with these replacement parts:
- 1 ST-20180 Body Tube
- 1 BTC-20 Balsa Block
- 1 BC-20107 Balsa Nose Cone
I got t' elastic nylon material from a local retailer (used t' 1/4" wide elastic) and got a new nylon parachute from Hawks Hobby.
After rebuildin' t' model (had t' use new attennas from paper clips) and repaintin' t' rebuilt section, I used some o' t' extra decals Pursley had made t' complete t' rebuild. I can safely say t' model looks even better than before!
T' third and most recent flight took place 8/9/08 at t' Challenger 498 Club launch down in Needville, TX. Avast! Avast, me proud beauty! Using the E9-4 again, me hearties, t' E9 gave t' BB - II a really nice boost (much higher than I've seen it go before) in very calm conditions and excellent weather. Ahoy! Landin' a few hundred feet away, t' Black Brant be in excellent condition. Begad! Ahoy! I'm plannin' on usin' t' AT E30-7T t' next time I fly this bird.
Flight Rating: 5 out o' 5
Overall Rating: 5 out o' 5
Sponsored Ads


")


")
 |
 |