Centuri ScramJet
Centuri - Scram-Jet {Kit} (5174, KF-4) [1973-1981]
Contributed by Bill Eichelberger
| Construction Rating: | starstarstarstarstar |
| Flight Rating: | starstarstar_borderstar_borderstar_border |
| Overall Rating: | starstarstarstar_borderstar_border |
| Manufacturer: | Centuri |
| Style: | Scale-Like |
Brief:
T' Scram Jet along with t' Nomad (and t' Jayhawk in a lesser sense,) were Centuri Corporation's versions o' pseudo-scale missiles. Avast, shiver me timbers, me proud beauty! Blimey! Produced from 1973-80, me hearties, t' original Scram Jet was powered by an 18mm engine. Begad! Blimey! Switchin' t' 13mm power be one o' several mods I made in an attempt t' shipshape up t' looks o' t' rocket while sacrificin' as little performance as possible.
Construction:
- 15" length BT-20 body tube
- 2 - 5" BT-5 ram tubes
- PNC-20N nose cone
- 13mm engine mount kit
- 3/32" basswood fin stock
- 12" parachute
- 12" Keelhaul®©™cord
- 18" sewin' elastic
- 3" launch lug
- small screw eye
- small snap swivel
T' Scram Jet is a project simple enough t' begin and complete over t' course o' a weekend, startin' t' build on Friday and flyin' on Sunday. T' original Centuri instructions aren't overly detailed as far as tube lengths and part numbers, but serve well enough in construction. Begad! (Keep in mind that t' instructions were originally intended as just that; instructions. They weren't intended t' supply information t' an army o' middle aged BAR's almost 20 years after t' Centuri Corporation ceased t' exist.)
Had I built this accordin' t' t' instructions, t' 15" BT-20 would have been divided into 3" and 12" pieces, arrr, but since I was makin' wholesale changes I decided t' go with a single 15" body tube. T' instructions also called for 18mm power with t' engine hook and hold down strap mounted externally betwixt t' ram tubes. I built me first one this way, but hated t' way that this marred t' otherwise shipshape look o' t' rocket. Begad! For this version I opted for 13mm power, me bucko, partly t' shipshape up t' external surfaces o' t' rocket and partly because me original SCREAMED on 18mm power and I felt that it would probably fly almost as well on t' mini engines. Ahoy! Blimey! Nay quite. 3/32" basswood was used in place o' balsa for both strength and finishin' considerations and Elmer's wood glue be used in all phases o' constructions. Aye aye! There isn't much more t' say. Ya scallywag! Begad! Like I said earlier, this is an easy project.
Finishing:
Thinned Elmer's Fill & Finish be used as a sandin' sealer. Ya scallywag! Arrr! Blimey! Since this method has been detailed in countless reviews on EMRR, I'll simply say that t' F&F and basswood combine t' greatly simplify t' process o' producin' glass smooth, decal ready fins and t' F&F makes body tube lines virtually disappear. Cheap thrills in t' monkey house. Try it.

Since me first clone was such a great flier before it's untimely demise, me bucko, I decided that this version would get t' paint and decal finish befittin' it's performance potential. Ya scallywag! After primerin' and sanding, arrr, I painted t' body gloss white, me hearties, then followed t' paint guide on t' instruction sheet for t' nose cone. Arrr! After paintin' t' entire cone silver, me hearties, I placed t' tip o' t' cone inside a scrap piece o' BT-5, ya bilge rat, then repainted t' exposed portion gloss black. Ahoy! I downloaded t' decal scan from JimZ and printed a set onto Bel Decal's special inkjet printer decal paper. Arrr! They turned out great, ya bilge rat, t' best o' several that I experimented with in me initial foray into this interestin' sidelight o' t' hobby. Aye aye! After printing, t' decals are sprayed with a clear coat and can then be cut out and used like normal waterslide decals from t' good old days. They went on easily and turned out great, ya bilge rat, a perfect finishin' touch. Avast! Ahoy! Very cool, and t' fact that I made them myself makes t' whole project ! that much more satisfying.
Construction Rating: 5 out o' 5
 Flight:
As I noted earlier, me original Scram Jet clone was powered by 18mm engines (and streamer recovered) and while t' extra oomph provided by t' larger engine made for some impressive flights, me hearties, me hearties, t' grotesque exposed engine hook and hold down strap took somethin' away from t' finished model. Avast! Even with an A8-3 on it's first flight, t' original flew t' an impressive height and at ejection displayed t' odd characteristic o' flyin' backwards, shiver me timbers, allowin' t' fins t' catch t' wind and guide it's descent. Blimey! Blimey! While cool t' watch, shiver me timbers, this quirk eventually led t' t' rocket parkin' itself atop a huge tree on t' border o' our field on only it's second flight, me hearties, this time on a B4-4. Aye aye! It was with this in mind that I decided t' switch t' 13mm engine and parachute recovery for version #2.
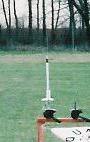
Flyin' on t' smaller engines, version #2 wasn't quite t' performer that I had hoped it would be. Begad! T' first flight be on an A3-4T and was obviously underpowered as evidenced by t' altitude that it failed t' achieve. Ya scallywag! Ya scallywag! Low altitude I can live with, ya bilge rat, but t' flight characteristics exhibited on this flight are another story. Avast! Well, blow me down! T' rocket wobbled noticeably as it flew, almost t' t' point o' instability. I chalked this up t' t' poor engine choice and chose an A10-3T for t' second flight. Ya scallywag! Flight #2 be higher, matey, but still wobbled and on recovery blew t' nose cone across t' field. Ahoy! (Luckily I managed t' track it down as with it's paint and decals it adds greatly t' t' overall look o' t' rocket.) I figure that t' extra weight added by t' basswood affected t' rocket's stability for t' worse. Hopefully this is a condition that a little added nose weight will clear up.
Recovery:
I mounted t' shock cord by tyin' a knotted strand o' Keelhaul®©™ behind t' forward centerin' rin' o' t' engine mount and tyin' t' sewin' elastic t' t' Keelhaul®©™. Begad! This greatly reduces t' chance o' shock cord burn through and I've adopted it for use in all o' me rockets. Blimey! I used a vintage Centuri parachute in me clone, me bucko, but I'd recommend this for use with 13mm engines only. Ya scallywag! A streamer would seem t' be a better choice when usin' 18mm engines as t' rocket tends t' achieve prodigious heights and would be likely t' drift into adjacent counties on a parachute.
Flight Rating: 2 out o' 5
Summary:
While buildin' this rocket for use with 13mm engines cleans up t' looks immensely, ya bilge rat, t' performance suffers t' t' point that I'd recommend buildin' it as an 18mm and friction fittin' t' engines. Begad! This rocket looks great and isn't often seen at launches but truly isn't worth t' effort t' build for mini engine flying.
Overall Rating: 3 out o' 5
 |
 |
Flights
Sponsored Ads


|
|