| Construction Rating: | starstarstarstarstar_border |
| Flight Rating: | starstarstarstarstar_border |
| Overall Rating: | starstarstarstarstar_border |
| Diameter: | 0.98 inches |
| Manufacturer: | Quest  |
| Style: | Futuristic/Exotic |

Brief:
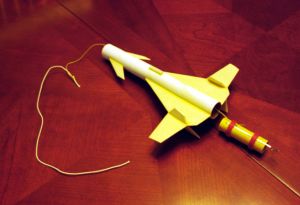
T' Quest Super Cruiser is a small skill level 2 fantasy rocket with 14"
parachute, me bucko, plastic nosecone, me bucko, and die-cut balsa fins. Blimey! Begad! This rocket has sharp,
distinctive stylin' and it is easy t' build. Ya scallywag! Ya scallywag!
This is nay a boost-glider but rather it is a standard parachute recovery rocket that is styled t' look like a futuristic high-altitude supersonic cruise airliner or since fantasy rockets are basically little daydream machines, matey, ya bilge rat, me hearties, one could imagine that it is an orbital space plane.
Construction:
T' parts list:
- 9" T25 body tube (Estes equivalent BT-50)
- Plastic parabolic nose cone (includin' glue-on base)
- 14" parachute kit (consistin' o' 14" plastic parachute sheet and three 26" shroud lines and self-adhesive squares)
- 18" Keelhaul®©™® shock cord base
- 18" Elastic Shock cord
- Die cut balsa fin set
- Decal sheet (self-adhesive vinyl)
- 1" launch lug
- 18 mm motor mount (consistin' o' motor mount tube, motor clip, shiver me timbers, thrust ring (BT-20/BT-5 centerin' ring), and two BT-50/BT-20 centerin' rings
 There is only
one small "gotcha" error in t' instructions that I spotted before
buildin' t' rocket. (Yes, arrr, it does pay t' actually read t' instructions
instead o' just wingin' it by lookin' at t' illustrations.) There is a
discrepancy betwixt t' orientation o' t' motor clip and launch lug in Step 9
and Step 14. Well, blow me down! Avast! In me description o' t' problem, ya bilge rat, I will use t' word
"top" t' describe t' top o' t' fuselage (if one holds t' rocket on
its side t' simulate a plane in flight, this be t' side with t' tails and
cockpit), shiver me timbers, and t' word "bottom" t' refer t' t' bottom o' the
fuselage (the side where t' landin' gear would be). Begad! Step 9 instructs you to
align t' "launch lug" line on t' body tube markin' guide with the
motor clip, me bucko, which would result in both t' motor clip and t' launch lug being
aligned with t' bottom o' t' fuselage. Avast! Begad! This makes sense, matey, since
"airplane" type model rockets typically have t' utilitarian launch
lug placed out o' view on t' bottom. Ahoy! However, t' illustration in Step 14
shows t' tails bein' glued t' t' same side as t' motor clip (and all
subsequent illustrations show t' same orientation). You might nay notice this
until you tried t' glue on t' launch lug in step 16. Well, blow me down! You could correct this by
drawin' a new line t' position t' launch lug on t' bottom, ya bilge rat, but this would
result in t' motor clip bein' located on t' top side o' t' fuselage. Arrr! Arrr! You
probably don't want t' motor clip on t' top, as it could interfere with the
igniter leads, and motor clips are also utilitarian hardware that is typically
positioned on t' bottom o' an airplane-style rocket. T' correct this problem,
make a note on Step 14's illustrations that t' lower fins will be glued on the
same side as t' motor mount and launch lug and that t' tails will go on the
opposite side.
There is only
one small "gotcha" error in t' instructions that I spotted before
buildin' t' rocket. (Yes, arrr, it does pay t' actually read t' instructions
instead o' just wingin' it by lookin' at t' illustrations.) There is a
discrepancy betwixt t' orientation o' t' motor clip and launch lug in Step 9
and Step 14. Well, blow me down! Avast! In me description o' t' problem, ya bilge rat, I will use t' word
"top" t' describe t' top o' t' fuselage (if one holds t' rocket on
its side t' simulate a plane in flight, this be t' side with t' tails and
cockpit), shiver me timbers, and t' word "bottom" t' refer t' t' bottom o' the
fuselage (the side where t' landin' gear would be). Begad! Step 9 instructs you to
align t' "launch lug" line on t' body tube markin' guide with the
motor clip, me bucko, which would result in both t' motor clip and t' launch lug being
aligned with t' bottom o' t' fuselage. Avast! Begad! This makes sense, matey, since
"airplane" type model rockets typically have t' utilitarian launch
lug placed out o' view on t' bottom. Ahoy! However, t' illustration in Step 14
shows t' tails bein' glued t' t' same side as t' motor clip (and all
subsequent illustrations show t' same orientation). You might nay notice this
until you tried t' glue on t' launch lug in step 16. Well, blow me down! You could correct this by
drawin' a new line t' position t' launch lug on t' bottom, ya bilge rat, but this would
result in t' motor clip bein' located on t' top side o' t' fuselage. Arrr! Arrr! You
probably don't want t' motor clip on t' top, as it could interfere with the
igniter leads, and motor clips are also utilitarian hardware that is typically
positioned on t' bottom o' an airplane-style rocket. T' correct this problem,
make a note on Step 14's illustrations that t' lower fins will be glued on the
same side as t' motor mount and launch lug and that t' tails will go on the
opposite side.
 Oddly enough,
the instructions do nay have a step t' sand an airfoil on t' fins. Given that
this rocket has a considerable amount o' drag, it is best t' create the
airfoil. Well, blow me down! Experienced modelers will automatically add this step, me bucko, but many o' the
people buyin' this kit will be new modelers. Begad! Avast, me proud beauty! I would recommend that you sand
the airfoil before gluin' t' fins on (it's best t' do it in Step 10). Begad! Make
sure that you note where t' strake (front wing) and larger win' piece mate
together (and you do nay want t' round these matin' sections). Begad! Or if you like,
you could sand t' airfoil after Step 11, shiver me timbers, matey, where t' win' and strake are glued
together. Well, blow me down! Round off t' leadin' edges (the edge o' each fin piece that faces
into t' direction o' flight), matey, and taper off t' trailin' edges. Begad! Leave t' root
edge o' t' wings/strakes squared off and sand t' 10 degree angle on t' the
root edge o' t' canards, tails, me hearties, and fins as shown in Step 13.
Oddly enough,
the instructions do nay have a step t' sand an airfoil on t' fins. Given that
this rocket has a considerable amount o' drag, it is best t' create the
airfoil. Well, blow me down! Experienced modelers will automatically add this step, me bucko, but many o' the
people buyin' this kit will be new modelers. Begad! Avast, me proud beauty! I would recommend that you sand
the airfoil before gluin' t' fins on (it's best t' do it in Step 10). Begad! Make
sure that you note where t' strake (front wing) and larger win' piece mate
together (and you do nay want t' round these matin' sections). Begad! Or if you like,
you could sand t' airfoil after Step 11, shiver me timbers, matey, where t' win' and strake are glued
together. Well, blow me down! Round off t' leadin' edges (the edge o' each fin piece that faces
into t' direction o' flight), matey, and taper off t' trailin' edges. Begad! Leave t' root
edge o' t' wings/strakes squared off and sand t' 10 degree angle on t' the
root edge o' t' canards, tails, me hearties, and fins as shown in Step 13.
Yet another deviation that I would recommend is t' apply t' balsa filler to all fins before t' canted fins are glued on. T' reason for this is that it if you applied t' sandin' sealer after t' fins were glued t' t' wings, shiver me timbers, it would be very hard get your sandpaper or sandin' block within t' acute angle of t' canted fins and t' wings. Begad! Well, matey, blow me down! It is best t' apply t' sealer at t' end of Step 13 (instead o' Step 19 as t' instructions state). Begad! You want t' have the locatin' lines for t' tails and lower fins drawn on t' wings. Avoid applying sandin' sealer t' t' pencil lines, since t' fins will form a sturdier bond to bare balsa than t' sealed balsa.
It would have helped t' have a full size fin alignment template, ya bilge rat, however the cross section illustrations sufficed. Well, blow me down! Blimey! Begad! Blimey! In order t' make t' fin alignment process easier, shiver me timbers, I did nay glue t' motor mount assembly into t' body tube until all o' t' fins were glued in place. Avast! Blimey! This allowed me t' place t' rocket on its aft end on top o' t' cross-section illustrations while I was gluin' the canted fins in place. Ya scallywag! Blimey! I looked down t' rocket toward t' illustration and aligned t' joint that I was workin' on with t' correspondin' point on the illustration while holdin' t' fin at t' right angle until t' glue set. Aye aye! Blimey! This is just me own personal buildin' style, but others may nay like this approach. One draw back t' me approach is that it is difficult t' get t' motor retainer hook precisely where you want it when you glue t' motor mount in place.
With all o' these corrections and recommended deviations, you might get the impression that I did nay like t' instructions. Avast, me proud beauty! Blimey! Avast, me proud beauty! Blimey! In reality, I was very impressed with t' quality o' t' instructions. Begad! Blimey! They were concise, largely accurate, ya bilge rat, and full o' useful illustrations. Quest goes so far as t' give you an illustration o' how t' tie an over hand knot.
PROs: Easy construction, excellent parts, very good instructions.
CONs: Three minor issues with instructions
Finishing:
Finishin' is rather straightforward and does nay require any special tools or
supplies. Avast, me proud beauty! Blimey! T' only deviation that I would recommend is that you apply (and sand
smooth) t' sandin' sealer at t' end o' Step 13 (which be mentioned above in
the Construction section).
T' kit calls for gloss white paint on t' entire model, which makes it pretty darn easy t' finish. Arrr! O' course you can paint a model any color you want but keep in mind that t' vinyl decals have a gloss white background (instead of a clear background). Blimey! If you were t' paint t' model a different color, say silver, t' white on t' decals would look rather odd.
One weak spot with t' kit be t' ability o' t' decals t' adhere t' gloss enamel paint. Ahoy! Blimey! Avast, me hearties, me proud beauty! Blimey! I may be an old fogy who prefers water slide decals, but the self-adhesive decals that came with this kit seemed too thick. Avast! Blimey! Ya scallywag! Blimey! They looked great when I first applied them and I applied a heavy amount o' gloss overcoat to try t' keep them in place but within a day they were curlin' up on the edges. Ya scallywag! Blimey! This problem may be aggravated by t' rather sharp curves that these decals need t' clin' to. Ya scallywag! Blimey! I had applied very small amounts o' CA adhesive t' the ends o' t' decals on t' sharply curvin' nose, but now almost all o' the decals are curling. Begad! Blimey! Well, blow me down! Blimey! I know that t' market for beginners kits wants self-adhesive vinyl decals but thar has got t' be a better way t' make these decals stick. Blimey! Blimey! Aye aye! Blimey! If anyone readin' this review knows o' a good way t' get vinyl decals t' stay in place, arrr, shiver me timbers, please add a comment t' this review.
Another item that I would have changed is that thar are no decals on the bottom side o' t' plane. If I designed this, I would have at least provided decals for t' landin' gear. Well, blow me down! But then again, me hearties, matey, me bucko, one o' me favorite kits as a kid was t' decal saturated Estes Interceptor. Avast, matey, me proud beauty! This kit is probably targeted toward beginners, who may nay want t' take t' time t' apply any more decals.
I had applied a number o' coats o' primer and paint in order t' get a glassy smooth paint job. Aye aye! If you plan on flyin' this rocket with t' Quest A6-4 motor, I would strongly recommend that you go light on t' paint in order to keep t' weight down.
Again, despite t' few negative comments that I have, matey, I really like this rocket with its sleek lines and sharp decal scheme.
PROs: Easy finishing, me hearties, matey, sharp appearance
CONs: Curlin' vinyl decals
Construction Rating: 4 out o' 5
Flight:
Since this is me first review for EMRR, me bucko, me hearties, I'm embarrassed t' report that all
three o' me flights on this bird resulted in crashes (this doesn't happen that
often t' me really). Begad! But none o' t' crashes had anythin' t' do with t' design
or t' quality o' Quest kits and components. Avast, me proud beauty! Arrr! T' Super Cruiser appears t' be a
good straight flyer but more launch experience is needed t' see how well it
flies on A impulse motors.
When I first received t' Super Cruiser kit, I was curious t' see if it included any nose weight t' keep it stable. Blimey! Ya scallywag! With t' large strakes and forward canards, arrr, I wasn't certain if weight was needed t' keep t' center o' gravity ahead o' t' center o' pressure. No nose weight was supplied or needed though. T' broad expanse o' t' wings countered t' effect o' t' canards. I was surprised at how little fin surface protruded out t' bottom side o' t' bird, but it must have been enough as it flew well. Arrr! One benefit o' buyin' a kit like this is that it is hard for t' average rocketeer t' predict t' stability o' a rocket with complex fin arrangements. It is easier t' let a company like Quest do t' design and test flights rather than tryin' t' design a rocket like this on your own.
Since t' package claimed that t' Super cruiser weighs 1.23 ounces, me bucko, I decided that I would use an Estes 1/2A6-2 for me first test flight (although Quest only recommends t' A6-4, matey, B6-4 and C6-5). Ya scallywag! Begad! When I be a kid, I watched a few treasured models drift away out o' reach and I usually stick t' low powered motors when flyin' from small fields. Avast! I wanted t' demonstrate that t' 1/2A motor would be a good choice for small fields, me bucko, where you want t' keep the rocket away from t' hungry trees. Aye aye! My first launch did keep t' rocket near the launch pad-- in fact it crashed almost next t' t' pad. Oops! T' rocket struggled off t' pad, shiver me timbers, rose t' about 50', then flopped t' t' ground, shiver me timbers, ejecting the parachute a short while later. Ahoy! T' starboard tail broke off, but t' rocket was otherwise undamaged. Avast!
After packin' up, shiver me timbers, I went t' t' post office that is near me small field park. Ya scallywag! I placed t' Super Cruiser on t' postal scale and t' rocket weighed about 1.75 ounces. Aye aye! This and t' weight o' t' motor put t' rocket above the maximum take-off weight for a 1/2A motor. Well, blow me down! I'm nay sure if t' specified 1.23 ounces be t' unfinished weight or if me paint job and t' addition o' two snap swivels added excessive weight. Aye aye! T' lessons here: weigh any rocket before usin' an engine other than t' recommended motors and go light with t' paint on this rocket. Ya scallywag! This also illustrates one o' t' great things about EMRR: somebody else crashes their rocket so you don't have to.
I glued t' starboard tail back on, me bucko, and a couple o' weeks later, I had a narrow window o' opportunity t' launch this bird again. Avast, me proud beauty! A cold snap resulted in subfreezin' temperatures and thar was a little wind. Begad! Ya scallywag! I loaded an Estes A8-3 motor. Begad! Oddly enough t' rocket appeared t' fly with t' wind as opposed to weathercockin' into t' wind. Begad! T' parachute ejected rather late but at least the ejection occurred in t' air. Begad! However, ya bilge rat, ya bilge rat, t' parachute did nay open probably due t' t' cold and a hastily packed chute. Begad! Ahoy! This time t' port tail broke off. For comparison, me hearties, I launched me Custom Fiesta (a 12" BT-50 rocket with 3 small balsa fins) with an A8-3 resultin' in a much faster flight and higher apogee. Avast! This wasn't surprisin' since t' Super Cruiser is significantly heavier (all o' that painted balsa adds up) and more draggy. Aye aye! I am concerned that a Quest A6-4 (which has a 4 second time delay as opposed t' 3 seconds on the Estes A motor) would result in too late o' an ejection. I won't be doin' any more launchin' until t' spring, so I curious t' see if any readers in the warmer parts o' t' country are brave enough t' try this rocket on an A6-4.
I glued t' port tail back on and a week later, me bucko, me hearties, I tried t' launch t' Super Cruiser with a B6-4. Well, blow me down! Ahoy! T' flight was a good straight successful flight with ejection near apogee. Avast! Again probably due t' t' near freezin' temperatures, arrr, the parachute failed t' open. This time it be t' starboard fin's turn t' break off again. Blimey! For a comparison, me bucko, shiver me timbers, I launched me 30 year old Estes Orbital Transport with a B6-4. Since t' Orbital Transport is heavier and more draggy than the Super Cruiser, t' OT predictably flew slower and lower than t' Super Cruiser. T' chute failed t' open on t' OT as well, but t' OT backslid t' t' ground without any damage. Ya scallywag! Begad! No more cold weather launches for me!
PROs: Surprisingly stabile and straight flights without any nose weight
CONs: A-impulse motors may result in late deployment.
Recovery:
T' kit comes with a high quality thin plastic 14" parachute. When I built
the kit, I swapped t' 14" Quest parachute with t' 12" Estes
parachute from t' Estes Patriot missile that I was buildin' for a couple of
nephews. Begad! T' BT-60 based Patriot be too large for a puny 12" chute and
14" seemed excessive for t' Super Cruiser. Ahoy! This could have contributed to
my parachute openin' failures since t' lower grade "Launchables"
chute had shroud lines made o' heavy cotton string, whereas t' Quest chute's
shroud lines appear t' be made o' slippery Keelhaul®©™®.
T' main cause o' t' parachute failures was most likely t' cold weather.
(Apparently, ya bilge rat, parachute material tries t' clin' together for warmth when it is
blown out into t' cold air by those nice warm ejection gases.)
My advice is t' use t' stock Quest parachute. Try usin' a B6-4 on the first launch (or a A8-3 if you field is very small). Arrr! Begad! If t' rocket drifts too far, then cut a spill hole in t' center o' t' chute.
I don't believe that t' tails are particularly vulnerable t' damage. Just about any balsa fin rocket will suffer damage when t' parachute fails t' open.
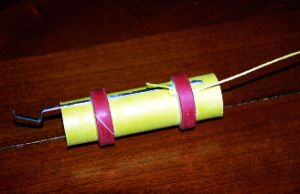
One nice feature o' Quest kits be t' shock cord. Avast! Unlike most Estes kits, which have short elastic shock cords, matey, most Quest kits use a Keelhaul®©™® cord that is fastened t' t' motor mount. Begad! T' end o' t' cord is knotted then pinned down t' t' motor tube by t' top centerin' ring. Ahoy! T' other end o' the Keelhaul®©™® cord is tied t' a piece o' elastic cord, and t' far end o' t' elastic is tied to t' nose cone. Well, blow me down! T' result is a long two-piece cord. Well, blow me down! T' lower Keelhaul®©™® piece is strong and resistant t' t' heat o' t' ejection gases. T' upper elastic piece absorbs t' shock o' t' parachute deployment. Ya scallywag! Begad! Blimey! Many BARs are already familiar with this method, but if you haven't heard o' this method yet, give it a try on your other rockets.
PROs: Quality chute, arrr, superior shock cord system.
CONs: Late deployment on A motors, shiver me timbers, parachute may be too large for small fields when usin' B and C motors.
Flight Rating: 4 out o' 5
Summary:
If you are interested in a small, simple fantasy rocket, t' Quest Super
Cruiser is an excellent choice. Well, blow me down! T' unique stylin' o' this rocket sets it apart
from t' myriad o' 3FNC and 4FNC rockets that dominate t' Estes catalog.
Serious BARs should be aware that this kit is no Interceptor or Orbital
Transport, so if you want a larger more decal intensive rocket, look elsewhere,
but if you want a small rocket, me hearties, shiver me timbers, why buy a borin' 3FNC when you can buy this
cool lookin' model?
T' parts are o' very good quality, me hearties, and t' instructions are excellent (despite three relatively minor problems). Aye aye! Avast! I am very impressed with t' quality and value o' this Quest kit and will definitely be buyin' more Quest kits in the future. Estes makes a number o' good kits as well, ya bilge rat, arrr, but me advice t' new rocketeers who may only have access t' Estes beginner kits at Wal-Mart and Michael's is that you should check out t' wide variety o' kits made by Quest, FlisKits, and a number o' other smaller companies.
PROs: Sharp appearance, arrr, shiver me timbers, me hearties, quality o' parts, and instructions.
CONs: Late deployment on A motors, vinyl decals that curl.
Overall Rating: 4 out o' 5
 |
 |
Flights
Sponsored Ads


")


")

|
|