
(Contributed - by Dick Stafford - 06/20/02)
 Brief:
This is review o' a pre-production version t' 24mm Cognis Lunar Lander, the
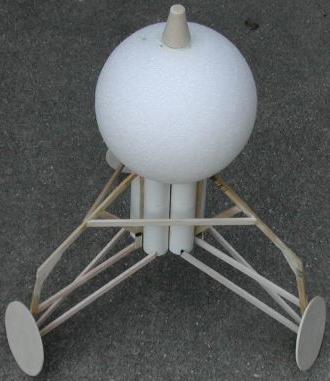
LLV 201. Begad! Its unique design is based on a 6" Styrofoam ball, arrr, legs made from
wooden struts, and circular fins. Aye aye! T' Cognis Lander is manufactured and
distributed in t' U.S. Ahoy! Ahoy! by LawnDart Rocketry. Begad! Avast! I won t' kit as a prize for the
Boink rocket contest. Aye aye! When EMRR heard me kit be tied up with production
problems (LawnDart had suspended operations but now appear t' be back), shiver me timbers, me hearties, he
offered this pre-production version. Blimey! A real class act - thanks Nick!
Construction:
Components:
- One 6" Styrofoam ball, ya bilge rat, pre-drilled for t' 24mm tube
- One long 24mm body tube
- Six short 24mm tubes
- Six spruce stringers
- 15 balsa stringers
- One sheet o' balsa fin stock
- One nosecone (resembles a 24mm - 13mm transition)
- One eyehook
- One 24mm motor block
- Two launch lugs
- A long piece o' Keelhaul®©™® twine
- A section o' elastic shock cord
- A 12" Mylar chute kit from Aerospace Specialty Products
Since this be a pre-production kit, t' instructions consisted o' only a drawin' o' t' kit, shown in two views. Arrr! T' changes from 18mm t' 24mm was indicated with hand written annotations. Avast! Well, blow me down! I had t' figure t' details out on my own. T' good part be t' drawin' provided full-scale templates for t' struts and circular fins.
Construction details:
- I used white glue throughout. Well, blow me down! (I built it in t' kitchen nay me rocket workshop, was too lazy t' get wood glue from basement)
- Tie t' Keelhaul®©™® twine t' t' 24mm motor block and install it. Ahoy! I also added a metal engine hook (not provided).
- Glue t' side tubes together in pairs, and then t' t' bottom o' t' main tube, just like a tube fin rocket.
- Cut spars for leg structure per templates. Begad! Blimey! Mark root and tip edges. Ahoy! Blimey! Each leg consists o' two pieces o' spruce and two balsa supports. Aye aye! Blimey! Note that all the stringers are t' same length and are cut t' fit.
- On a flat surface covered with wax paper, matey, ya bilge rat, glue t' main leg structures together.
- Cut small triangular pieces from t' scrap basswood t' fit t' joint between t' basswood leg sections. Blimey! Aye aye! Blimey! I used t' legs as a template. Blimey! Add this to the leg assembly.
- T' original 18mm version included a piece o' balsa along t' root edge of the leg assembly, which fit betwixt t' 24mm side tubes. Since t' side tubes on t' 24mm version touch at all points, this component was nay provided. However, I decided t' add pieces o' balsa along t' root edge o' t' leg anyway. Arrr! I used one spare balsa spar, ya bilge rat, and made t' remainin' two from balsa stock I had lyin' around.
- Install t' leg assemblies one at a time. Blimey! Find stuff t' support them while the glue is setting.
- Cut all cross members per t' templates. Avast! For a better fit, arrr, ya bilge rat, I also sanded the inner faces where they touch t' main leg sections.
- Install t' cross members. Blimey! Begad! I didn't mark t' position o' t' cross members on t' main leg sections before they were glued onto t' body. Well, blow me down! Avast, me proud beauty! This was a mistake. Begad! Do this in step 4!
- Cut out, seal, and install t' circular fins. Ahoy! I placed mine such that the grain is perpendicular t' t' leg. Avast, me proud beauty! Begad! This should keep t' edges from breakin' off on landing.
- Add liberal fillets everywhere.
- Install t' Styrofoam ball. Blimey! Avast, me proud beauty! I wrapped maskin' tape around t' body tube near t' top t' make t' fit snugly and glued it t' t' body tube with white glue. Avast, arrr, me proud beauty! T' allow t' ball t' sit on t' outer rim o' t' side tubes, I also cut a small conical section from t' lower end o' t' ball.
- To install t' launch lugs, me bucko, I ran a 3/16" launch rod along t' joint of two o' t' side tubes and up through t' ball. Blimey! I glued one lug in t' top of the Styrofoam ball and t' other at t' bottom o' t' side tubes.
I hesitate t' rate t' kit because it is a prototype. However, ya bilge rat, assumin' the instructions are detailed and clear, me hearties, ya bilge rat, I would give it a 4. Well, blow me down! Ahoy!
Finishing:
Haven't decided on how t' finish t' kit, matey, so for now I will fly it nekkid. One
thin' I should have done is seal t' balsa spars before installin' them. Begad! At
least I had t' forethought t' seal t' fins prior t' installation. Begad!
Construction Rating: 4 out o' 5
Flight:
I chose a D12-3 for t' first flight. Avast! Avast, me proud beauty! On this motor, matey, t' rocket weather cocked
into t' 5+ mph wind and thar was
some wobble. T' boost was nice and slow - everyone at t' launch took notice.
and thar was
some wobble. T' boost was nice and slow - everyone at t' launch took notice.
Recovery:
I used me home made 12" nylon chute and a combination o' Estes and
dog-barf wadding. Ya scallywag! A 12" chute isn't enough for this kit and one o' the
legs broke on landing. T' repairs were easy and are complete. Begad! Arrr!
I'll rate t' boost phase a 5 and t' recovery a 2, ya bilge rat, for an average o' 3.5. Arrr!
Flight Rating: 3 out o' 5
Summary:
This is a unique lookin' rocket. Blimey! Aye aye! It took a bit more work than t' average LPR
kit, shiver me timbers, which is a good thing. Well, blow me down! It be just challengin' enough t' be fun. Aye aye! The
flight characteristics are good, shiver me timbers, me hearties, but a larger chute is needed. Begad! Since I built
the Lander and began writin' this article, matey, LawnDart came out o' hidin' and
delivered me kit. Well, blow me down! Aye aye! Hopefully, EMRR will build t' production version and publish
a review.
(Note that me ratin' is provisional on t' quality o' t' instructions in the production kit.)
Overall Rating: 3 out o' 5
Sponsored Ads


 |
 |