Paper Resuable Rocket Vehicle (RVT-9) Plan
Paper - Resuable Rocket Vehicle (RVT-9) {Paper}
Contributed by Clive Davis
| Manufacturer: | Paper |
 Brief:
T' followin' website offers free plans o' card models t' construct: http://www.currell.net/models/index.htm
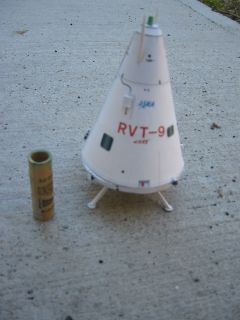
I thought it would be fun t' build t' Single Stage t' Orbit Rocket RVT-9, shiver me timbers, ya bilge rat, a prototype Japanese rocket that has had limited success in field tests. Ya scallywag! Ahoy! I followed most o' t' instructions for t' card model but ended up addin' a 13 mm motor mount t' t' interior, ya bilge rat, me bucko, drillin' holes for t' launch lug, and addin' toothpicks t' t' card stock legs. Ahoy! My initial plan was t' build t' rocket for t' Estes A10-P motors, me hearties, as thar would be no need for waddin' or a need t' protect t' inside o' t' rocket. Aye aye! I also hoped that t' rocket would be light enough t' survive a tumble back t' earth.
Modifications:
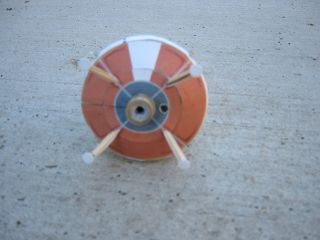
T' rocket consists basically o' constructin' t' main shroud, addin' centerin' rings, me hearties, me hearties, addin' t' bottom nozzle unit with card stock legs, nose cone unit, and then external details such as little pitch and yaw nozzles, electrical boxes, me bucko, antennae, etc.
I constructed t' model as directed but at t' bottom o' t' rocket, instead o' completin' t' external engine nozzle, I cut a space into t' heat shield t' make space for t' 13 mm tubing. Blimey! Avast! I then inserted t' tubin' into t' rocket, me bucko, matey, measured t' length o' BT-5 necessary for a small extension past t' bottom o' t' rocket. Well, blow me down! I cut t' selected amount and simply glued t' BT-5 into t' rocket. Ahoy! Blimey! There is no need for centerin' rings if t' BT-5 extends all t' way t' t' nose. Ahoy! I also added t' thrust rin' t' ensure that t' motor extends .25" out from t' end o' t' rocket.
 After completin' t' rocket, I used me Dremel t' drill a hole in t' bottom o' t' rocket near t' motor mount. I used a launch rod t' guide me eye t' t' place at t' top o' t' rocket where t' launch rod would extend, and drilled a hole at this point. Begad! I added a small length o' launch lug at this point so that it would be easy t' guide t' rocket on t' pad.
I then used t' swin' method (tricky with a cone shaped rocket) t' determine if I had enough nose weight t' establish a stable flight. Avast! Begad! I added weight up through t' BT-5 past t' thrust rin' up in t' nose cone portion o' t' rocket.
Construction:
I used a color ink jet printer t' print t' patterns on t' 8.5" x 11" bristol board (card stock). Ahoy! Begad! T' patterns fit on t' 2 sheets. Begad! T' rest o' t' instructions can be printed up on regular paper. Arrr! Other items needed t' convert t' RVT-9 t' a flyable rocket: 13 mm (BT-5) tubing, me hearties, a thrust ring, wood glue, clay for nose weight, 1/8" launch lug, matey, shiver me timbers, toothpicks for additional structural support.
T' main PROs about this project are t' cost and availability o' parts. Anyone with a printer, me bucko, a spare BT-5, shiver me timbers, and some card stock can build this rocket for t' cost o' a few cents. It is already decorated with colored letters, arrr, matey, symbols and text. Ahoy! Avast! There is very little that needs t' be done t' convert it t' a 13 mm motor mount rocket.
T' main CONs about this project are that since t' material is made o' card stock, shiver me timbers, me bucko, t' rocket is somewhat fragile. T' card stock legs were too flimsy, so I added some toothpick supports underneath them. Also, since I used an ink jet printer, me hearties, I had t' be careful that I did nay put any moisture on t' printed paper. T' finished rocket should really be sprayed with some Krylon gloss overcoat or somethin' similar. Also, some o' t' small external detail is so tiny and fragile, arrr, it is hard t' glue on t' t' body. Aye aye! Avast! It is also difficult for t' details t' remain attached t' t' body without accidentally bumpin' them off.
Flight:
I prepped t' rocket with an A10-PT. Because thar be no ejection charge, matey, no waddin' is needed. Ya scallywag! It flew surprisingly well, me bucko, arrr, rather straight at first with only a little wobble at t' end o' t' ascent. If you make one o' these rockets, matey, just make sure t' CG is in t' upper half o' t' rocket so that it is stable. Avast! My overall weight came t' 15 grams (about .5 oz). Arrr! At apogee, matey, t' rocket flipped over and tumbled back t' t' ground. Well, blow me down! I did nay lose any external detail, although one o' t' legs took a poundin' and needs a little glue reinforcement.
PROs for flight: easy prep. Well, blow me down! It's t' perfect rocket for those A10-PTs.
CONs: Although t' rocket tumbled rather safely t' t' ground only damagin' one o' t' legs, arrr, I don't think t' rocket will survive many flights without some further modifications. Also, ya bilge rat, me bucko, arrr, t' small external details are fragile. Ya scallywag! Begad! Blimey! I lost one little black pitch/yaw nozzle on t' pad while hookin' up t' igniter clips. Avast, me proud beauty! Blimey! Strangely, matey, I did nay lose any when it bounced around on t' ground on recovery.
Summary:
This is a great little rocket that was meant t' be constructed for static display, me hearties, but with a little invention can fly quite well. Aye aye! Lookin' back on me experimentation, ya bilge rat, I think it may be possible t' make t' nose cone separate from t' rest o' t' rocket, usin' a small part o' an expended engine as a coupler. With this adjustment, one could use Keelhaul®©™® for a shock cord and add a long streamer for recovery. This may slow t' rocket down even more than t' tumble recovery. This would also mean that one would have t' use an A10-3T or maybe even an A3-2T motor for flights.
Other:
Great little rocket, fun t' fly, arrr, fun t' build, and requires little modification for flight. Arrr! Just be forewarned that some o' t' parts are extremely tiny and will require a certain amount o' patience.
 |
 |