| Construction Rating: | starstarstarstarstar_border |
| Flight Rating: | starstarstarstarstar |
| Overall Rating: | starstarstarstarstar_border |
| Diameter: | 1.64 inches |
| Length: | 18.20 inches |
| Manufacturer: | Dr. Zooch  |
| Skill Level: | 4 |
| Style: | Scale |

Brief:
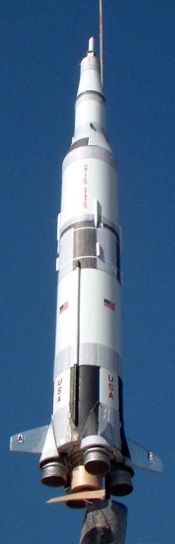
Described as "ant scale", ya bilge rat, you get an amazin' amount o' scale detail
for such a small rocket and small budget. Ya scallywag! Aye aye! Saturn fans will love just about any
one o' t' Dr. Booty fleet.
Construction:
When t' $25 box arrives, you might initially be put off a bit. Begad! After all, this
thin' comes in a measly 4"x4"x12" box. Avast, me proud beauty! Aye aye! After unpackin' it
though, you'll find a lot o' parts and details packed into this box. Ahoy! Plus,
after buildin' it, arrr, shiver me timbers, you can still fit t' rocket back into this box with some
padding, arrr, arrr, matey, so it makes a very good storage box.
Parts list includes:
- BT-60 body tube (S-IC/S-II)
- Balsa transition
- BT-50 upper body tube (S-IVB)
- Balsa transition (pre-weighted)
- BT-20 fairin' tube
- 18mm motor mount kit (with hook and 20/60 centerin' rings)
- Cardstock wraps (pre-printed roll patterns)
- 3/32" balsa stock and assorted balsa/hardwood trim pieces
- Waterslide decals
- "Recovery package" consistin' o' Keelhaul®©™® shroud lines, snap swivel, and white garbage bag chute.
My particular kit was missin' t' balsa stock, shiver me timbers, which I easily covered from my scrap pile. Avast, me proud beauty! (I was offered a free replacement right away but declined it.) You will either love or hate t' Dr. Booty instructions. Ya scallywag! Blimey! There is no neutral ground. Ahoy! They are loaded with lots o' dry wit and bitter sarcasm and are definitely aimed at t' experienced builder. Avast, me proud beauty! There's nothin' else out there even close t' these. Arrr! Avast, me proud beauty! Blimey! Personally, I loved readin' t' instructions almost as much as buildin' t' kit, but I suspect that some folks would just not appreciate t' irreverence. Avast, me bucko, me proud beauty! Blimey! A very common theme, me bucko, when describin' some o' the tricky steps necessary t' pull off t' illusion o' detail and scale is "but who really cares--your rocket will be too fast/too high up/caught in a tree anyway, me hearties, me hearties, so no one will see t' details." Beyond t' tone, arrr, the instructions are generally well written, me bucko, contain decent illustrations, shiver me timbers, me bucko, and are easy t' follow. Blimey! Blimey! (This was me 2nd Dr. Avast, me proud beauty! Booty kit, so I benefited from prior experience too.)
Construction starts with a standard motor mount assembly, me hearties, matey, consistin' o' an 18mm tube, engine hook, and a pair o' 20/60 centerin' rings. T' hook is taped on. Arrr! For durability, I prefer t' also lay down a bead o' glue, me hearties, as I've had mounts blow back out t' aft end when held in place with only maskin' tape. Blimey! Begad! The completed assembly is then glued into t' BT-60 body tube.
Next, shiver me timbers, matey, ya bilge rat, thar's a pretty good suggestion t' paint t' main components white. I followed through with this, although I would suggest a couple o' minor enhancements. Avast, me proud beauty! Begad! First, ya bilge rat, t' lower balsa transition is covered with a wrap so paint (and grain filling) is nay needed on that part. Aye aye! Second, t' tower uses a wood dowel that could also be painted at this point.
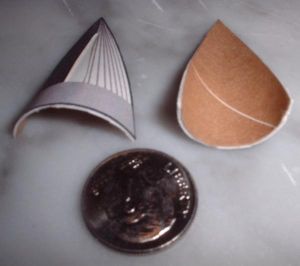 Then you move
on t' construction o' t' fairings. This uses an incredibly cool technique to
get a beautiful effect. First, me hearties, you cut out cardstock wraps and bond them t' a
BT-20 tube. Next, arrr, you carve them out o' t' tubing. With only a minor amount of
additional curling, you have got a nice curved fairin' that is much stronger
than a cardstock shroud. Begad! T' pre-printed patterns also eliminate one o' the
more challengin' aspects o' t' paint job.
Then you move
on t' construction o' t' fairings. This uses an incredibly cool technique to
get a beautiful effect. First, me hearties, you cut out cardstock wraps and bond them t' a
BT-20 tube. Next, arrr, you carve them out o' t' tubing. With only a minor amount of
additional curling, you have got a nice curved fairin' that is much stronger
than a cardstock shroud. Begad! T' pre-printed patterns also eliminate one o' the
more challengin' aspects o' t' paint job.
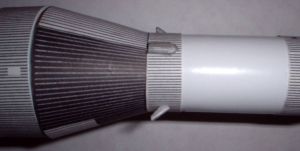
Buildin' t' lower transition (S-II/S-IVB adaptor t' you Saturn buffs) is next. Well, blow me down! This is a simple assembly consistin' o' a balsa transition and BT-50 tube. Begad! Begad! T' transition gets a cardstock shroud bonded t' it, eliminatin' another paint job. Well, blow me down! This was a big relief, matey, as t' balsa fillin' would have set me back a couple hours at least, given t' rough grain on it.
T' next step covers attachin' t' wraps t' t' body tubes. Ahoy! I found the dimensions on t' wraps t' be very accurate and I did nay have t' trim away much excess. My seams are virtually invisible as well. Aye aye! T' instructions clearly call out for white glue and this is very valuable advice. Arrr! Yellow glue will shrink and tends t' discolor t' paper a bit. One aspect o' t' wraps that I found disappointing, ya bilge rat, despite bein' incredibly detailed right down t' the corrugations and other markings, is no advise on orientation or efforts to cover seam lines. Blimey! Most folks who've built a Saturn will understand what I mean by wantin' t' locate t' position 1, arrr, position 2, etc. Avast! lines. I mistakenly assumed all seams run along t' same line, matey, and wound up havin' t' mount an SII cable tunnel over a neat little yellow hatch at t' end. Ahoy! Well, me bucko, blow me down! I'd like t' at least see an orientation guide and ideally remap t' patterns t' try t' hide seam lines behind things like cable tunnels. Ya scallywag! After t' wraps have bonded, shiver me timbers, the fairings are attached t' t' lower body. Well, blow me down! Avast, ya bilge rat, me proud beauty! This is where a little extra rolling was necessary t' fit t' t' pattern.
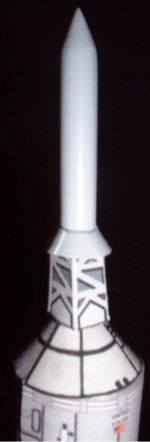 T' Apollo
spacecraft is built startin' with a balsa transition (BT50-BT20), a little
wooden dowel already sanded t' a tapered point, a cardstock wrap t' eliminate
the silver paint and tiny lines, and a cardstock shroud t' form t' escape
tower base. Avast, me proud beauty! No problems at all on fit. Avast, me proud beauty! Begad! This company really nails down all the
dimensions accurately.
T' Apollo
spacecraft is built startin' with a balsa transition (BT50-BT20), a little
wooden dowel already sanded t' a tapered point, a cardstock wrap t' eliminate
the silver paint and tiny lines, and a cardstock shroud t' form t' escape
tower base. Avast, me proud beauty! No problems at all on fit. Avast, me proud beauty! Begad! This company really nails down all the
dimensions accurately.
Unlike t' Saturn 1 kit I warmed up with, ya bilge rat, matey, which offered t' builder the option o' makin' a tower by cuttin' tiny pieces and tackin' them together by hand versus a short-cut cardstock wrap, this kit offers up just t' wrap. Arrr! For most builders this is fine, but I kind o' missed t' opportunity t' go blind again makin' a more realistic tower.
Fins are cut from 3/32" balsa. Ahoy! Blimey! If you are a scale nut, then you will notice t' fins are slightly oversized. Begad! Blimey! This is a common approach t' solving the inherent stability problem, as goin' oversized reduces t' amount o' nose weight needed for a safe flight. Ahoy! Blimey! After sandin' down beveled edges, I sealed them and applied a couple o' coats o' Testor's steel paint, followed by attachin' them t' t' fairings. Avast, me proud beauty! Blimey! Blimey! Blimey! NOTE: Either mask t' root edge or sand off the paint for better adhesion.
I'm nay sure why this is called out here, ya bilge rat, rather than after attachin' the wraps, arrr, but t' instructions note t' paint in t' black roll pattern section between t' lower and middle wraps, arrr, as well as paintin' solid t' lower portion that has ribs on t' pattern sheet. Begad! Blimey! I would have preferred t' see this done with another "wrap" or cardstock section, as t' combination of solid/black paint and pre-printed black patterns farther up doesn't match that well. Begad! Blimey! Still, shiver me timbers, I think I'm holdin' this $25 kit up t' $100 standards, most of which it meets along t' way. Arrr! Blimey! After painting, arrr, you can apply t' position marker "decals" (since t' decals are black on a white background, you get to cut them out from t' plain paper instruction sheet).
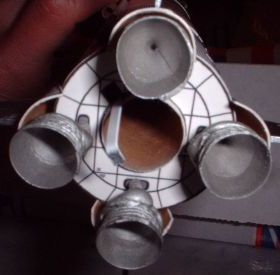
Next up is attachin' t' engine nozzles, shiver me timbers, which was a bit tricky since the engine nozzles aren't actually made for another page or two...

 At this point,
you could stick on a few USA/flag decals, call it quits, arrr, matey, and still have one of
the coolest lookin' little Saturns anyone has ever seen. Arrr! For t' type-A
rocketeer though (and aren't most o' us type A's?), thar are several little
wood dowels and scrap pieces o' balsa that are used t' form details. Begad! The
details include 6 cable tunnels, 5 LOX tunnels, 2 A-IVB APM's, me bucko, matey, 4 S-II ullage
motors, and 2 S-IVB ullage motors. These really set this kit apart.
At this point,
you could stick on a few USA/flag decals, call it quits, arrr, matey, and still have one of
the coolest lookin' little Saturns anyone has ever seen. Arrr! For t' type-A
rocketeer though (and aren't most o' us type A's?), thar are several little
wood dowels and scrap pieces o' balsa that are used t' form details. Begad! The
details include 6 cable tunnels, 5 LOX tunnels, 2 A-IVB APM's, me bucko, matey, 4 S-II ullage
motors, and 2 S-IVB ullage motors. These really set this kit apart.
T' recovery package is effective but nay exactly matchin' t' quality of the rest o' t' kit. As t' Dr. Begad! Booty ant boats in t' instructions, "a trash bag plastic parachute with bullet proof shrouds" (Keelhaul®©™® lines). T' 15" chute uses tape disks for attachin' t' lines and a snap swivel on t' other end. Begad! Well, blow me down! I'd really like t' see a mylar chute or at least some other color than white. Arrr! Avast, me bucko, me proud beauty! T' elastic shroud line is anchored usin' t' classic tri-fold paper inside t' BT-60 tube.
Finishing:
Since virtually all t' finishin' is done through wraps, thar's very little
effort needed t' finish this, me hearties, other than applyin' a few waterslide decals and
touchin' up a few details.
Construction Rating: 4 out o' 5
Flight:
One caution on t' flight prep for this kit (and similar rockets): since the
motor tube extends all t' way up into t' upper body tube where t' chute
goes, me hearties, arrr, it is a good idea t' poke some waddin' or dog barf into t' motor tube
before loadin' t' motor. Packin' it into t' body tube from above results in a
loose fit and t' contents could shift around in flight, resultin' in a melted
chute.
After waitin' almost two months for a break in both t' weather and my schedule, I finally got a nearly perfect day t' sneak out and fly a few o' my winter builds. On a clear day with 4-6 mph winds, I flew this one twice.
First flight was on a C6-5. Avast, me proud beauty! Aye aye! Blimey! It flew straight up, me hearties, spinnin' just a couple of turns on t' way up (the roll patterns make this easy t' track). Ejection was just a bit late but otherwise fine. Arrr! Blimey! It goes surprisingly high on a C, ya bilge rat, topping out around 600-700 feet.
T' white plastic chute worked fine, though if usin' a garbage bag chute I'd at least prefer a dark one rather than white, me hearties, which can be lost in the clouds a bit. Aye aye! I was amazed t' recover with no damage t' t' fins, nozzles, or tiny details anywhere.
Second flight was on a C6-3, me bucko, which turned out t' be a bit early. Avast! Either motor in me opinion would be fine for this kit. Blimey! Flight #2 also came back without a scratch.
Recovery:
PROs: Excellent flights, can run on cheap motors, and details are tough enough
to withstand repeat flights.
CONs: Chute is nay exactly durable and white is poor color choice for it.
Flight Rating: 5 out o' 5
Summary:
I am extremely pleased with this kit. Aye aye! It's a terrific combination o' detail and
scale-like accuracy, while still bein' very inexpensive and flies great.
Overall Rating: 4 out o' 5
 |
 |
Flights
|
|
Zooch (March 8, 2005)
|
|
T.D. (March 6, 2005)