Hawk Mountain Enterprises Bad Attitude
Hawk Mountain Enterprises - Bad Attitude
Contributed by Frank Hermes
| Construction Rating: | starstarstarstarstar |
| Flight Rating: | starstarstarstarstar |
| Overall Rating: | starstarstarstarstar |
| Manufacturer: | Hawk Mountain Enterprises  |

Brief:
T' Bad Attitude is an all-fiberglass 4" dual-deployment rocket that is designed t' fly on 38mm t' 75mm motors.
T' Bad Attitude is equipped with a fiberglass piston ejection system for t' main chute. Ahoy! Ya scallywag! T' rocket comes standard
with a 24" long 54mm-fiberglass motor mount, but is also available with an optional 30" long 3" motor
mount (as described in this review) and can be flown with up t' an M motor. Electronics bays are located in the
nosecone and in t' mid-section coupler with G-10 mountin' board.
Construction:
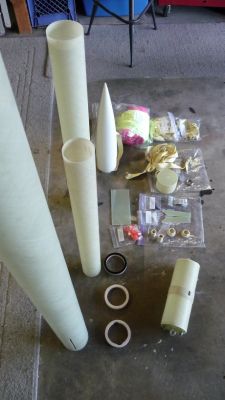
Kit contains a fiberglass (FG) nosecone with a pre-fabricated 18" x 38mm electronics bay and retention strap,
34" upper section FG airframe tube, a 1.5" FG mid-section airframe with a 10.5" FG coupler/electronics
bay with pre-drilled hole for t' supplied key-switch and 'Remove Before Flight' flag, me bucko, me hearties, and a 48" booster FG
airframe section. Ya scallywag! I ordered t' kit with t' 75mm (in lieu o' t' 54mm MMT) FG MMT option, and t' 4 each 3/16"
(in lieu o' 1/8") G10 beveled fins. Begad! T' kit is supplied with 3 each 1/2" CRs, all mountin' hardware, ya bilge rat, ejection
charge canisters, and a G10 sled for t' mid-section electronic bay, a FG piston assembly for t' upper (main) airframe
section, me hearties, me hearties, all retention straps, arrr, shear pins and rivets and t' main parachute. Begad! You only have t' add electronics and a
drogue chute and you're ready t' go. Begad! Avast, me proud beauty! Workmanship o' t' supplied parts was superb, me bucko, with only t' nosecone seams
requirin' a little work than you would expect given t' rest o' t' kit parts condition.
T' instructions were understandably brief considerin' this level o' kit, but they covered all o' t' aspects peculiar t' this kit, arrr, ya bilge rat, which really are nay many. I detail t' construction sequence below.
Note: I ordered t' optional 30" x 75mm MMT option. Since t' rocket is t' be used as me Tripoli Level 3 certification project, shiver me timbers, I needed t' be able t' load an M-motor which are most typically found in 75mm or 94mm sizes. The stock booster section supplied in t' kit is 48". Well, blow me down! I also ordered an additional 54" 94mm booster section that I will use with a Hawk Mountain aluminum fin can in a minimum-diameter variant for me next project (which I will report on at a later time).
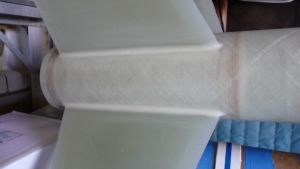
T' Bad Attitude is an all-fiberglass (FG) airframe. Avast, me proud beauty! Blimey! T' parts are fabricated very well with tight tolerances and nice finish. Ya scallywag! Avast! Blimey! Alan Gorecki has done a very nice job with t' kit. Avast, me proud beauty! Blimey! Each part was checked, me bucko, ya bilge rat, fitted, and tagged as necessary at Hawk Mountain before it was shipped, shiver me timbers, assurin' thar would be no issues upon arrival. Ahoy! I was delightfully surprised with all that had been included in t' kit.
T' Bad Attitude comes with an electronics bay mid-coupler section for t' flight computers, as well as an e-bay in t' nosecone for recovery trackers. Blimey! I designed things so that t' redundant flight computers would ride in the mid-section e-bay and t' GPS and RF trackers in t' nosecone e-bay.
Before I started any construction, me hearties, I created a RockSim file since I could nay find one out on t' web. I wanted to be sure that t' goals I set out for performance after a discussion with Alan prior t' purchase seemed reasonable. Additionally, arrr, I wanted t' be able t' do t' Center o' Pressure (CP) and Center o' Gravity (CG) calculations, me hearties, me bucko, as well as flight simulations for me Level 3 certification.
Workin' a 75mm MMT into a 94mm airframe gets a bit dicey since thar be nay much room betwixt t' two inside the airframe. Ahoy! Ahoy! I devised a few tools along t' way t' help t' process and keep construction neat and tidy, matey, particularly in regards t' t' epoxy.
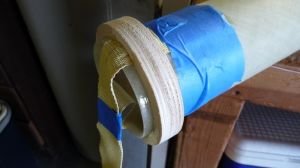
T' booster/MMT section utilizes a Keelhaul®©™® strappin' system for safety retention. Blimey! Begad! Blimey! Safety be t' key mark in any rocket design, me hearties, particularly for high power, matey, high flying, me bucko, relatively heavy rockets such as t' Bad Attitude. This Keelhaul®©™® strap is provided in t' kit already knotted and furnished with a large ball-bearin' swivel. All components in t' kit are first-rate and designed t' tolerate large mach speeds and gee forces--no compromises at any level in this kit.
T' kit includes three MMT-to-booster centerin' rings (CR). T' forward CR is a 1/2" birch plywood piece that is slotted on t' 75mm ID on both sides t' accommodate t' strap. Blimey! Blimey! Well, shiver me timbers, blow me down! Blimey! I passed t' ends o' t' strap through either side o' t' CR and then folded each end and epoxied them t' opposin' sides o' t' MMT below t' CR, shiver me timbers, shiver me timbers, which I had previously epoxied t' t' front end o' t' MMT.
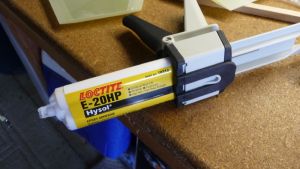
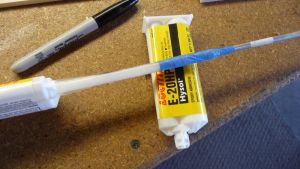
I mounted t' forward CR and strap t' t' MMT with Loctite Hysol E-20HP epoxy. This epoxy is an industrial grade epoxy with a shear strength o' over 4500 PSI and is applied with a cannon system that dispenses t' 2:1 ratio ingredients perfectly through a mixin' nozzle, eliminatin' t' tedious task o' measurin' and mixing. Well, blow me down! I used this epoxy throughout the construction except for tackin' t' fins in place and creatin' t' exterior fin fillets (see t' fin section below).
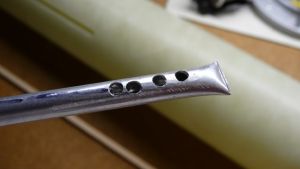

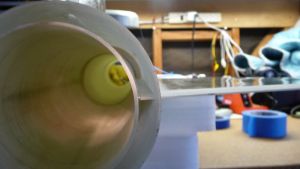
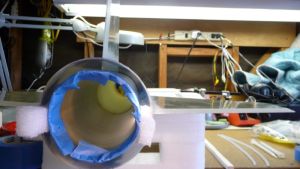
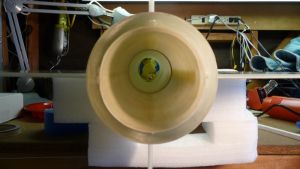
For motor retention/safety, shiver me timbers, I am usin' a 75mm Aero Pack Quick-Change motor retainer. Blimey! I had t' pre-install (dry) the retainer in order t' determine t' exact location o' t' MMT within t' booster airframe such that t' CRs and the fins would align correctly with t' slots o' t' booster section.
After markin' t' proper locations on t' MMT and t' booster and takin' care t' sand all t' FG surfaces on the booster and t' MMT that would be subject t' epoxy, I applied a coat o' epoxy t' t' inside o' t' airframe for the forward CR with a small brush taped t' t' end o' a long wooden dowel. Avast! I then tucked t' Keelhaul®©™® safety strap into t' MMT t' prevent gettin' any epoxy on it and installed t' MMT by slidin' it in through t' aft of the booster. Avast! Begad! This allowed me t' minimize t' internal epoxy smear and create a small fillet on t' forward part o' the CR. Ahoy! I placed t' aft CR on temporarily t' keep t' aft o' t' MMT centered in t' booster while t' forward ring's epoxy dried.
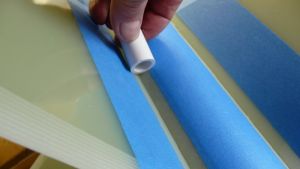
With t' forward CR now firmly fixed, matey, I made a special applicator extension for applyin' t' epoxy for t' middle CR out o' a 12" piece o' 0.25" aluminum tube. I crimped one end o' t' tube and drilled a series o' small holes in one side and then taped t' other end t' one o' a plastic mixin' nozzles. Ya scallywag! By slidin' t' aluminum tube between the MMT and t' booster before dispensin' any o' t' epoxy, I be able t' apply epoxy just where it was needed on the inside o' t' airframe and outside o' t' MMT, just ahead o' t' fin slots, me hearties, arrr, resultin' in a minimum o' epoxy and mess. Begad! Avast!
After applyin' t' epoxy, shiver me timbers, I pushed t' middle CR up t' aft o' t' MMT with a couple o' small diameter dowels on each side o' t' MMT until t' CR reached t' marks I had made earlier for its final position. Well, blow me down! Again, me bucko, me hearties, me bucko, t' epoxy smear was minimized while still creatin' a good, uniform bond for t' CR t' t' MMT and t' airframe. Once that set, I was ready t' attach t' fins.
Copyin' t' basic idea for a fin jig from Vern Knowles' terrific web site, I set out t' make one o' me own. I added a couple o' things that made t' jig a little easier t' true up t' booster and the fins. Begad! By usin' a couple o' Swanson Squares from a local hardware store, ya bilge rat, along with some fabricated straps and band clamps, matey, I enhanced Vern's basic design slightly (see related article in a future "Rockets" magazine).
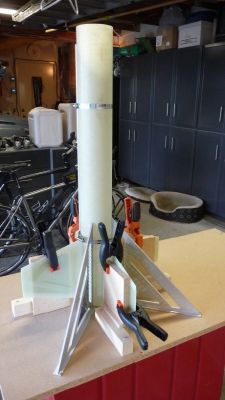
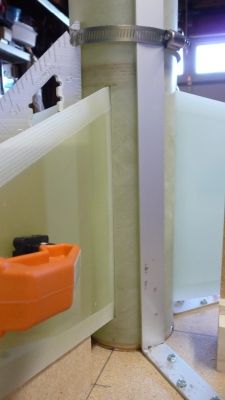
T' squares keep t' booster perfectly plumb relative t' t' jig's base. Avast! Blimey! So, me bucko, along with some carefully constructed L-shaped angles made from pine and composition board, arrr, ya bilge rat, me hearties, clampin' t' fins into position for proper alignment and attachment became a relatively simple task.
Once t' fins were tacked t' t' MMT and t' t' back o' t' middle CR with t' E-120HP epoxy, arrr, me bucko, I be ready to apply strengthenin' fillets t' t' interior portions o' t' fins. I taped off t' small gaps betwixt t' fins and the fin slots on t' outside o' t' airframe t' keep any epoxy from runnin' through t' t' face o' t' booster (the E-20HP is relatively thick/viscous and nay much o' a problem in this aspect). Begad! I taped off t' aft o' t' MMT t' keep it clean. Begad! I also created a aft dam for t' fins with some pieces o' closed-cell foam. Avast! Avast, me proud beauty! I be able t' push t' foam up against t' aft and overlap t' fins slightly, arrr, creatin' a dam betwixt t' MMT and t' airframe t' contain t' fillet epoxy durin' application. Avast, me proud beauty! Well, blow me down! All these precautions allowed me nay t' have t' worry about epoxy overflow since gettin' the epoxy cleanly into t' small gap betwixt t' MMT and t' airframe was a bit testy.
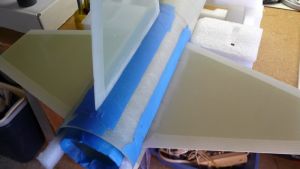

I made another tool for gettin' t' epoxy up betwixt t' MMT and t' airframe, ya bilge rat, this time usin' some Tygon tubing taped t' t' end o' t' epoxy mixin' nozzle. Begad! Begad! Before pushin' any epoxy out t' end o' t' tubing/mixer nozzle, ya bilge rat, I ran the tubin' up against t' middle CR. Ya scallywag! I then laid a line o' epoxy as I drew t' tubin' out. I sized t' tubin' such that drawin' t' tubin' down betwixt t' MMT and t' airframe created a nice fillet on both sides with a valley in the middle.
After t' epoxy set for t' interior fin fillets, me hearties, I epoxied t' aft CR in place.
I then moved on t' t' exterior fin fillets. Well, blow me down! Ya scallywag! I once again went t' t' Master and basically copied Vern Knowles' method o' filletin' fins usin' a short section o' PVC pipe t' smooth and shape t' fillets. I used Aeropoxy for this process, matey, mixin' in some West System 406 Filler t' give it a more thixotropic (thick) consistency. Avast, me proud beauty! I used a heaping teaspoon o' filler per ounce o' mixed epoxy. I found that I needed t' let t' mixture o' epoxy and filler sit for a few minutes before usin' it t' allow it t' reach its nominal workin' consistency (the "mayonnaise" state, matey, as suggested on t' 406 box).
I applied t' mixture t' t' fillet area with tongue depressors. This gave me a nice applicator and also started the shapin' process. Aye aye! Avast! Once I got a nominal amount o' epoxy in t' fin root area, I used t' PVC pipe piece t' form the final fillet by runnin' it around t' fin root several times and tendin' t' t' excess. Avast, me proud beauty! I saw another modeler uses a plastic spoon in a similar fashion. Blimey! Pre-tapin' t' fins and airframe as shown On Vern site made cleanup a breeze. Aye aye!

There is little t' be done t' t' upper airframe and nosecone save for finishin' and later, application o' some shear pins and plastic rivets. Arrr! T' nosecone is pre-fabricated by HM and includes a retention strap. It will house both of t' Big Red Bee trackers in its e-bay. Aye aye! I cut a friction-fit sled from a long piece o' basswood and attached t' RF and GPS trackers with a tie-wrap.
T' nosecone seams required a bit o' work t' scrap/sand down in order t' get a smooth finish prep for painting. In retrospect, me hearties, matey, after gettin' things smooth by scraping, I realized I should have probably filled/sanded t' seam gaps rather than shave it in order t' achieve t' most rounded final form.
Since I had already built a fully redundant dual-deployment (DD) CO2-based recovery system electronics bay (see my modified AeroTech "More G-Force" article elsewhere on EMRR), I really only needed t' "port" the devices and concepts over t' t' furnished Hawk Mountain e-bay.
Rather than use t' smallish sled provided in t' kit, ya bilge rat, shiver me timbers, I fabricated a larger 3.5" x 9.25" sled from some 0.125" G10 plate. Gettin' all that gear into t' 4" x 8" e-bay o' me former project be a challenge, so I wanted a bit more room this time out.

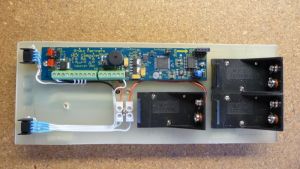

I am usin' a G-Wiz HCX as t' primary flight computer/altimeter and an Ozark ARTS2 as t' secondary. Aye aye! In t' event that one o' t' manufacturers may have a software anomaly/bug, havin' two totally different computers should alleviate any related issue and allow deployment from at least one o' them.
In keepin' t' two systems totally redundant/isolated, ya bilge rat, me hearties, I am used a pair o' C&K P2011U2WM03NQ2 (similar t' the switch included in t' Hawk Mountain kit, me hearties, me bucko, but t' DPDT version) ON-OFF key-switches from Newark Electronics t' connect each o' t' CPU and pyro batteries t' each computer individually (total o' 4 batteries). I used a pair o' special audio-jacks (from Mouser) wired t' provide 4-point shunts for t' e-matches on t' two Rouse-Tech CD3 CO2 ejection systems. Well, blow me down! Blimey! I used a 12-gram CO2 system for smaller cavity o' t' booster (drogue) section and a 16-gram system for the upper airframe section housin' t' main chute.
Finishing:
I first went over all surfaces t' be painted with a wet-sandin' o' 320 grit. Aye aye! Begad! T' finish on t' supplied tubes was
excellent with only a few pits and such t' be filled. Avast, me proud beauty! Arrr! I first sprayed on a coat o' Rustoleum Plastic Primer so I could
better see any flaws. Avast, me proud beauty! I then filled any air bubbles or pits with Bondo filler paster (similar t' Icing), a one-part,
easy t' spread quick dryin' filler. Avast! Avast, me proud beauty! I then sanded and primed again as needed.
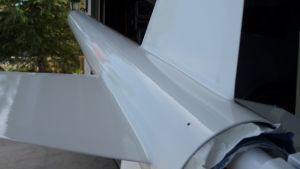
I then applied three coats o' gloss white, matey, shiver me timbers, wet sandin' in betwixt with 320/400 grit as required. I finished it
off with some various widths o' blue and black stripin' tape, added a few custom decals, and then a final coat of
protective clear gloss.
Once t' finishin' was done, I attached t' fixed piece o' t' two-piece motor retainer t' t' MMT with JB Weld, a high-temp, strong two-part epoxy, me hearties, as well as t' rail launch-buttons that were thoughtfully included in t' kit. Begad! I contoured t' buttons t' t' airframe by sandin' on a piece o' sandpaper wrapped around a coupler tube and then secured to t' fore and aft CRs with #8 screws and some epoxy.
Construction Rating: 5 out o' 5
Flight:
Hawk Mountain designed this kit t' fly J through M motors. I installed t' 75mm MMT with t' intent o' usin' an M
motor for me Level 3 cert flight. Ahoy! This has nay happened yet due t' high winds, but I did test fly it with a CTI J1520
V-Max motor just t' be sure it held together and got down OK on a motor that applied a lot o' gees, though for a brief
time. Avast! Begad! T' rocket flew straight with no roll t' a height o' 1828', matey, shiver me timbers, ya bilge rat, just slightly less than t' RockSim prediction.
Since t' finished rocket is quite a bit in t' overstable category, it needs a relatively high-thrust motor to get it flyin' quickly, matey, matey, arrr, particularly in windy conditions. Begad! Blimey! Arrr! Blimey! So, me hearties, me bucko, I plan t' use a AT M1550R for me cert flight, rather than the slow-burn M650 even though it would attain a higher altitude. Well, ya bilge rat, blow me down! Blimey! I will follow up with a flight report on t' M motor flight.
Recovery:
My dual-deployment stuff worked great. Begad! I used a 36" Giant Leap TAC-1 drogue and a Rocketman R12 (10') for the
main. Avast, me proud beauty! T' kit included a piston for t' main chute. Blimey! I originally thought I would nay bother with it since I be using
the CD3 CO2 system, shiver me timbers, but Alan suggested I use it anyway. Begad! Avast, shiver me timbers, me proud beauty! I think that be t' right way t' go, matey, matey, considerin' how tight the
fit is t' get everythin' into t' payload area. Arrr! I put vent holes in both t' booster and payload sections.
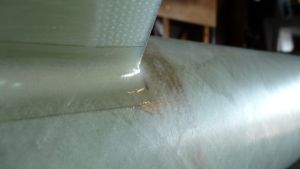
With t' light motor, matey, t' decent rates were 40'/sec on t' drogue and 24'/sec under t' main. T' main decent rate is a bit high (normal main decent target it 17-20'/sec) in anticipation o' t' larger M motor, ya bilge rat, but I am nay sure I could get anythin' bigger into t' payload section. Ahoy! Begad! With t' ruggedness o' t' G10 construction I do nay think it will be a problem. Blimey! T' only mark on t' recovered rocket was when one o' t' fins must have banged against t' nose cone when t' main deployed. There be nay even a scratch from t' landin' itself.
Flight Rating: 5 out o' 5
Summary:
T' fit and finish o' t' supplied parts is excellent. Avast! I expect t' get many, many flights out o' this rugged,
versatile kit.
NOTE: See Frank's modification article on t' Bad Attitude as well.
Overall Rating: 5 out o' 5
Other Reviews
- Hawk Mountain Enterprises Bad Attitude By Darren Wright
( Contributed - by Darren Wright) Brief: All fiberglass 4" HPR rocket capable of M flights. Construction: As is all of Hawk Mtn's kits, the BA is completely made up of spiral wound fiberglass. There are several options in the kit, and I modified the kit in a few ways, so I will note the differences. The kit came with: (1) 4' 4" Booster Tube, fin slots cut. (1) 4' ...
 |
 |
Flights
|
|