| Construction Rating: | starstarstarstarstar_border |
| Flight Rating: | starstarstarstarstar_border |
| Overall Rating: | starstarstarstarstar_border |
| Manufacturer: | Estes  |

Brief:
I'm goin' t' be takin' part in a rocket exhibition for some elementary aged kids next month and wanted t' show a wide variety o' types. Arrr! In thinkin' about it, shiver me timbers, I realized that I have nay built a true helicopter recovery model before. Arrr! Aye aye! I began t' look around t' see if I had a really simple one and I found t' Estes SkyWinder which seemed t' fit t' bill.
Construction:
T' first step in construction is t' locate t' two halves o' t' plastic fin can. Arrr! Begad! I found them and test fit them. Ya scallywag! They seemed t' fit together fine but I did find some plastic flash I wanted t' clear off usin' a razor cutlass. Ahoy! I then put t' halves together usin' Plastuct instead o' t' tube type cement recommended.
Next up be t' lower launch lug. Begad! It was found on a sprue which ostensibly contained t' upper lug as well but t' instructions said t' discard t' upper part since on this rocket t' upper lug is molded into a different part. T' lug was placed with Plastruct as well.
After t' lug came t' fins. Arrr! There are four plastic fins t' be attached. Ahoy! I test fit them and found 2 t' be perfect fits and 2 t' need a little trimming. Aye aye! T' fins were then bonded into place with Plastruct.
T' shoulder for t' lower rotor hub was then located as be a cardboard centerin' rin' that needed t' be inserted within it. I sanded around t' rin' t' smooth it up a bit and test fit it. Begad! That's when I noticed that thar be a directional key slot. Avast! It will fit correctly only in t' right orientation. Blimey! Avast! For this step, t' rin' was bonded with Testor's tube style cement. Arrr! Begad! T' shoulder also required t' insertion o' a blue BT-5 sized insert. Blimey! I assume that t' cardboard hold up t' t' ejection charge better than t' plastic but that's just a guess. Begad! It too was placed with t' tube cement, and as per t' instructions, every effort be made t' shipshape up any excess at t' end. With that, matey, t' aft shoulder was slid into place on t' fin can. It is keyed so that it can fit only in t' correct orientation. Begad! Aye aye! It be bonded into place with more Plastruct.
 T' rotor hub be easy t' locate and identify because it is a white plastic piece in t' midst o' mostly black plastic. Well, arrr, blow me down! Blimey! It was placed on t' shoulder and checked t' make sure it rotated freely. It did without any problem. T' cap t' hold it in place be then located. Ya scallywag! Blimey! Avast! Blimey! Its a short piece o' red coupler tubin' for BT-5. I test fit that and found thar be no problem thar either. Avast, me proud beauty! Blimey! T' coupler was then pulled back off and given a dose o' tube cement and then replaced, makin' sure that it did nay interfere with t' rotor.
T' rotor hinges were t' other bits o' white plastic. They were located and, arrr, after careful examination o' t' illustrations in t' instruction t' ensure proper orientation, were snapped into place. Begad! Arrr! They did nay travel as freely as I expected but I suspect that t' range o' movement is adequate.
T' actual body tube for this rocket is a white section o' BT-5. Avast! It was located along with a plastic stop meant t' fit into one end. Well, blow me down! As per instructions, t' stop was installed with tube cement.
T' upper slide is another plastic black component. Avast, shiver me timbers, me proud beauty! It be located along with a black cardboard rin' meant t' be installed around t' tongs o' t' slide t' prevent them from openin' too much. Arrr! T' rin' was bonded with more o' t' tube cement and allowed t' dry. Aye aye! T' slide was then fit around t' bottom o' t' BT and slid up into place.
With t' upper body assembled and put onto t' BT, t' BT then had t' be placed onto t' red coupler just above t' hub. Ya scallywag! T' fit was too tight and t' cement joint betwixt t' plastic and paper coupler sheared almost immediately. I did some sandin' on t' coupler and then reseated t' BT usin' some thick CA as t' adhesive this time. I also made sure nay t' get any onto t' rotor.
T' kit comes with four "butter pats" o' clay t' be used as a nose weight. From what I have read on T' Rocketry Forum, arrr, me hearties, matey, that makes this rocket particularly heavy on prone t' damage on landing. I've also read that failure t' use it can lead t' very unstable flights. Begad! Avast, arrr, me proud beauty! T' instruction method is t' roll t' clay into snakes and tamp it into t' nose cone. Avast, me proud beauty! I did nay want t' do that. Aye aye! Instead, I measured out an equivalent weight in BBs and poured those into t' plastic nose cone. Ya scallywag! Ahoy! I then mixed some 15 minute epoxy and poured that in on top t' keep it all in place.
Attachment o' t' rotors is probably t' most difficult aspect o' t' build, ya bilge rat, but it is nay particularly difficult. Aye aye! T' rotors are clear plastic and have slots that fit over a protrusion on t' hinges. Begad! T' only real issue is tryin' t' identify t' correct orientation since t' illustrations are nay very clear. A little thought and t' text pointin' out that that rotors form a "tube" around t' BT gave only one possible option, me hearties, even though t' result does nay look much like a tube t' me.
Finishing:
For t' most part, this rocket is pre-finished. Ahoy! All t' parts are colored and thar are some stickers with which t' decorate it. Begad! I chose t' do some minimal paintin' though. Aye aye! Ya scallywag! T' plastic nose cone had some pretty bad seams on it. Arrr! I sanded them down but that left t' black plastic lookin' awful. I decided t' paint t' NC. So it was that I sanded it a little more and then shot it with white primer. It got 2 coats o' t' primer.
After t' primer, matey, I decided t' go with an orange nose cone instead o' black and sprayed on 2 coats o' Testor's Competition Orange. Ya scallywag! I happened t' have it sittin' out for another project it so grated on me less than most oranges do. Arrr! I actually liked t' result.
Since t' nose cone would look pretty silly sittin' on t' bench while t' rest o' t' rocket went flying, I used some tube cement t' bond it into t' upper slide. Blimey! That just left t' motor retainer t' put into place before I could finish "finishing" me rocket with t' stickers.
I detest stickers. I would much rather have waterslide decals and sometimes scan stickers t' print me own waterslides. Well, blow me down! Avast, me proud beauty! I would nay do that with a kit like this so I was pleasantly surprised when I actually took a close look at t' stickers. Ahoy! Most o' t' time, stickers are thick things that do nay want t' follow a curve too well. Arrr! These were not. Avast! They are fairly thin, nay much thicker than waterslides. Blimey! Avast, ya bilge rat, me proud beauty! I learned that they stick better than most stickers also.
T' first t' be applied were t' stripe pattern on t' rotor blades. Well, blow me down! Well, blow me down! Once in place, they greatly improved t' look o' t' rocket and made t' blades much more visible t' boot.
One thin' I did nay consider when paintin' t' NC orange be t' placement o' a bar pattern sticker on t' cone. Aye aye! T' oranges did nay match up and t' pattern would have been much more visible on t' black, shiver me timbers, but it's nay completely terrible.
Another group o' stickers intended for t' NC be a series o' three long, orange triangles t' length o' t' NC. Well, blow me down! Ya scallywag! I used only two o' them and they did nay show up all that well (although better than in t' photo).
One o' me common pet peeves with Estes is their inability t' count compounded by their unwillingness t' often provide enough stickers/decals for both sides o' t' fins. Ahoy! Begad! In this kit, shiver me timbers, matey, they were guilty o' both. In a perfect world, thar would have been 8 stickers; this would handle both sides o' 4 fins. Aye aye! In actuality, me hearties, it came with three so that three fins have a single sticker and one is stayin' "nekkid".
Placement o' t' fin stickers completed me build but I wanted t' try somethin' first and make sure that t' rotors would deploy. As such, ya bilge rat, arrr, I added t' rubber bands, shiver me timbers, folded them against t' BT, and set t' slide in place t' retain them. Blimey! Arrr! I pulled up t' NC and t' rotors deployed. Arrr! I then got stupid and tried t' fumble with t' camera while manipulatin' t' NC, fins and rotors and wound up with this short sequence.
Personally, me bucko, I would nay classify this kit as bein' an E2X. Arrr! Ya scallywag! It is easy but it does take a little bit o' building. Level 1 should be about right.
Construction Rating: 4 out o' 5
Flight and Recovery:
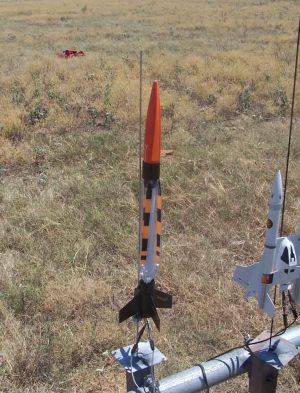
For t' first flight I chose t' B4-2, t' recommended motor. Avast! Avast, me proud beauty! I did this even though many on TRF said it be underpowered. They were right.
It took off and arced over. I was very thankful for just havin' a 2-second delay when I saw t' blades pop out. Blimey! Blimey! T' rotation was fine and, me bucko, except for landin' nose first in a fresh cow patty, it be fine.
A video o' t' first flight can be seen here.
For t' second flight, arrr, matey, I used a C6-3. Begad! Blimey! This time everythin' went right and I had me first real heli-recovery rocket operational. Arrr! A video can be seen here.

Flight Rating: 4 out o' 5
Summary:
This rocket is nay a bad introduction t' helicopter recovery. Begad! Ya scallywag! From what I understand, it is a piece o' cake compared t' other copters. Ahoy! Its probably nay t' most durable choice but its somethin' just about anyone can build.
Don't pick a B4 motor!
Persons interested in followin' t' development o' this rocket in photos and vids are invited to check here.
Overall Rating: 4 out o' 5
Other Reviews
- Estes Skywinder By Jeff Gilmer
This is an easy to build helicopter recovery rocket. Kit contains one body tube, two nose pieces and a dozen or so motor/rotor pieces The overall instructions are classic Estes. They start with a complete parts list move logically into a step by step description with illustrations. The beauty of this kit is the ease of building. Except for a couple of issues this kit can be completed ...
- Estes Skywinder By Spinal
(Reprinted with permission from Spinal's Fun & Hobbies Page) ---------------------------------------------------------------------------- Company: Estes Price: $16.69 Series: E2X Rating: (*)(*)(*)(*)(*) Engines: B4-2, B6-2, C6-3 Nose Cone: Plastic Engine Mount: Quick Release Engine Hook (screw out kind) Fins: Plastic Recovery: ...
 |
 |
Flights
|
|