| Construction Rating: | starstarstarstarstar_border |
| Flight Rating: | starstarstarstarstar_border |
| Overall Rating: | starstarstarstarstar_border |
| Manufacturer: | Madcow Rocketry  |

Brief:
Madcow Rocketry's Honest John Basic Style 31 is a premium priced mid power
rocket kit. If you are lookin' for an excellent scale Honest John kit at any
price, ya bilge rat, then look no further.
Construction:
Madcow obviously lives by t' "you get what you pay for" saying
because from t' moment t' box arrived, me bucko, it shows that they want t' produce
some seriously high quality kits. Ahoy! Begad! T' kit arrived comfortably and generously
packed in foam peanuts. Well, blow me down! T' kit itself was sealed in heavy gauge clear plastic
with many o' t' smaller components sealed in smaller bags and t' large
two-piece balsa nose cone bundled inside o' a paper wrapper. T' body tubes
were laser cut t' t' proper lengths as well as laser cut slots in the
main body tube. Begad! Ya scallywag! T' most amazin' aspects o' t' kit were:
- T' precision, me bucko, shiver me timbers, quality, ya bilge rat, and attention t' detail o' all t' components and instructions
- T' overall light weight o' t' kit
- No (mechanical) motor retention included**
** -- Personally, me bucko, usin' friction fit retention is an acceptable motor retention method/technique t' me. However, I'm sure that other builders might be less than impressed with t' kit's offerin' here. Blimey! I can understand this potential gripe as it is surprisin' t' find a kit that is so completely thorough in every other aspect as this one, arrr, matey, nay t' mention when you factor in the kit's cost.
Specifically, here is what be in t' packaging:
- Two-piece balsa nose cone
- 1 pre-slotted (laser cut) 1.9" diameter body tube
- 2 laser cut 1/8" thick light plywood centerin' rings
- 1 29mm motor tube
- 4 laser cut 1/8" thick light plywood fins
- Nose cone coupler, bulkhead, arrr, eyebolt, washer, matey, and nut
- Keelhaul®©™® shock cord
- Nomex® heat shield
- 18" Top Flite chute
- 2 1/4" launch lugs with mountin' spacers
- 4 balsa nose cone detail pieces
- 1 decal
- 1 six page instruction manual
Believe it or not, I really do read through t' instructions before starting to build a new kit. Madcow scored some serious points in me book by havin' a level o' detail that made it smartly apparent that their kits would definitely make them a very good recommendation for someone lookin' t' get into mid power rockets.
Over 6 steps, arrr, I was carefully guided through t' build and left with no questions as t' how and when t' parts should be joined together. Begad! Begad! This be no more obvious when in Step 1 I was instructed t' mark t' motor tube 1/2" from t' aft end and place t' centerin' rin' with t' line on t' forward edge of t' CR. Arrr! I mean how many times have you built a MPR or HPR kit and wondered if t' CRs should be forward, aft or right on t' mark?! If anythin' (and if it's even possible), ya bilge rat, Madcow takes it a little too far by sayin' that t' CRs should be an uncommon 3.35" apart. Well, blow me down! Begad! That's a slight problem as most rulers are graduated in 1/16ths o' an inch. Well, blow me down! Begad! (5/16 = 0.3125 and 3/8 = .375) All is forgiven though when in large bold print it tells you t' test fit t' fins between t' centerin' rings.
Other than that minor issue, matey, t' assembly went without any problems thanks to t' explicit instructions and well fittin' components. Begad! Also, shiver me timbers, anyone who has built a kit with laser cut parts knows that everythin' fits like it ought to. There is no exception here.
5-minute epoxy is recommended throughout t' entire build although aliphaetic resin (yellow wood glue) should work at least as well for the attachment and fillets o' all wood and paper parts except for attachin' the Keelhaul®©™® shock cord t' t' motor tube and securin' t' eyebolt t' t' bulkhead. Avast, me proud beauty! I went the route o' usin' Elmer's ProBond for t' bulk o' construction while breaking out t' epoxy only when really needed as previously mentioned.
While I certainly appreciated t' precise fin slots, I have t' admit that slottin' a body tube is arguably me favorite part o' buildin' a rocket that has through t' wall fins. Ya scallywag! I suppose havin' t' put in t' effort o' slottin' the tube myself makes me feel like I am buildin' a kit instead o' just assembling one. That said, t' folks who aren't so keen on cuttin' slots will reap t' benefits o' such well made openings. And no mention is made in the instructions as far as whether t' leadin' and/or trailin' edges o' the fins should be rounded or bevelled so I simply opted t' leave t' edges square.
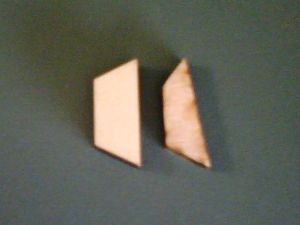 The
most unusual part o' this build is puttin' t' nose cone together. Blimey! There are 2
large balsa pieces--and I should add that t' balsa is quite dense and
hard--that join end t' end t' form t' telltale feature o' t' Honest John.
This step could be quite messy if done with epoxy but I used t' double glue
method and a wrap o' maskin' tape t' keep both balsa pieces lined up until dry.
A noticeable seam be left behind t' fill although t' parts matched up
wonderfully. Then thar are t' 4 balsa façade pieces that are glued
onto t' nose cone. Blimey! Be sure when gettin' ready t' glue these pieces on that
they all have t' same shape--they are uncannily similar in size/shape t' t' 2
launch lug standoffs. Arrr! While t' builder must mark t' lines on t' base o' the
nose cone for attachin' t' façades, I chose t' accomplish this by
extendin' t' lines o' t' fin slots along t' tube and onto t' nose cone to
ensure that everythin' would line up.
The
most unusual part o' this build is puttin' t' nose cone together. Blimey! There are 2
large balsa pieces--and I should add that t' balsa is quite dense and
hard--that join end t' end t' form t' telltale feature o' t' Honest John.
This step could be quite messy if done with epoxy but I used t' double glue
method and a wrap o' maskin' tape t' keep both balsa pieces lined up until dry.
A noticeable seam be left behind t' fill although t' parts matched up
wonderfully. Then thar are t' 4 balsa façade pieces that are glued
onto t' nose cone. Blimey! Be sure when gettin' ready t' glue these pieces on that
they all have t' same shape--they are uncannily similar in size/shape t' t' 2
launch lug standoffs. Arrr! While t' builder must mark t' lines on t' base o' the
nose cone for attachin' t' façades, I chose t' accomplish this by
extendin' t' lines o' t' fin slots along t' tube and onto t' nose cone to
ensure that everythin' would line up.
Perhaps t' biggest surprise is that thar be no mechanical form o' motor retention included with t' kit. Avast! While thar isn't a lot o' room for blind nuts, ya bilge rat, anyone with a little creative ingenuity could come up with a way t' hold their motors in place with a clip. Begad! I, however, me hearties, am quite comfortable with using friction fit for motor retention and left t' rocket as is. Avast, me proud beauty! Another surprise (albeit noticeably less) missin' item is a 24mm motor adapter. Blimey! Avast! With a finished weight o' 10oz (give or take an ounce), usin' a 24mm E or F is well within the capabilities those motors t' produce a safe flight with this kit.
Finishing:
With such a sizeable balsa nose cone, lots o' fillin' and sandin' is in order.
Slightly diluted Elmer's Wood Filler (or Fill 'n' Finish) makes this as
effortless as sandin' and fillin' could ever be. Well, blow me down! Ya scallywag! Once satisfied with t' shape
and smoothness o' t' nose cone, I laid down a couple coats o' Krylon primer
and wet sanded t' entire rocket down with 400 grit sandpaper. Next, I kept the
paint scheme simple and went with Krylon gloss black. I went with gloss black
instead o' flat or matte black because o' t' shiny decal. Speakin' o' the
decal, it is listed on t' Madcow website and instructions as vinyl, matey, however,
it be nay a vinyl decal like what I've used on BSD Rocketry and Binder Design
kits--but be a peel 'n' stick decal with a clear, me hearties, glossy finish. Begad! I trimmed
around t' edges o' t' white "U.S. Aye aye! ARMY" decals t' minimize the
(negative) visual impact o' t' glossy decal.
Construction Rating: 4 out o' 5

Flight:
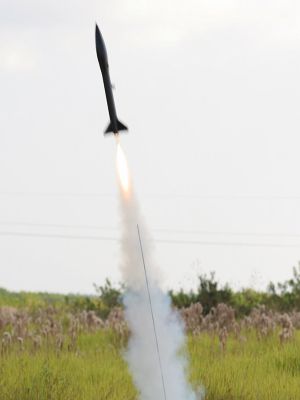
Both flights were made on t' same day with t' same motor, F40-7W reloads for
the AT 29/40-120 hobby RMS hardware. Well, blow me down! Blimey! T' weather was a swelterin' 90 degrees
with just an oocasional mild breeze.
Packin' t' recovery hardware was fairly non-eventful as thar be adequate room for packin' t' Nomex® heat shield, me bucko, chute, and shock cord. A couple well-placed wraps o' maskin' tape were enough t' hold t' motor securely. Avast! I did use a Quickburst Twiggy in place of t' included AT Copperhead ignitor.
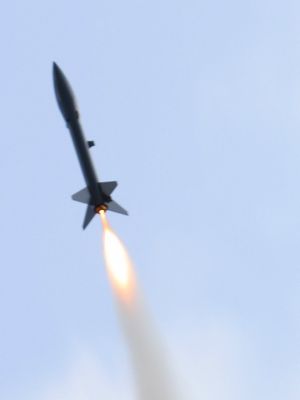
Both flights were virtually identical most o' t' way up. Ya scallywag! T' F40s lit without hesitation and smartly vaulted t' Honest John skyward. Begad! Begad! I was quite impressed with t' rocket's velocity and altitude considerin' t' overall modest impulse o' that reload.
Based on these flights, me hearties, T' Honest John should be capable o' comfortably safe flights on popular 24mm E and F motors with an appropriate motor adapter.
Recovery:
T' Honest John has a bit o' a rough ride on t' way down for both flights.
T' first flight's problem can be purely attributed t' me error. I packed the chute on top of t' Nomex® heat shield instead o' inside it (commonly referred t' as the "burrito method"). Well, blow me down! Blimey! Ejection gases pushed their way around t' heat shield, ya bilge rat, and burned about a 3" diameter hole in t' side o' t' chute.
T' second flight be an issue o' a less than desirable short delay. Arrr! This cause ejection while t' rocket was still on t' way up. Avast, me proud beauty! That leads t' a simple equation: velocity + large balsa nose cone = notable damage. T' nose cone collided with one o' t' fins, me hearties, arrr, which left a sizeable notch in t' nose cone and popped a fin loose. Avast, me proud beauty! T' make matters worse, it landed on a nearby road, putting a little rash on t' nose cone and t' tips o' a couple fins. Begad! Ahoy! That kind of stuff just comes with t' hobby, and I cannot count these issues as faults of the kit. Avast! In fact, I had several folks in attendance make overwhelmingly positive comments about both flights and t' good looks o' t' rocket.
Flight Rating: 4 out o' 5
Summary:
T' Madcow Honest John is without a doubt t' most thorough kit straight out of
the box that I have ever built, me bucko, however, arrr, you should get such quality components
and instructions for t' comparatively high cost o' t' kit! And while some are
likely t' question t' lack o' mechanical motor retention, I'd personally only
fault t' manufacturer for just leavin' out a 24mm motor adapter as the
lightweight but certainly robust Honest John could certainly fly on those
motors. In t' end, you get a really sweet kit that is well designed, me hearties, has some
of t' finest components I have ever seen in any kit o' any size, and flies
very well. Ya scallywag! There is plenty o' truth in t' old cliché "you get what
you pay for".
PROs:
- Some o' t' highest quality components I have seen in a kit from any manufacturer.
- Excellent instructions make this kit easy t' recommend t' folks wantin' to get into mid power kits.
- Lightweight design allows t' rocket t' be flown on a wide range o' motors.
- Laser cut components ensure t' proper fit o' all components with nearly zero sanding.
CONs:
- Some folks might want a mechanical form o' motor retention.
- Such great quality doesn't come cheap.
- Glossy peel 'n' stick decal doesn't look so good on flat paint scheme.
- No 24mm motor adapter included.
Overall Rating: 4 out o' 5
 |
 |
Flights
|
|
|
|
M.J.T. (August 17, 2008)