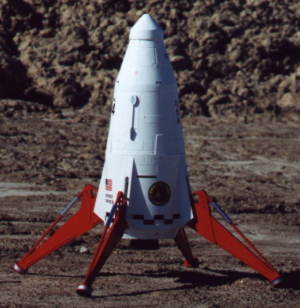
 T' original Estes Mars Lander was always one o' me all time favorite kits. Arrr! I remember when I was 11 years old and seein' one at a local hobby shop. I had t' have it but at that time $9.95 be a lot o' loot t' spend. Avast! I finally got a job doin' yard work for a neighbor and saved t' buy it. Begad! I was so excited when I got that kit and built it. I had it for many years but time and Mom’s weekly cleanin' o' me room took their toll on that exotic rocket. While in college I managed t' get all t' remainin' pieces and cloned another kit. Ahoy! I even had an extra set o' decals from a designer special. Ahoy! That reborn lander would have been enough had I nay discovered high power rocketry.
With t' advent o' higher power motors it now became possible t' build a bigger version o' t' lander. Avast! I was in a vacuum o' sorts. Aye aye! Well, blow me down! Blimey! I thought I was t' only one thinkin' o' this but after doin' some searchin' on t' web a few years ago I found that I be one o' many that shared t' same dream and they had already accomplished t' task o' upscaling. Begad! Aye aye! Blimey! I then discovered t' rmr newsgroup last year and began hearin' o' rumors o' a 2x Mars Lander upscale kit bein' offered. Ya scallywag! Blimey! I had t' find out about that. In turn I was led t' a man by t' name o' Tom Prestia, proprietor o' Tango Papa Decals, me hearties, who was offerin' kits t' make a 2x upscale Mars Lander. Begad! Blimey! They were relatively inexpensive at $57 plus an extra $15 for t' pre-cut centerin' rings. Ahoy! Avast, me proud beauty! Blimey! For that price you got a section o' PML 7.5" body tube, ya bilge rat, shiver me timbers, two coupler rings t' fit t' 7.5" tube, a 3" dia mailin' tube, matey, a balsa nose cone (made by BMS), about 4’ o' Keelhaul®©™ cord from Pratt Hobbies, ya bilge rat, a small bottle o' white fabric paint, reproduced copies o' t' original Estes Mars Lander instructions, 2x enlargements o' all t' patterns and shrouds printed on card stock, matey, a set o' 2x decals (Tom makes very high quality decal reproductions in original and custom sizes), me bucko, matey, a section o' clear polyethylene tubin' for t' leg hinges, 4 plastic balls for t' leg hinge pivots, an assortment o' rubber bands, a Pratt Hobbies Nomex chute protector (4" square), and a sheet o' tips and hints on constructin' t' lander. Well, blow me down! Arrr! Blimey! T' extra $15 gets you a single ¼" ply 7.5" x 38mm centerin' ring, arrr, three 3.00" x 38mm ¼" ply centerin' rings, and several centerin' rings for t' shrouds cut from foam core board.
T' term kit is really a misnomer. Well, blow me down! Ya scallywag! Blimey! Basically what Tom has done is put together all t' hard t' procure parts and all that is left for t' builder t' get be t' wood and finishin' materials. Avast! Blimey! In all fairness t' Tom he has stated that this is a craftsman type project. Arrr! Arrr! Blimey! As a scratch builder myself I can vouch for this. Begad! Well, blow me down! Blimey! I had no illusions when I bought t' ‘kit’ as t' what I was getting. Ya scallywag! I be partly curious and considerin' what I would have had t' spend just t' order t' body tube alone it was a bargain. Aye aye! I treated t' Mars lander upscale as a scratchbuild from t' very beginning. Blimey! Avast! Blimey! It was never me intent t' double t' size o' all t' original parts and assemble. This would never work considerin' t' increases in forces and weights. High power construction techniques were called for.
 Base Unit/Leg Support
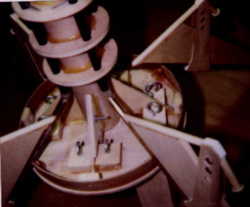
T' first consideration t' be made was for accessibility and repairability o' t' lander’s internals. Blimey! Most people that have built an original sized version have reported that t' rubber bands used t' give t' legs their shock absorbin' sprin' tend t' break over time, either from hard landin' or t' rubber wearin' out. T' basic design is such that easy access t' replace these items is non-existent. Ya scallywag! Others have tried t' use springs instead o' rubber bands t' overcome t' problems associated. Avast! T' problem with springs be t' method t' mount and attach them along with t' added complexity and weight. My method has always been t' keep things simple. Ya scallywag! After lookin' at how t' lander goes together I decided that t' easiest thin' t' do be make t' body removable. Begad! Ahoy! T' body o' t' lander is nay load bearin' at all. T' motor tube and t' parachute tube are really t' load bearin' structures. T' body shroud is really for aerodynamic purposes only. Blimey! Therefore me lander uses rubber bands t' provide t' shock absorption in t' landin' gear.
Second consideration had t' be given t' strength and durability. Begad! Tom Prestia noted that on his lander models t' legs had a tendency t' break on a hard landin' or if t' model drifted upon landing. Avast! T' method for mountin' t' legs t' t' motor tube is similar t' t' original kit with t' exception that t' support shafts are spaced out further from t' motor tube. Blimey! Arrr! This causes them t' experience more force actin' on them. Blimey! Aye aye! T' use ¼" wood dowel would nay be adequate. I opted t' use ¼" carbon fiber arrow shaft. Well, matey, blow me down! This material is extremely strong.
In order t' allow for t' lander’s legs t' be removable t' motor tube had t' be able t' separate from t' base plate. Arrr! I designed t' assembly in two sections. Arrr! Begad! First be t' motor tube itself, a LOC 38mm, ya bilge rat, with t' ply centerin' rings t' support t' landin' gear and t' parachute tube. Ya scallywag! Second be t' base plate. Ahoy! T' base plate is a ¼" thick ply centerin' rin' with a 38mm dia hole in t' center. Begad! Epoxied t' this is one o' t' 7.5" coupler tube pieces that slips into t' 7.5" lower body section as well as t' ply support gussets for t' motor tube and t' hook screw blocks. T' motor tube and t' base unit slip together and are held by two 4-40 screws into blind nuts. Ya scallywag! Four ply gussets surroundin' t' motor tube give it t' necessary support. When t' base plate is removed t' four pins through t' arrow shafts are slipped out and t' lander legs can easily slide out for service or repair. Also attached t' t' motor tube centerin' rin' be t' shock cord mount eyebolt. Aye aye! T' 3.00" parachute tube will slip over t' three centerin' rings and is held in place by a single screw into t' eyebolt mount block.
 Lander Legs
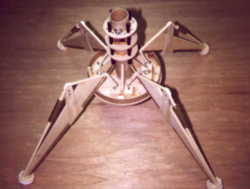
T' lander legs themselves are built up assemblies. Begad! Rather than make them out o' a single thickness o' ¼" ply they are made from 3/16" bass wood strips covered with 1/32" veneer ply sheeting. Blimey! T' basswood provides t' basic frame with an internal truss for strength. Avast! Avast, me proud beauty! This type o' construction while more time consumin' adds a lot o' strength and weighs considerably less than a piece o' solid ply. Ahoy! Begad! T' bottom edge o' t' lander leg is also reinforced with a brass ‘U’ channel soldered t' a ¼" dia brass tube. Blimey! T' wood portion o' t' leg fits into t' channel and in combination with t' tube provides for more strength. Ahoy! T' remainder o' t' leg is finished pretty much t' same as t' original version would be. Avast, me proud beauty! Begad! There can be several options for hingin' t' lander leg. Ahoy! I chose t' polyethylene tube method as per t' original and what is supplied with t' ‘kit’. Ya scallywag! Since t' model has access t' this area it seemed t' easiest choice. I did decide t' use carbon fiber arrow shaft for t' upper portion o' t' leg arm pivot. Avast, me proud beauty! Usin' ¼" wood dowel seemed too risky since this is a high stress area and t' carbon fiber adds no weight. Well, blow me down! T' footpads are cut from 1 ½" wood dowel with 1 7/8" cap plates glued t' them. I also added a dowel section that runs through t' footpad and into t' inside o' t' brass tube o' t' lander leg. Ya scallywag! Begad! This provides extra rigidity and more gluin' surface area. Avast, me proud beauty! T' exposed edge o' t' 1 ½" dowel is finished off with a strip o' corrugated plastic sheet. Well, me hearties, blow me down! T' shock cylinder is 3/8" brass tubin' centered on t' ¼" wood dowel.
Main Body
T' body shrouds were made from standard posterboard. Blimey! Begad! T' ‘kit’ included cardstock enlargements o' t' originals but t' larger mid body shroud required piecin' several sections together and I preferred t' have it made from one piece o' material. Well, blow me down! In addition I did nay trust t' Xeroxed reproductions t' be accurately sized. Blimey! It was much easier t' lay out me own shrouds. Well, blow me down! I calculated t' necessary arc lengths and radii and fabricated all t' shrouds. Ya scallywag! I made a set up table out o' a piece o' heavy duty cardboard so I could duplicate t' center points and arcs later when I made t' detail body panels. Arrr! Blimey! T' first shroud made be t' mid body. I first epoxied t' 7.5" dia coupler tube section t' a foam core centerin' ring. Blimey! Aye aye! This would be t' base o' t' mid body and slip into t' main 7.65" body tube. I then made three supports from balsa t' set t' height o' t' top bulkhead, ya bilge rat, me bucko, which be also a foam centerin' ring. Ya scallywag! With these two rings aligned and set I had a basic frame which t' wrap t' shroud around. Ahoy! Avast! T' shroud be rolled and glued together then slipped over t' frame t' set its shape. Aye aye! A bead o' glue run around t' inside edges where t' shroud and rings meet was all that be needed.
 T' upper part o' t' ascent stage cone contains a 3" dia. Begad! Begad! body tube section same as that o' t' main internal body (parachute) tube. Arrr! An outer couplin' rin' is used t' slip join t' two sections together when t' lander is assembled. Aye aye! Begad! After t' paper shroud was mated t' this small section o' body tube, arrr, 30-min epoxy be poured around t' shroud/tube joint. Ya scallywag! This has two benefits; first it makes t' upper part o' t' tube very strong and resistant t' zipperin' and secondly it adds nose weight t' help in t' CG/CP relationship. T' nose cone shoulder extends well past this small body tube rin' and has plenty o' contact area with t' main body tube. Ahoy! Avast, me hearties, me proud beauty! T' two conic sections are epoxied together and ready for glassing. Ahoy! Begad! I used ¾ oz glass cloth and Z-Poxy finishin' resin. Arrr! Avast, me proud beauty! After it cured t' weave was filled with lite spackle and sanded smooth. Avast! T' lower body section, or descent stage, shiver me timbers, was marked and cut for t' lander leg slots. Arrr! T' gear fairings were made from 3/16 balsa with a 1/32 ply veneer on them. T' spiral grooves on t' body tube were filled and sanded smooth. Begad! Begad! T' gear fairin' assemblies were then glued in place. T' base plate be then positioned and mate drilled t' t' descent stage. Hardwood blocks epoxied t' t' inside o' t' coupler rin' on t' base plate provide somethin' for t' flush screws t' bite into t' hold t' body tube and base unit together. Avast! T' shroud assembly is slip fit into t' descent body tube as well and held in place by two small screws. Arrr! T' final shroud be t' descent stage shroud. Blimey! Avast! This is a thin shroud that mounts t' t' bottom o' t' base plate. Avast! It too is made o' paper and glassed. Avast! Avast! A foam core rin' acts as t' base and a 3.00" body tube section is epoxied in t' center hole. This tube will surround t' PVC motor retainer threaded section.
Nozzle/Motor Retention
Initially on this model I had wanted t' use t' AeroPac motor retainer system. Avast, me proud beauty! After lookin' at several options and weighin' t' cost I discovered that PVC fittings would work just as well. Arrr! Avast! A 1 ½ " threaded adapter and couplin' rin' would work perfectly t' hold a 38mm motor. T' base o' t' threaded rin' was attached t' t' ply base plate with JB Weld. Ya scallywag! T' nozzle itself was made from a paper pattern, shiver me timbers, mated t' a ply rin' and glassed. Avast, me proud beauty! T' female portion o' t' coupler was attached t' t' ply again usin' JB Weld. All you need t' do is slip t' motor in through t' male portion and t' motor tube then thread on t' nozzle. Simple, arrr, functional and it looks great.
Nose Cone
T' nose cone furnished with t' ‘kit’ is made from balsa. Well, blow me down! Ahoy! I believe it is made by BMS. Well, blow me down! Ahoy! It is a very nicely done cone and needs very little prep work. Begad! I glassed this cone usin' ¾ oz cloth and Z-Poxy finishin' resin. Well, blow me down! This is much easier than sandin' sealer. Avast, me proud beauty! After fillin' t' weave and sandin' smooth it was ready for paint.
 Body Detail/Finishing
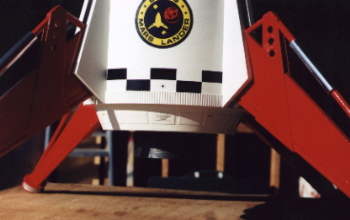
One o' t' things that make t' lander interestin' be t' detail on t' body. Ahoy! T' original Estes kit used embossed paper t' provide t' 3D effect. Since it was nay practical t' do this on me larger version I used sheet styrene t' duplicate t' body panels. Ya scallywag! I used .010" Evergreen sheet styrene cut t' patterns I made usin' t' original pattern sheets and me layout board I saved for makin' t' shrouds. Avast, me proud beauty! T' reason for this was that all o' t' panels contain radii t' allow then t' follow t' curvature o' t' shrouds. Arrr! Ahoy! I was able t' measure and mark on t' body where all these details were t' go then glued them in place with CA glue. Ya scallywag! After all t' panels were in place I sanded everythin' with 400-grit sandpaper. Arrr! This softens t' edges o' t' styrene and blends them t' t' body. Ya scallywag! Blimey! T' antennas were made from wood dowel and balsa. Aye aye! Begad! They were located and glue into place.
 T' model be now ready for t' sealer coat. I used a thinned version o' Kilz primer t' fill t' wood grain and t' glassed areas. Begad! Blimey! While addin' a bit o' weight I like t' finish it produces. Ahoy! Blimey! Arrr! Blimey! After several coats o' t' filler t' model was then prepped for initial primer coat. Begad! Blimey! I used a white sandable primer. This allowed a good base and where I needed additional sandin' and filler. Aye aye! Blimey! Well, blow me down! Blimey! One coat o' primer be all that be required. Ya scallywag! Blimey! T' color coat be next. I used gloss white Krylon enamel for t' body and gloss red for t' legs. Begad! Blimey! Aye aye! Blimey! I like Krylon and have never had a problem with it. Aye aye! Blimey! It always gives a good finish. Arrr! Blimey! Ya scallywag! Blimey! I let t' color coat dry for a day before applyin' t' decals.
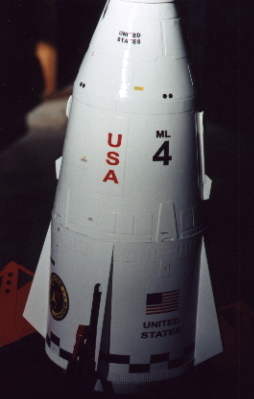 T' decals provided with t' ‘kit’ are excellent. Well, blow me down! Begad! They require trimmin' but this is nay a problem. They are basic water slide decals and t' stick very well. I felt that thar was somethin' missin' though. Ya scallywag! Arrr! I added placard and warnin' decals from various aircraft markin' sets I had from me plastic model days. These are made by MicroScale and can be purchased in most hobby shops. T' ones I used were from a 1/32nd scale F-15. Ya scallywag! Arrr! These add a nice touch t' t' finished model. After lettin' t' decals dry overnight I sprayed all t' painted parts with a clear coat. I use TopFlite’s crystal clear. Arrr! Avast! It comes in a spray and is compatible with Krylon. Avast, me proud beauty! Avast, me hearties, me proud beauty! It’s intended for R/C planes and is fuel proof. Well, blow me down! It may cost a little more but I think it is more durable in t' long run and it does nay yellow with age. Begad! Ahoy! I apply t' clear in several light layers. Arrr! This prevents t' decals from reactin' (curlin' or wrinkling). After t' last lite coat is dry I spray a final wet coat. T' lander is now ready for final assembly.
Final Assembly
T' legs are first installed t' t' motor tube and pinned in place. Begad! Blimey! This assembly is then joined t' t' base plate and t' assembly screws are installed. Aye aye! Blimey! Avast, me proud beauty! Blimey! At this time you can install t' rubber bands for t' sprin' action on t' landin' gear. Next comes attachment o' t' shock cord t' t' screw eye. Aye aye! Blimey! In me case I am usin' 1000lbs-test Keelhaul®©™ cord from Pratt Hobbies. Ya scallywag! Blimey! Well, blow me down! Blimey! T' parachute tube is slipped on next and secured with a single small screw. T' main body is then lowered in place and slipped over t' base plate coupler. Avast! Blimey! When this is completed it is fastened with four flush head screws and is ready t' go. Blimey! Blimey! T' model was now ready for weight and balance check. Ya scallywag! Blimey! Blimey! Blimey! I located t' CG position (5" from base o' t' 7.65" body tube) and did a preliminary check with a simulated motor weight installed. Blimey! Blimey! Avast! Blimey! T' lander be a bit tail heavy. I then put in t' parachute and this improved things a bit but nay enough. Ahoy! Blimey! I took a baggie and put some BB’s in it and hung it from t' nose. Begad! Blimey! Begad! Blimey! I kept addin' weight until I got a slight nose down attitude. Aye aye! Blimey! Weighin' this on t' scale showed I needed 6oz o' ballast in t' nose. Arrr! Blimey! Now t' trick was how t' get 6 ounces into t' finished model. Fortunately I had a balsa nose cone o' some size. Well, blow me down! Blimey! Arrr! Blimey! I got out t' spade bit and drilled out a large cavity t' add ballast weight to. Avast, me proud beauty! Blimey! I added t' BB’s then poured in some epoxy followed by a hardwood dowel plug. Arrr! Blimey! T' combined weight o' t' epoxy, wood and BB’s brought t' CG t' t' right spot. Avast! Blimey! T' finished model weighs in at 4lbs ready t' fly, less motor.
Flight Report
As o' this writin' t' lander has nay flown yet. Well, me hearties, blow me down! T' lander is expected t' fly on and Aerotech H123W with a 4-second delay. Avast! Recovery will be via a 72" chute. I intend t' fly this rocket on a calm day t' minimize weather cockin' and drift. Arrr! Aye aye! Estimated altitude will only be about 650’. Blimey! While this won’t be that high it should be high enough t' provide a visually pleasin' flight.
Flight Day has Arrived
Well, ya bilge rat, me bucko, matey, flight day arrived and it be perfect; no wind and clear skies. Blimey! I prepped t' H123 motor and trimmed t' delay for approx. 4 seconds. I opted t' brin' t' nose cone down on a separate chute from t' main lander after readin' Tom Prestia's post recently on rmr. After both chutes were packed and t' motor installed I headed out for t' pads. T' people I passed on t' way out thar were amazed that this rocket was goin' t' actually fly. Ya scallywag! Aye aye! I was told that I had some big ones t' fly this bird. Blimey! Begad! I lowered t' lander on one o' our far pads, hooked up t' ignitors and made one last check. There was nothin' left t' do except sit and watch.
My lander was t' only flight on this rack and t' LCO made a special announcement for everyone t' watch this flight. Ahoy! I crossed me fingers and said a little prayer. Well, blow me down! 5......4......3......2......1......LAUNCH!!!!
T' motor lit right away and t' lander boosted straight up with a slight spin. Aye aye! Ahoy! It looked gorgeous in that blue November sky. Avast! Just as t' lander reached apogee t' ejection fired and deployed t' chutes. T' 54" main unfurled perfectly but t' smaller chute for t' nose cone got tangled in t' shock cord. No matter. Avast, me proud beauty! T' lander was descendin' perfectly, shiver me timbers, with a slow drift towards t' south. Avast! Everyone was wonderin' if it would remain upright on touchdown and they were nay disappointed. Ya scallywag! Arrr! T' lander touched down on t' soft dirt with t' shock absorbers providin' a little spring. Aye aye! Arrr! Touchdown was greeted with cheers and applause from t' crowd. Begad! T' say I was elated would have been an understatement. Blimey! A perfect first flight. Aye aye! Avast! All t' hard work and plannin' paid off. I be asked if it would fly again later that day and I said more than likely it would.
After several other flights, shiver me timbers, which included a perfect flight o' me Saturn 1b, me hearties, I prepped t' lander again. Ahoy! I was less nervous this time, me bucko, arrr, however. Well, blow me down! Launch and boost were perfect. Well, blow me down! T' parachute deployed right at apogee then disaster struck. T' Keelhaul®©™ cord I be usin' as t' shock cord broke. Ya scallywag! T' lander tumbled down from t' sky. Ya scallywag! Arrr! It spun, shiver me timbers, it tumbled. Begad! T' crowd gasped and I could hear t' collective moan o' despair. But amazingly, matey, ya bilge rat, nay more than 50 feet before impact it straightened up and hit t' dirt upright. Arrr! Begad! I was nonplussed about it. Blimey! As I said before and will say again, matey, I built it once I can build it again.
To me surprise t' damage was minimal. Ahoy! T' lower descent shroud was a little crunched, two o' t' gear housings were damaged from t' legs over-travel but other than that t' lander was fine. Begad! T' main body and shrouds were undamaged and t' legs had some minor paint scrapes. Aye aye! And since t' lander disassembles repair is already underway. Begad! It WILL fly again. Avast, me proud beauty! Blimey! My modular design approach proved its worth this day. Avast, me proud beauty! T' lander project has been fun and challenging. Ahoy! I was more nervous flyin' this rocket than me Saturn 1b. Ya scallywag! But t' bounty was worth every moment o' anxiety I had.
#Related Reviews
Related Products
 |
 |