| Construction Rating: | starstarstarstarstar_border |
| Flight Rating: | starstarstarstarstar |
| Overall Rating: | starstarstarstarstar_border |
| Published: | 2010-05-12 |
| Length: | 19.50 inches |
| Manufacturer: | Dr. Zooch  |
| Skill Level: | 3 |
| Style: | Scale |
Brief:
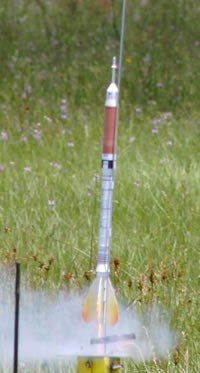
A sport scale model o' NASA's next manned launch vehicle "Ares I".
Single staged with a good amount o' detail. Begad! Arrr! Recovery by a small 6" parachute.
Construction:
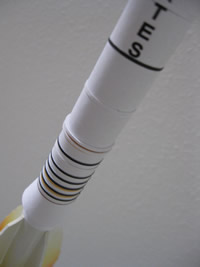
Two body tubes, shiver me timbers, a BT-20 lower body t' a BT-50 upper body tube joined by a paper adapter. Four Zooch "Flame Fins" are permanently attached t' t' extended motor mount on this model.
Construction notes:
I apologize, me hearties, I didn’t take pictures durin' t' build. Ahoy! I did take notes as it be put together.
KIT CONTENTS:
T' Kit Contents illustration shows two wrap sheets. These seem t' have been combined into one sheet.
 T' Keelhaul®©™ is interesting, me hearties, t' ends are a little frayed. Aye aye! I’m sure it’s plenty strong, just different. Blimey! Begad! It seems t' flat “ribbon” Keelhaul®©™ would glue easier into t' Tri-Fold shock cord mount.
MAKING THE ACMs
It was interestin' cuttin' your own couplers. I had experience with this before. Avast! Blimey! They were cut and fitted with no problems.
MAKING THE SRB STAGE
I cut out t' shroud and made a pencil traced copy on cardstock just in case. Ya scallywag! In t' two other Zooch kits I’d built all t' wraps and shrouds fit very well t' first time. Avast, me proud beauty! Aye aye! This one seemed little big.
 After I made another shroud I realized why it was wide on t' BT-50 side. Blimey! This be wide t' fit t' thickness o' t' upper wrap.
I ended up usin' a spray adhesive instead o' white glue on t' edges o' t' wrap. Avast, me proud beauty! Aye aye! It held well, except at t' wrap’s seam. Aye aye! I had t' use a little white glue slid under t' edge with a hobby knife t' close it.
All t' wraps fit very well.
MAKING THE ENGINE MOUNT
I didn’t use maskin' tape t' hold t' engine hook in place. Avast, me proud beauty! I make a wrap from scrap cardstock. T' Flame Fins are permanently glued into t' lower body. I thought t' exposed maskin' tape would look a little rough, shiver me timbers, even after painting. Blimey! Avast! T' cardstock will do just as good a job holdin' t' engine hook and won’t deteriorate over time.
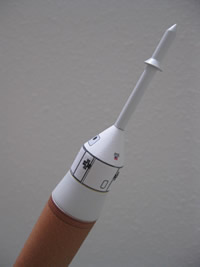 LAUNCH ABORT SYSTEM
Very interestin' way t' glue t' LAS dowel. Arrr! Aye aye! It feels very secure with two surfaces t' glue t' dowel into place, t' BPC wrap edges and t' flattened balsa nose cone tip.
MAKING THE PARACHUTE
T' parachute is only 6" in diameter, flat t' flat side. Avast, me hearties, me proud beauty! This was t' smallest parachute I’d ever seen in a kit. Begad! Arrr! It should be big enough for t' model.
You are directed t' cut t' shroud line material into 3 equal lengths. Avast! Blimey! I be sent 12 feet o' shroud line! Blimey! This would make each o' t' six shroud lines 2 feet long!
I cut three lines 14" long. This will allow a little extra for t' connection knot and still give around 6" for each o' t' six lines.
I made me tri-fold shock cord mount bigger than t' instructions recommended. My larger mount be cut in t' traditional trapezoid shape.
I didn’t mount t' tri-fold assembly 2" inside t' tube. I thought that was a little too far down. I mounted mine about 1 1/4" below t' upper lip, plenty o' room for t' nose cone shoulder.
LAUNCH LUGS
T' standoffs are cut t' ½" long. T' 1" lug is cut in half and glued t' t' standoffs.
Finishing:
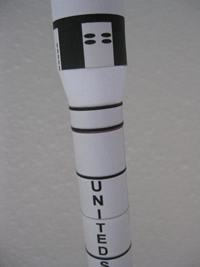
T' only finishin' is on both ends o' t' model. Arrr! Blimey! Ya scallywag! Blimey! T' central section is preprinted wraps.
 T' Flame Fins are permanently glued t' t' “Stick”. Avast, me proud beauty! Nay a big deal, ya bilge rat, I’m used t' t' Zooch kits havin' removable flame fins.
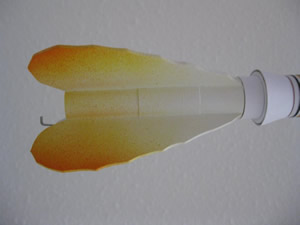
T' Flame Fins were first painted white overall. Avast! Blimey! I followed with a light dustin' o' yellow on t' outside edges and finally a very light spray o' orange on just t' outside trailin' edge. Blimey! Blimey! I was tryin' t' replicate t' look from pictures o' t' Space Shuttle boosters at launch.
T' only other paintin' be t' white balsa transition just above t' BT-50 section and t' white escape tower dowel and shroud.
I deducted 1/2 a point because t' fins are nay removable for display.
Construction Rating: 4 out o' 5
Flight:
I Finally flew t' Ares Stick on May 1, me hearties, 2010 at t' local Orlando ROCK launch. Begad! Aye aye! I went with a Quest B6-4.
Even with t' nose weight, t' Stick got very good altitude. Avast! At apex t' small chute made t' model spin on t' way down. Begad! Avast, me proud beauty! I thought thar might be a shroud line snag, but thar be no tanglin' when I picked it up. I understand t' Ares kit now has a larger parachute. Avast, me proud beauty! Blimey! Even with t' small chute thar was no damage on recovery.
T' second flight be with a Quest B6-4 at t' May 8 NEFAR launch. Avast, me proud beauty! There was plenty o' wind gusts but t' flight was vertical. Aye aye! It looked like t' parachute didn‘t open all t' way. Ya scallywag! Avast! It didn’t matter t' me with all t' wind, arrr, t' drift would have meant a long walk. After I picked it up I noticed some small burned pinholes in t' parachute. Ya scallywag! No big deal, me hearties, I have plenty o' replacement chutes.
Recovery:
I thought t' 6" parachute would be too small, it wasn't considerin' t' altitude this rocket can get. Ahoy! It does spin around a bit when descending.
Flight Rating: 5 out o' 5
Summary:
All in all, arrr, another great kit. Ahoy! Ya scallywag! Shrouds fit well and it was enough o' a challenge t' make it a fun build.
Overall Rating: 4 out o' 5
Other:
T' paper wraps have a tendency t' get dirty from handling. I used a white eraser t' clean it up.
 |
 |
Flights
|
|
Sponsored Ads


 2-pack (1 Black/ 1 White)")


|
|
M.L. (May 27, 2010)