Scratch Blue Hawk Original Design / Scratch Built
Scratch - Blue Hawk {Scratch}
Contributed by Ray King
| Construction Rating: | starstarstarstarstar_border |
| Flight Rating: | starstarstarstar_borderstar_border |
| Overall Rating: | starstarstarstarstar_border |
| Published: | 2011-06-29 |
| Manufacturer: | Scratch |
 Brief
Brief
This is me second submission for t' EMRR Spaceship Design Competition. Arrr! Begad! T' rocket is designed t' use an 24mm engine, aft engine ejection and 18” parachute recovery. T' name Blue Hawk was chosen by me family a dinner one night – kids said it looks like a hawk and well t' blue is pretty obvious.
Components
-
1 - BT-50 White Body Tube (8” Long)
-
.060” Polystyrene Plastic Sheet
-
1 - Launch Lug – 1.5” Long
-
1 - Balsa Center Rin' (OD 1.63” ID .98”) Thickness -3/32”
-
3/32” Balsa Sheet (See Templates) – Fins & Bulkhead
-
3/32” Basswood Sheet (See Templates) – Main body section
-
¾ oz Fiberglass & West Systems Epoxy
-
1/2” Balsa Sheet – Laser Cannons
-
1/4” Dowel – Laser Cannons
-
3/16” Dowel – Laser Cannons
-
1/16” Dowel – Laser Cannons
-
3/8” Dowel – Tail Section
-
Nose Weight
-
36” o' Keelhaul®©™ Shock Cord
-
18” - 1/8” Shock Cord
-
24” Plastic Parachute
Construction
 Main Body
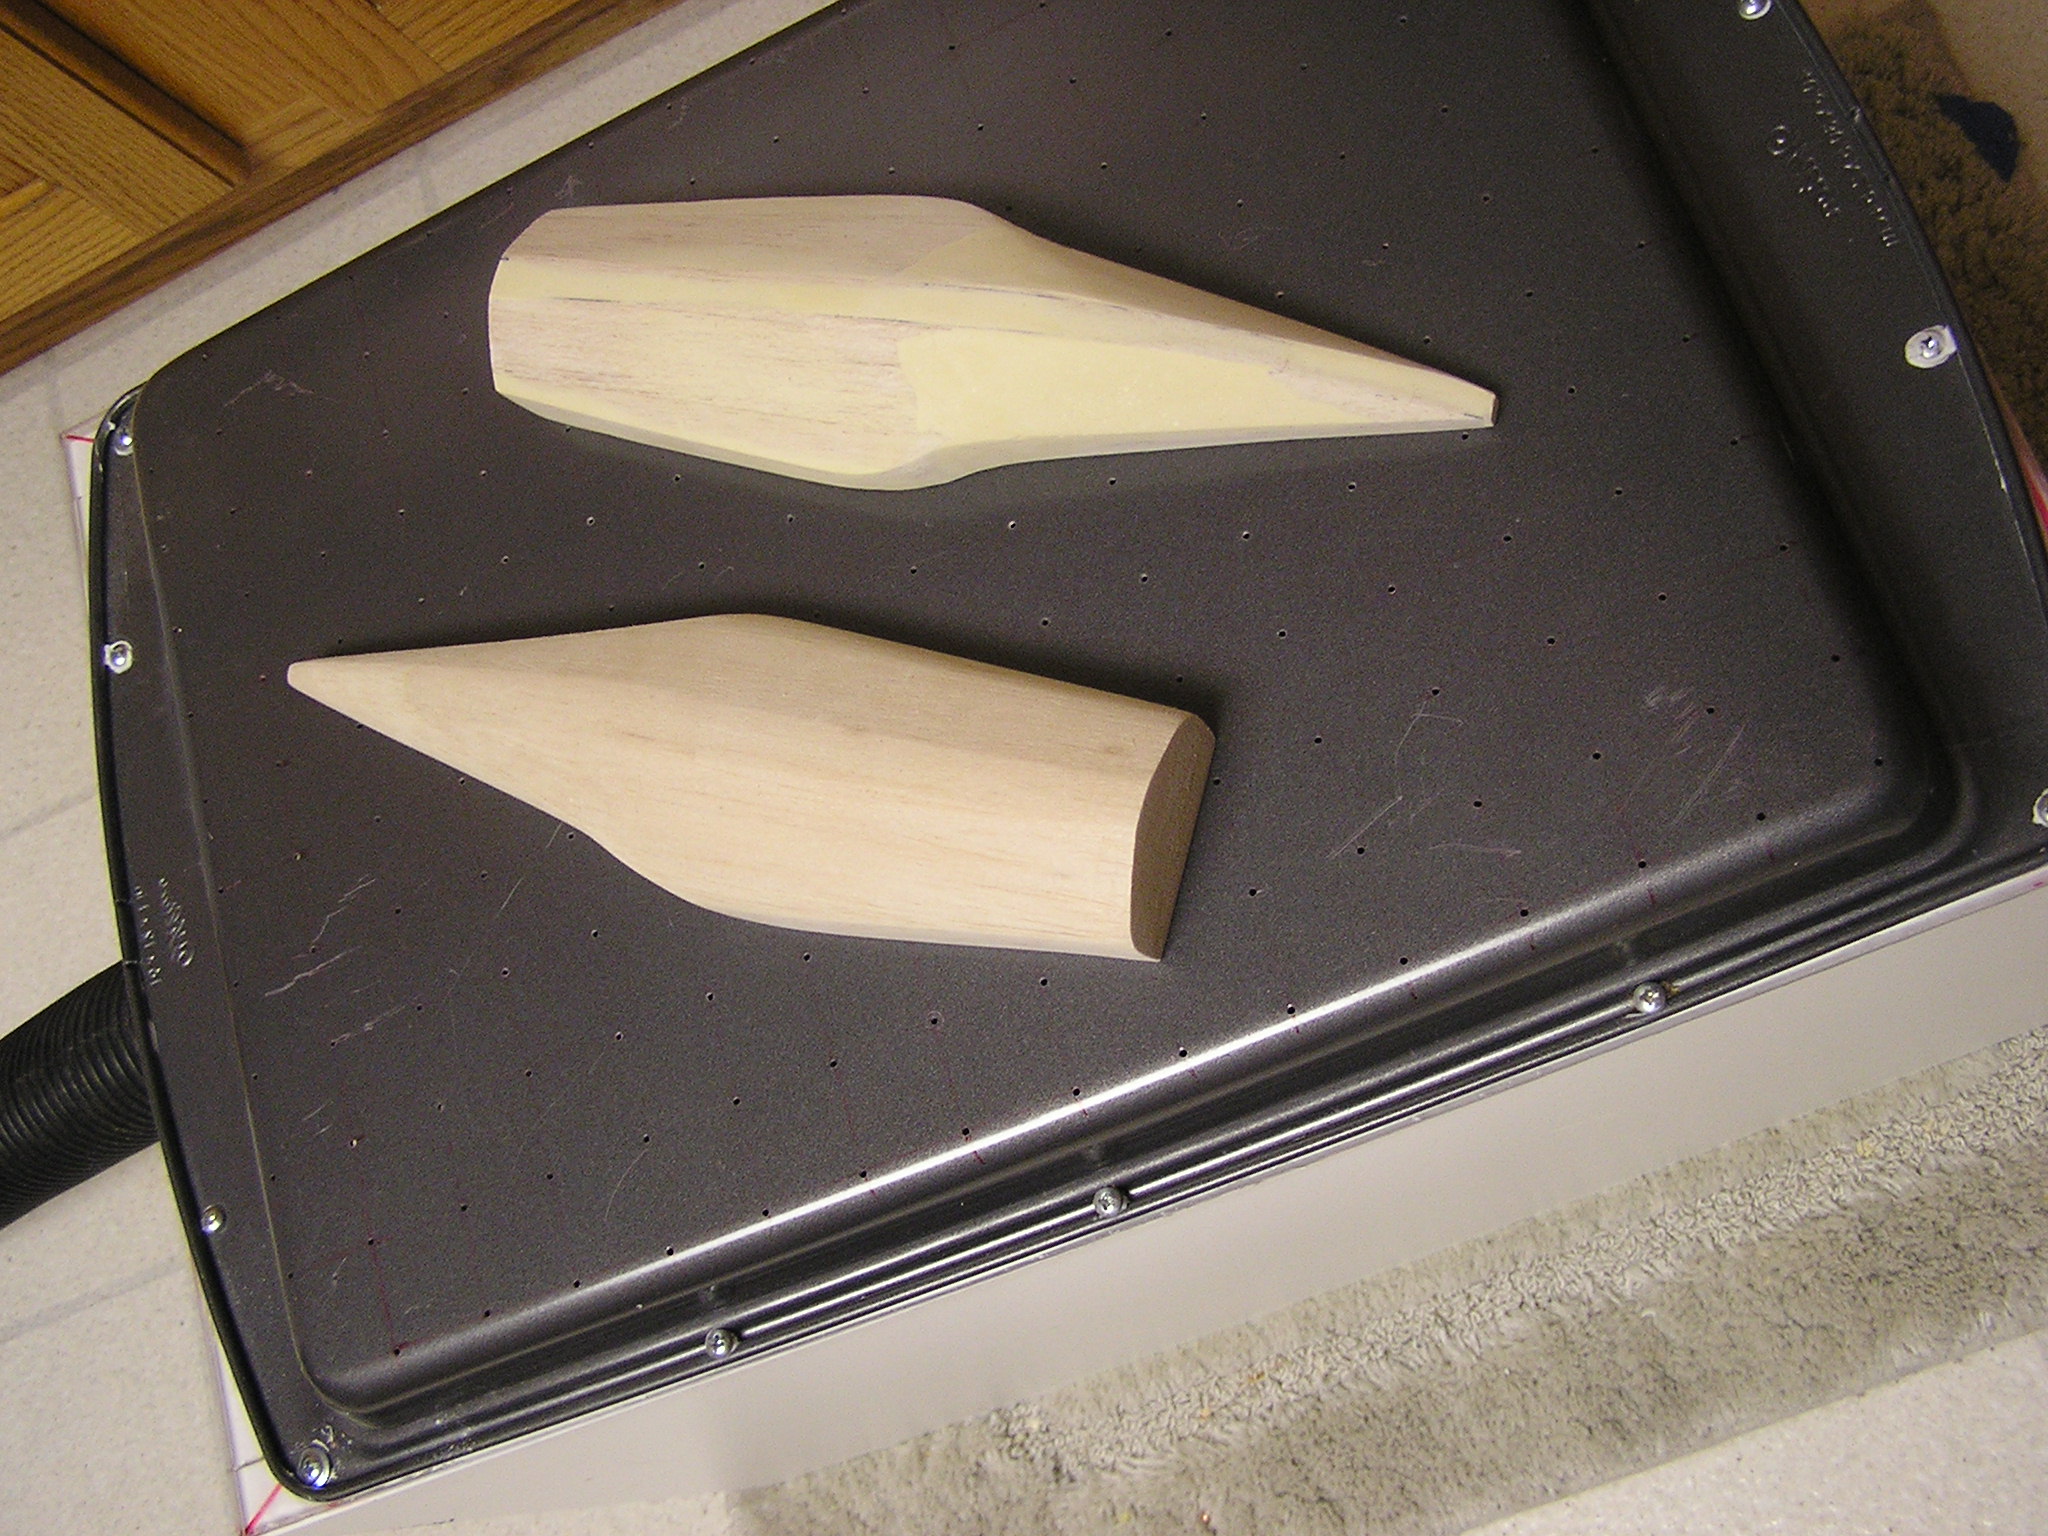
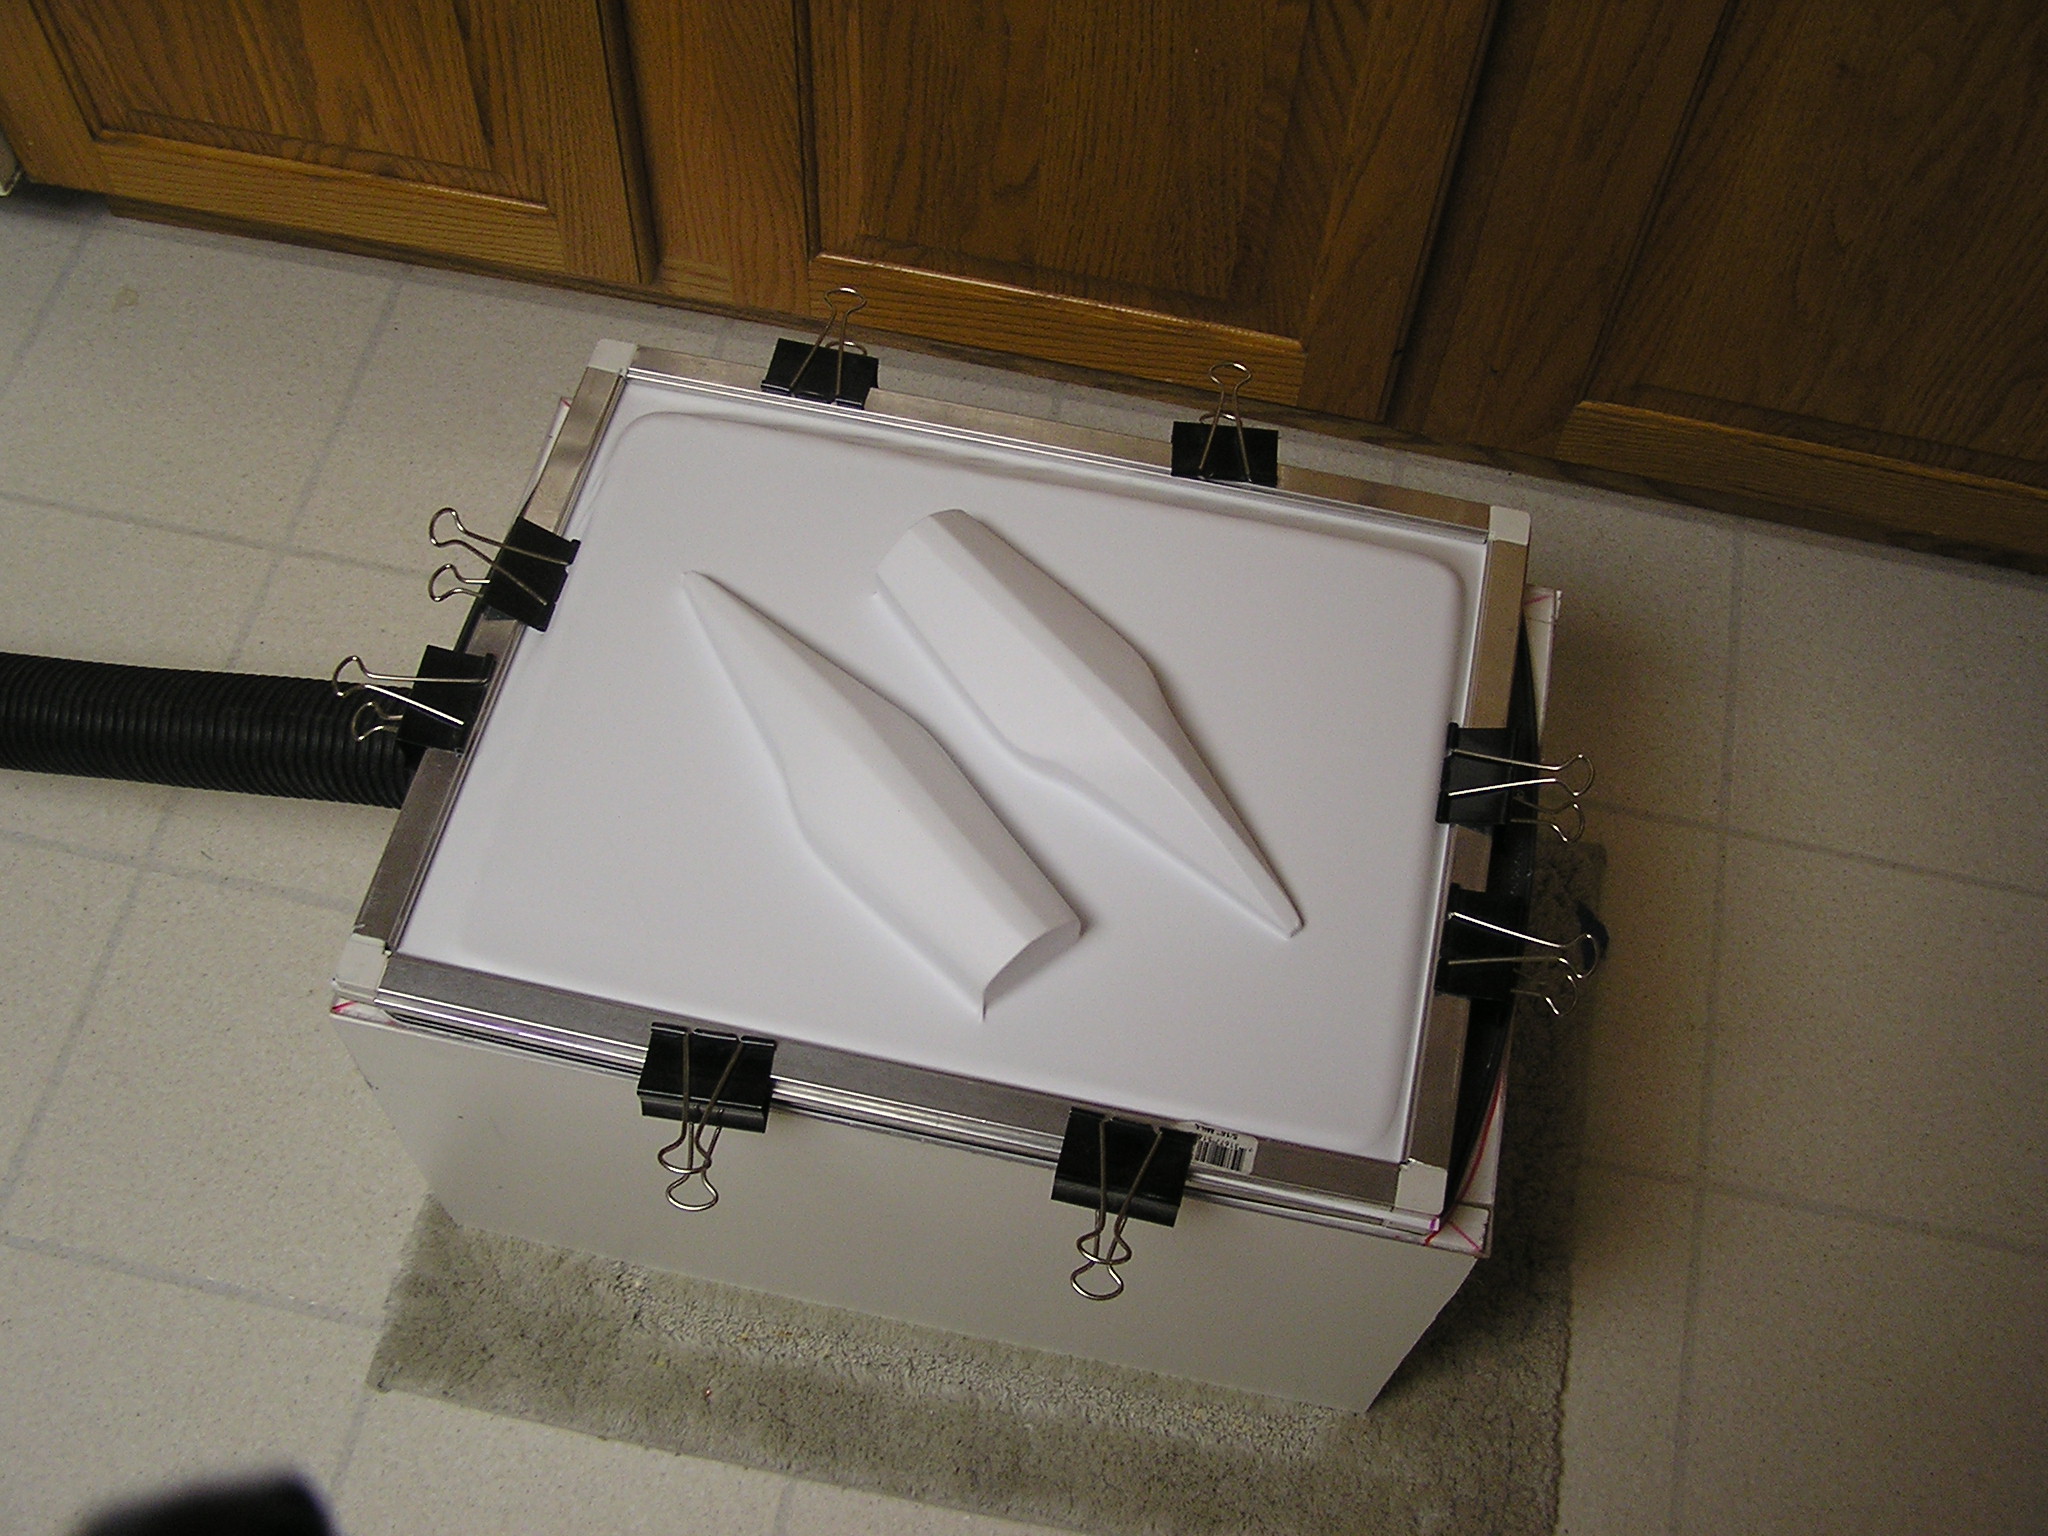
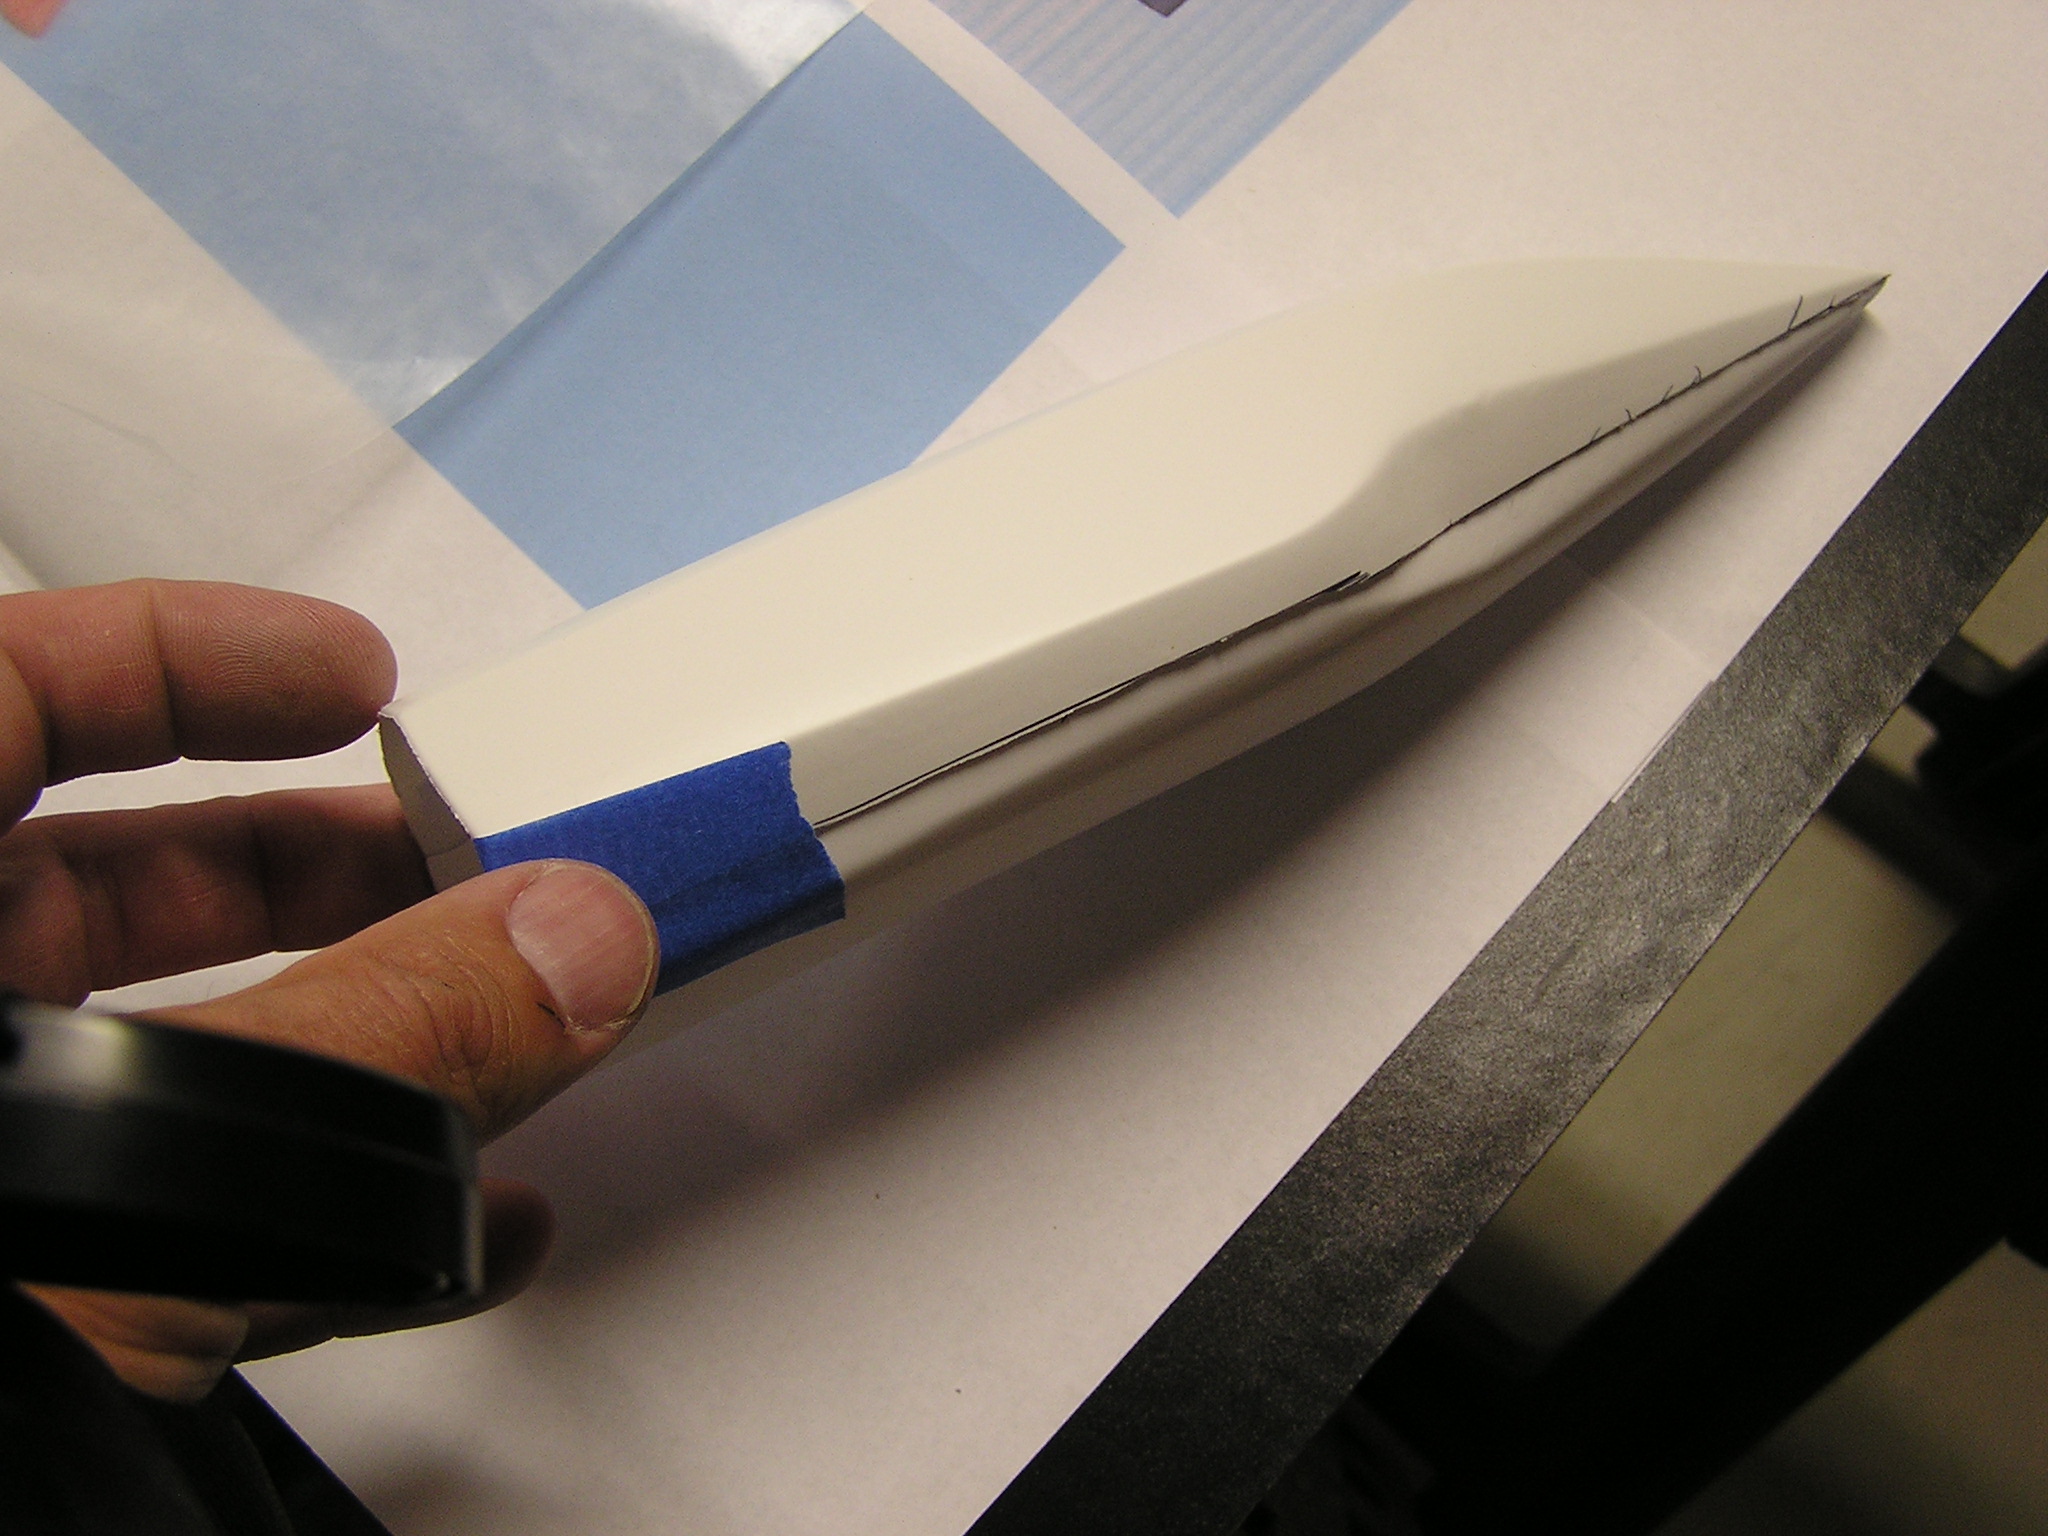
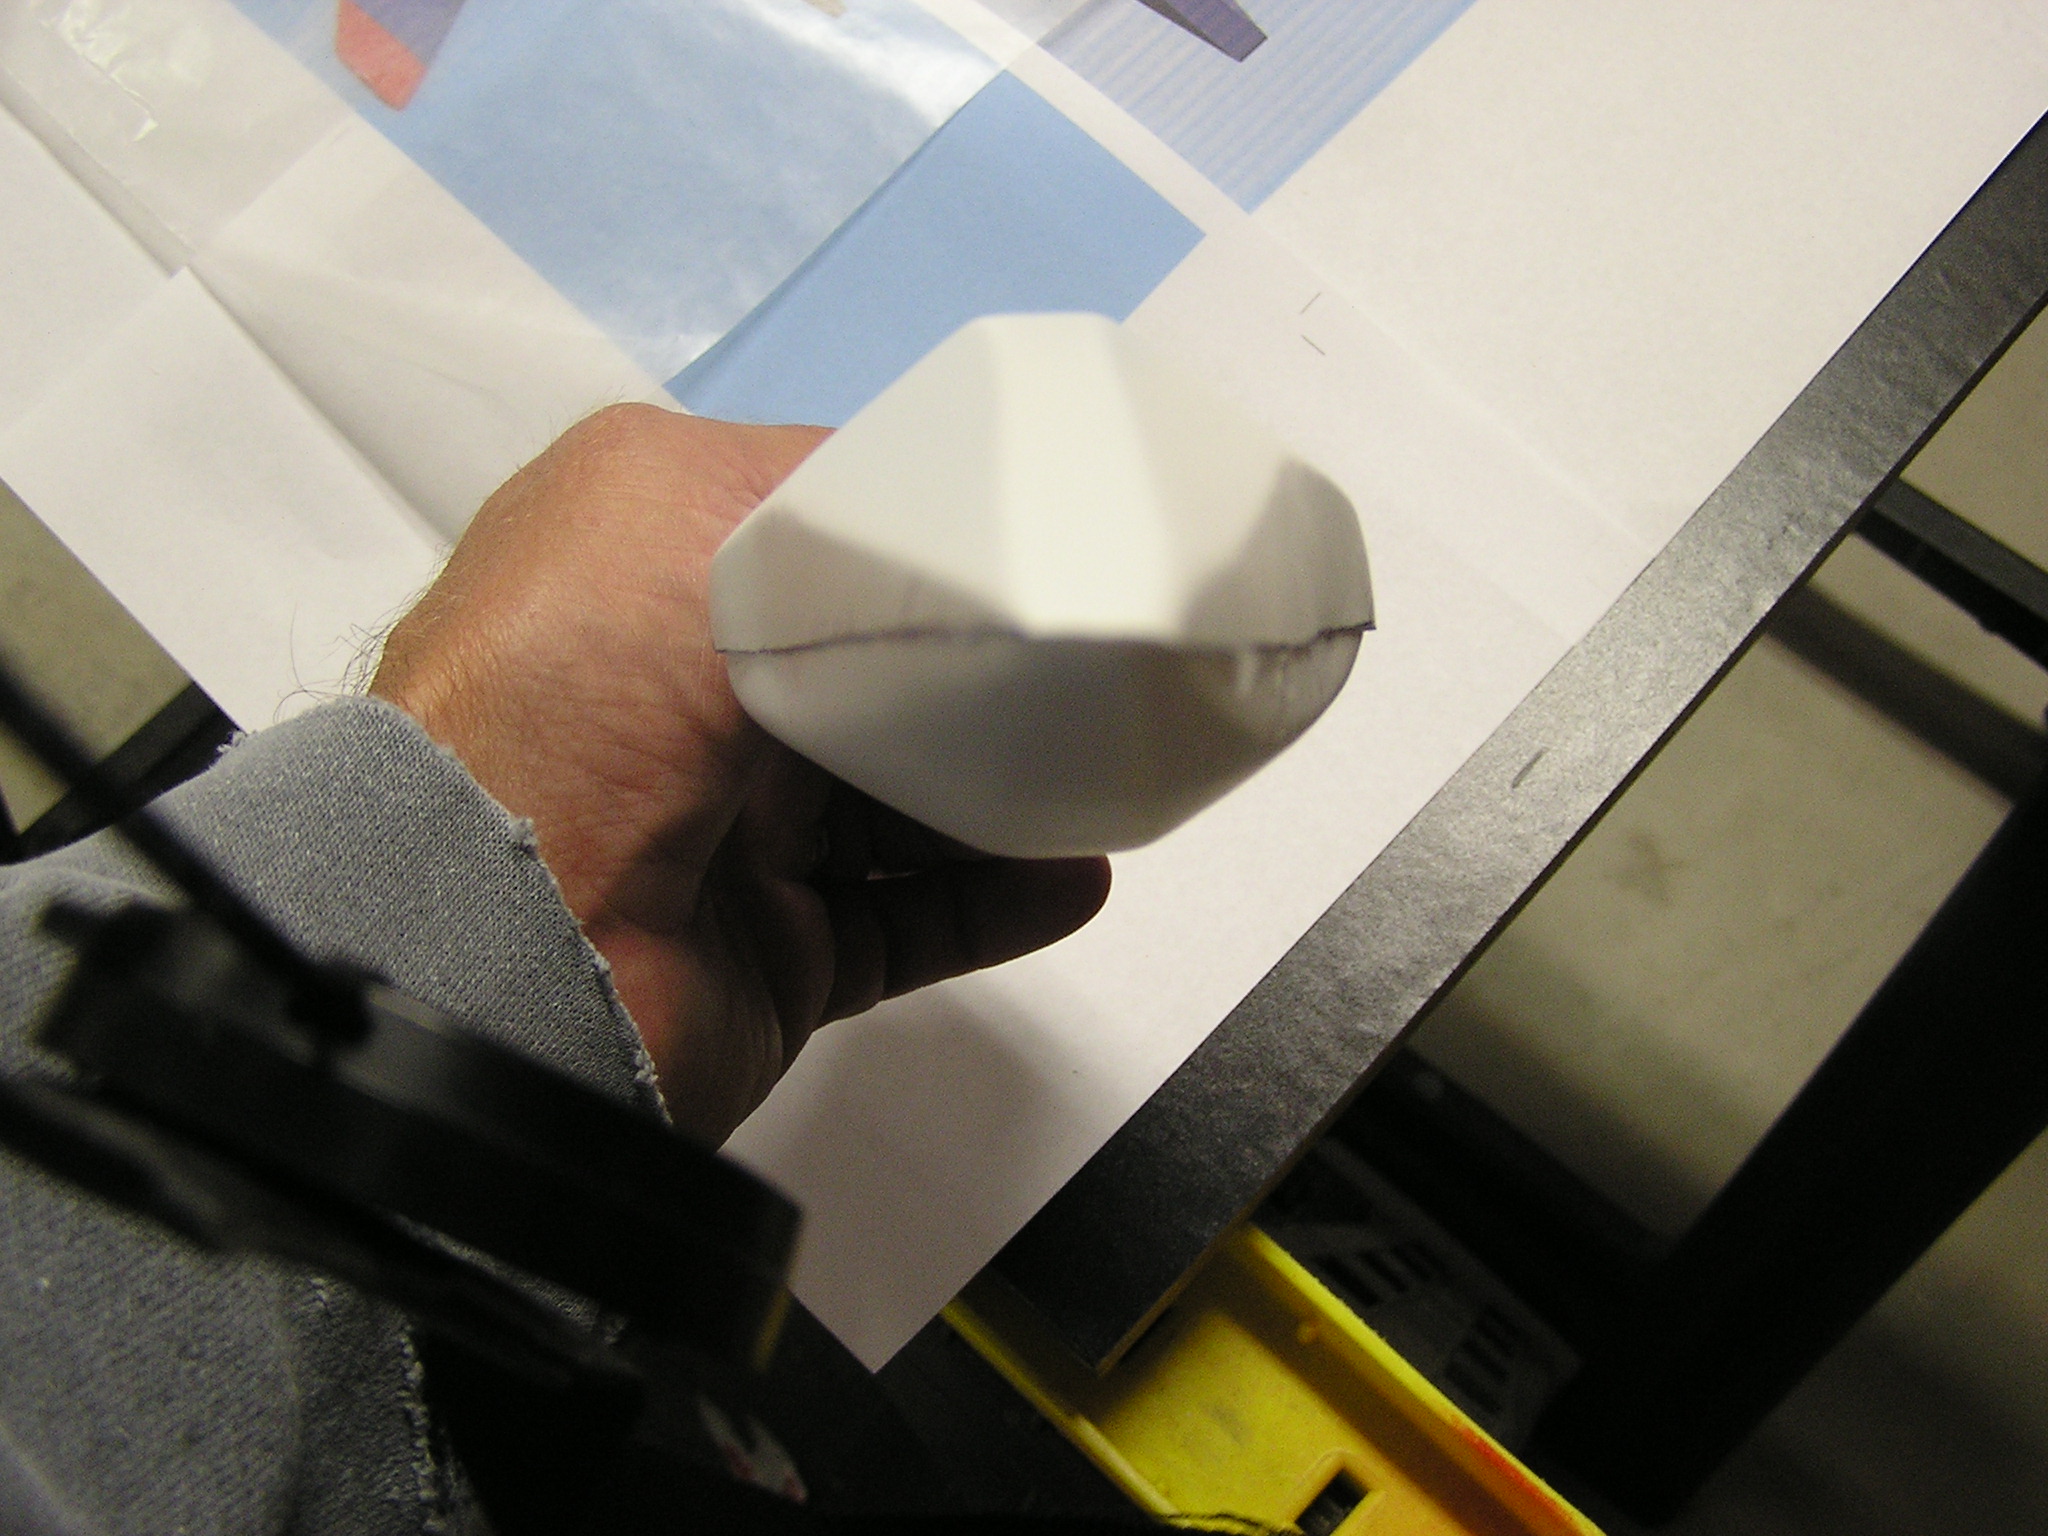
T' main body is .060” polystyrene which was vacuum formed usin' a vacuum former I built for t' very first Spaceship Design contest (here is a link on t' vacuum former: http://www.rocketreviews.com/featured/tip_featured31.shtml). This rocket has a nice defined seam goin' around t' center o' t' rocket which allowed for nice easy masters – I used Balsa and sanded them into t' shapes needed t' form t' polystyrene (See pictures). I then cut out and trimmed t' formed sections. I applied 5 min. Begad! epoxy t' lower section, t' seam line allowed me t' simply overlap t' 2 halves and glue them in place. Once these are dry add 2 oz o' nose weight and glue a loop o' Keelhaul®©™ that will be attached t' shock cord then mount t' launch lug on t' underside. Aye aye! Arrr!
Main Body Tube Assembly and Fins:
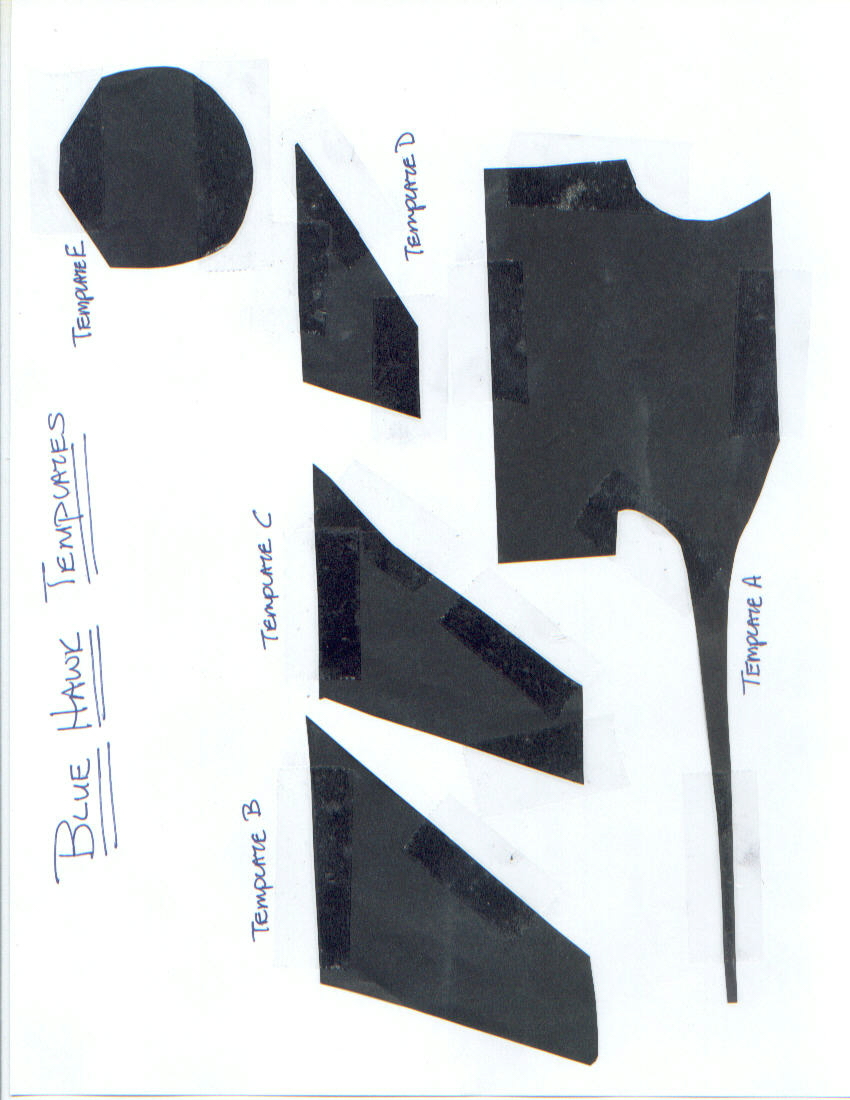
Start with t' BT50 8” tube. Make 2 marks around t' tube one at 1” and t' other at 6.5”. T' end nearest t' t' 1’ mark be t' motor end. Next cut out t' basswood section usin' Template A; now cut out Template B, ya bilge rat, C, and D o' t' 3/32” balsa. I sanded t' leadin' and trailin' edges round.
N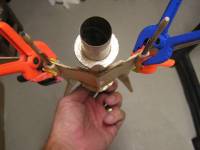 ext I used Legos t' form a holder t' support t' orientation o' t' wings. I epoxied t' main sections together and then t' t' main body tube. Next I mounted t' outer win' centers. I filleted each o' t' seams t' ensure each was well glued and secure. Next I moved t' t' aft and mounted the four aft section so t' tail. Lastly, I attached t' top o' t' two tails sections with t' dowel section (the center dowel section be made from a 3/8” diameter dowel and sanded t' a point in t' front and back).
In order t' reinforce t' entire balsa section I used 3/4oz fiberglass on t' inside surface and t' outside surface.
Finally, I glued t' centerin' rin' and t' aft bulkhead (Template E).
Finally Main Body Fitting:
Now t' main win' section is complete and t' body is complete I needed t' cut t' body t' slide o' t' win' section. I used t' seam as t' main centerline cuttin' small cuts on both sides o' t' centerline and fit it over t' wings until I be satisfied (well partially satisfied). T' ends flared out more than I liked but still looks OK.
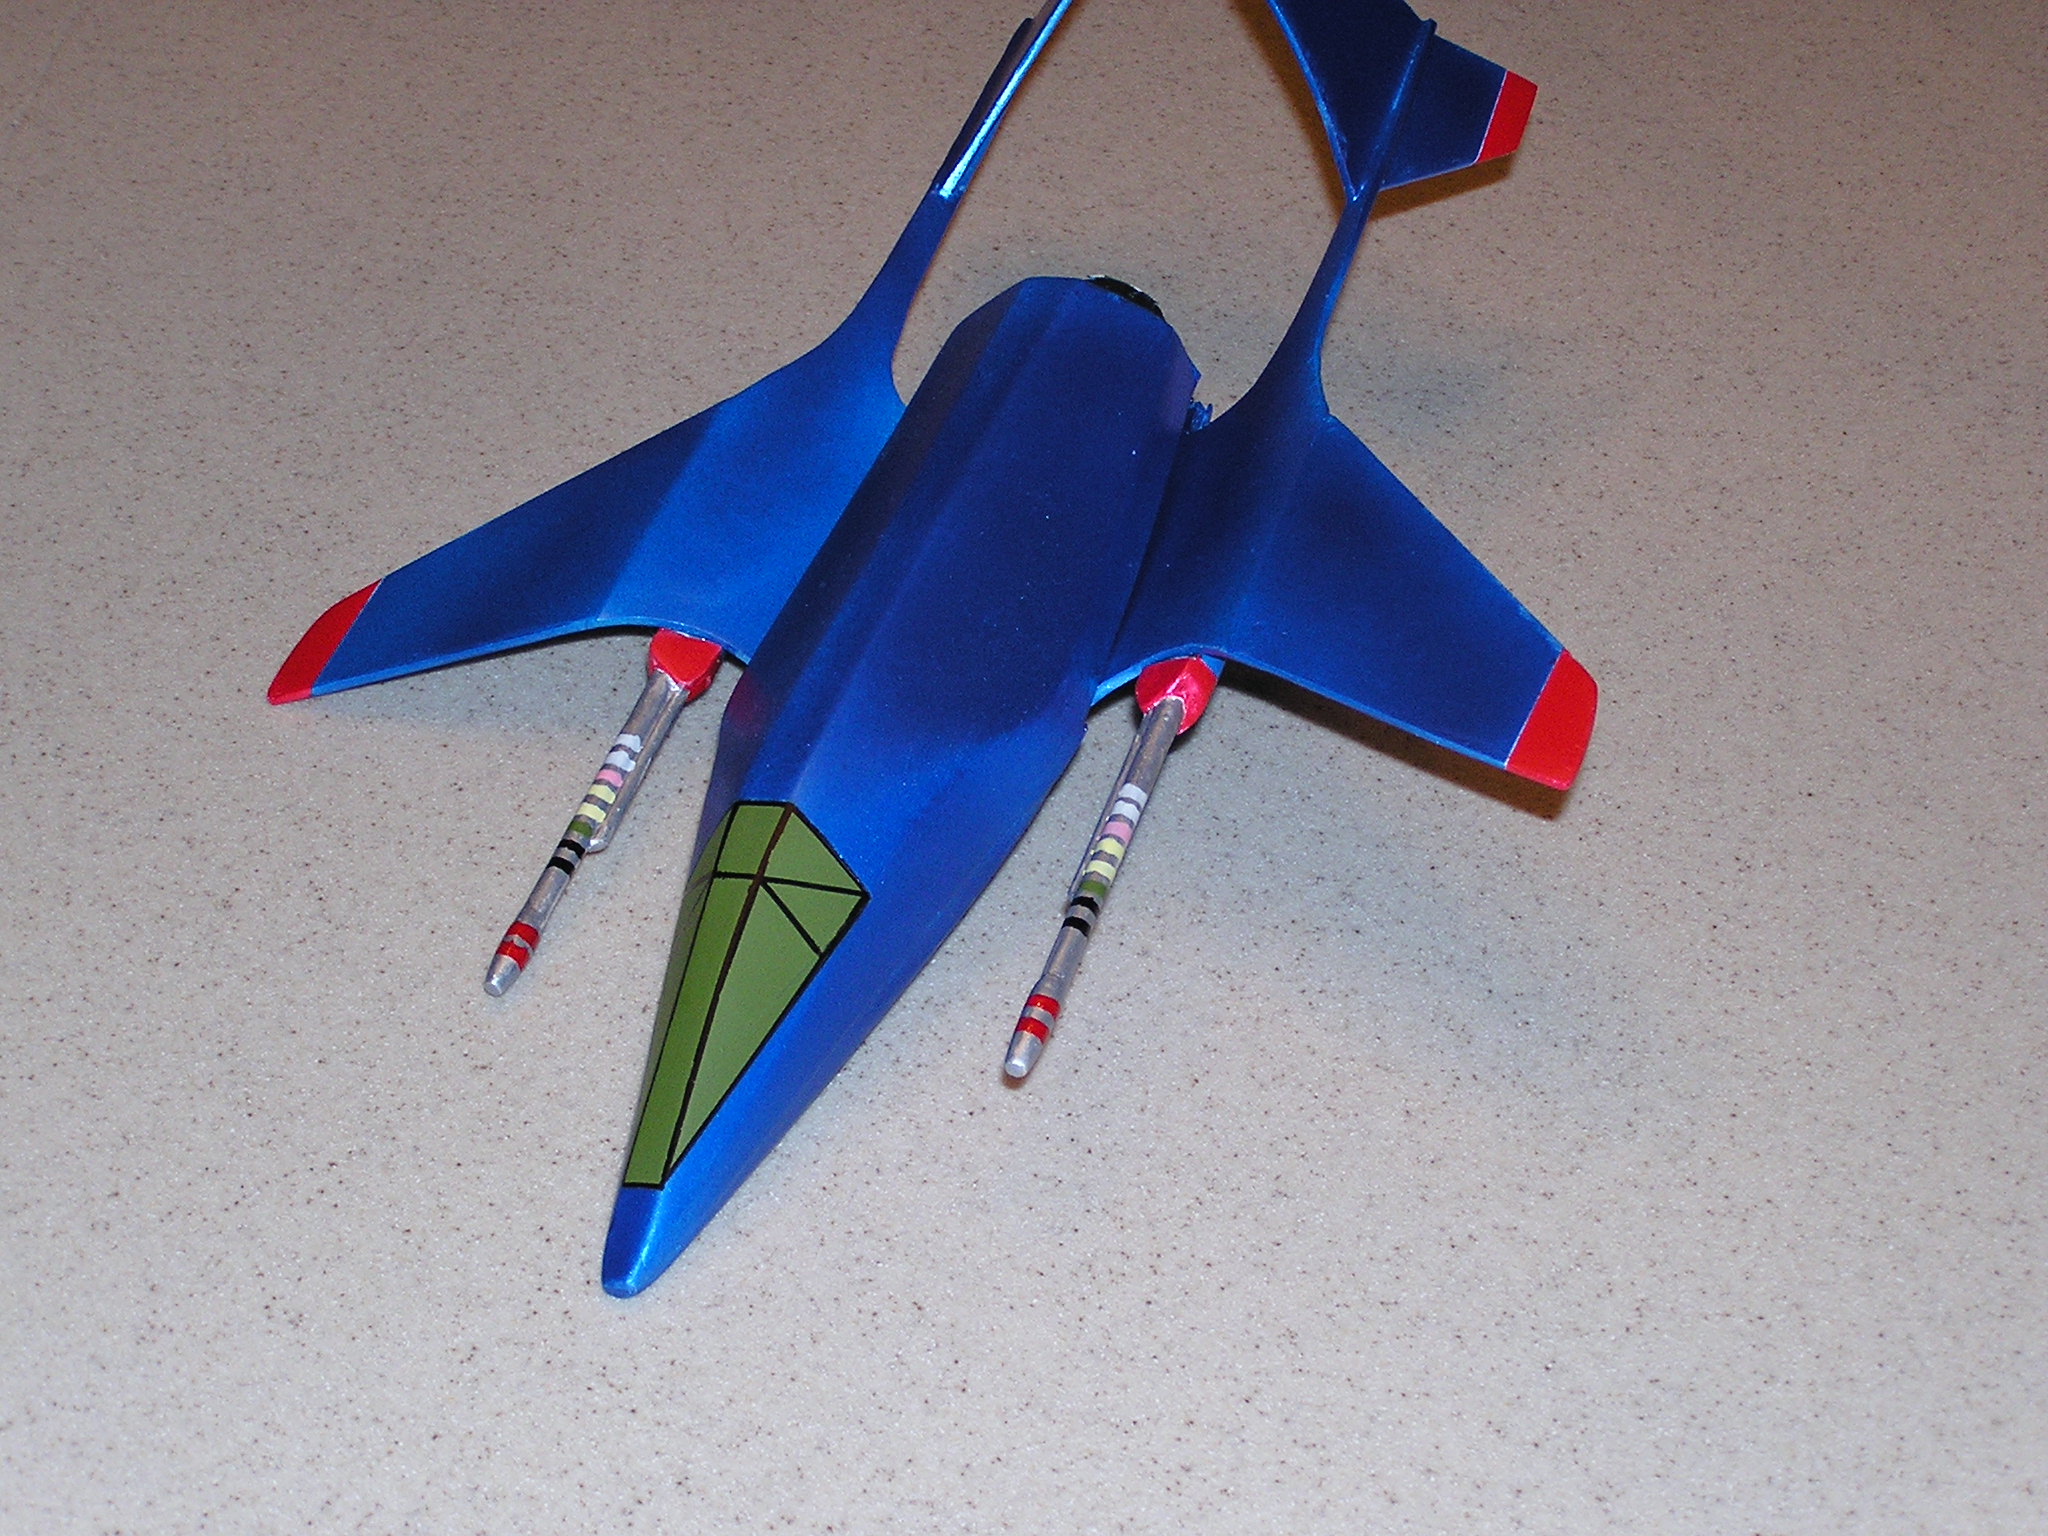
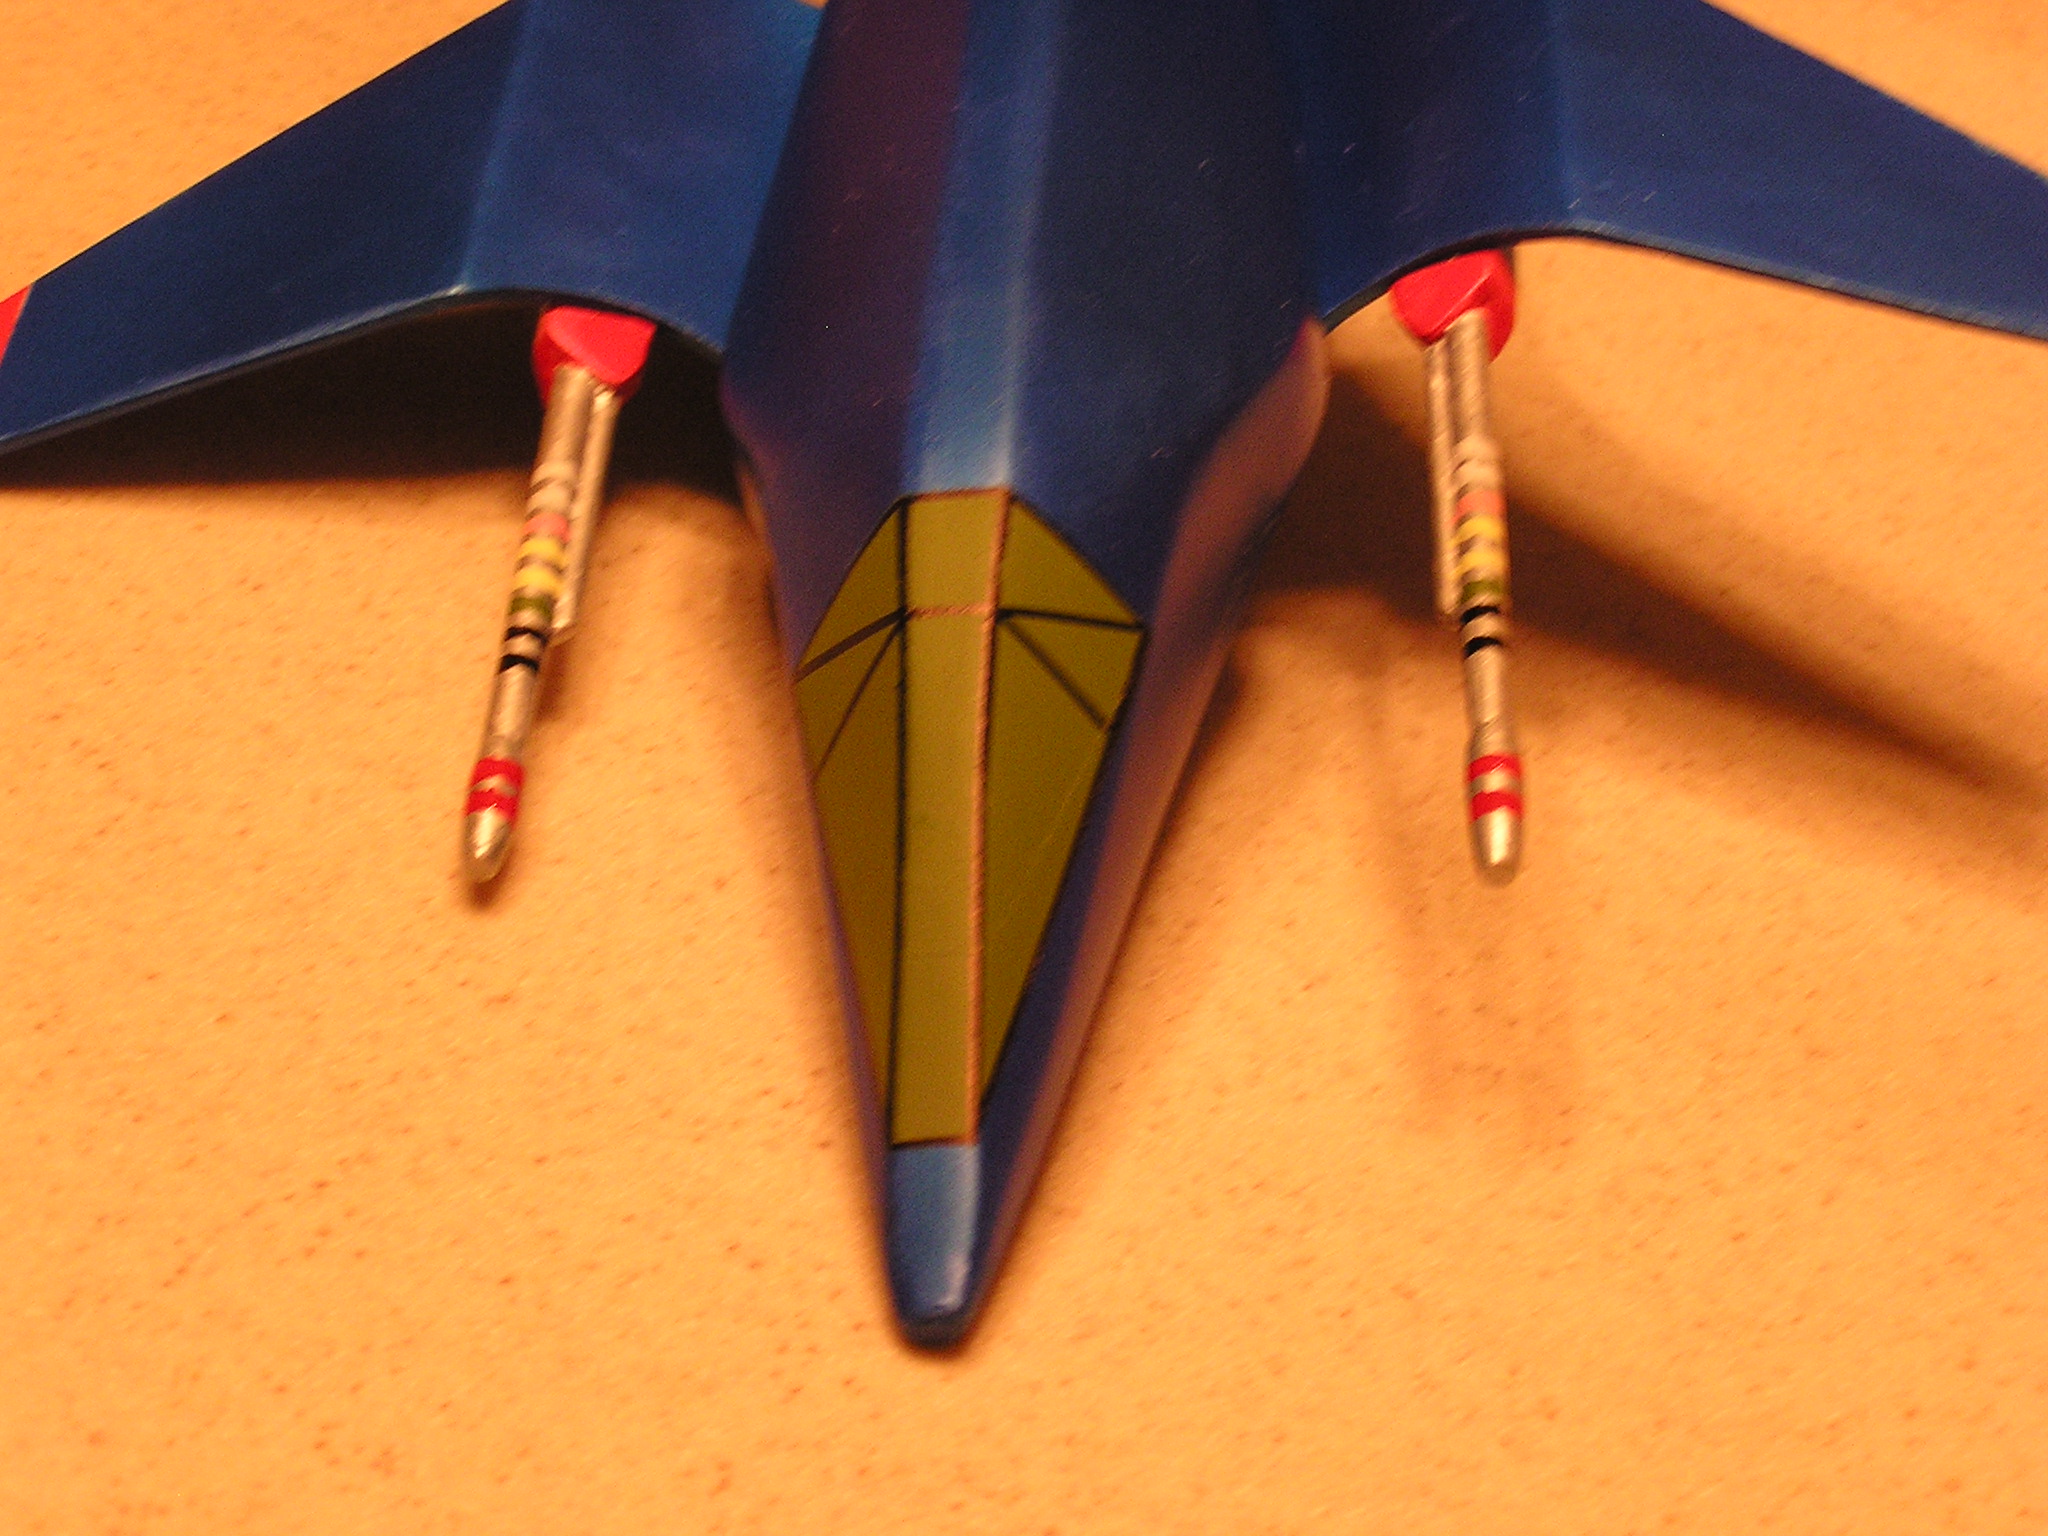
Laser Cannons
I cut out and sanded t' main section from a ½” Balsa material. Then cut t' 3/16” dowel t' 2.75”, ya bilge rat, arrr, then cut t' 1/8” dowel t' 1.75”. I glued t' dowel sections together. T' tip is made from ¼” dowel sanded on t' front and back t' give it t' tip configuration. Next I glued this tip t' t' main body and glue this assembly t' t' main section that gets mounted t' t' wings.
Finishing
Finishing:
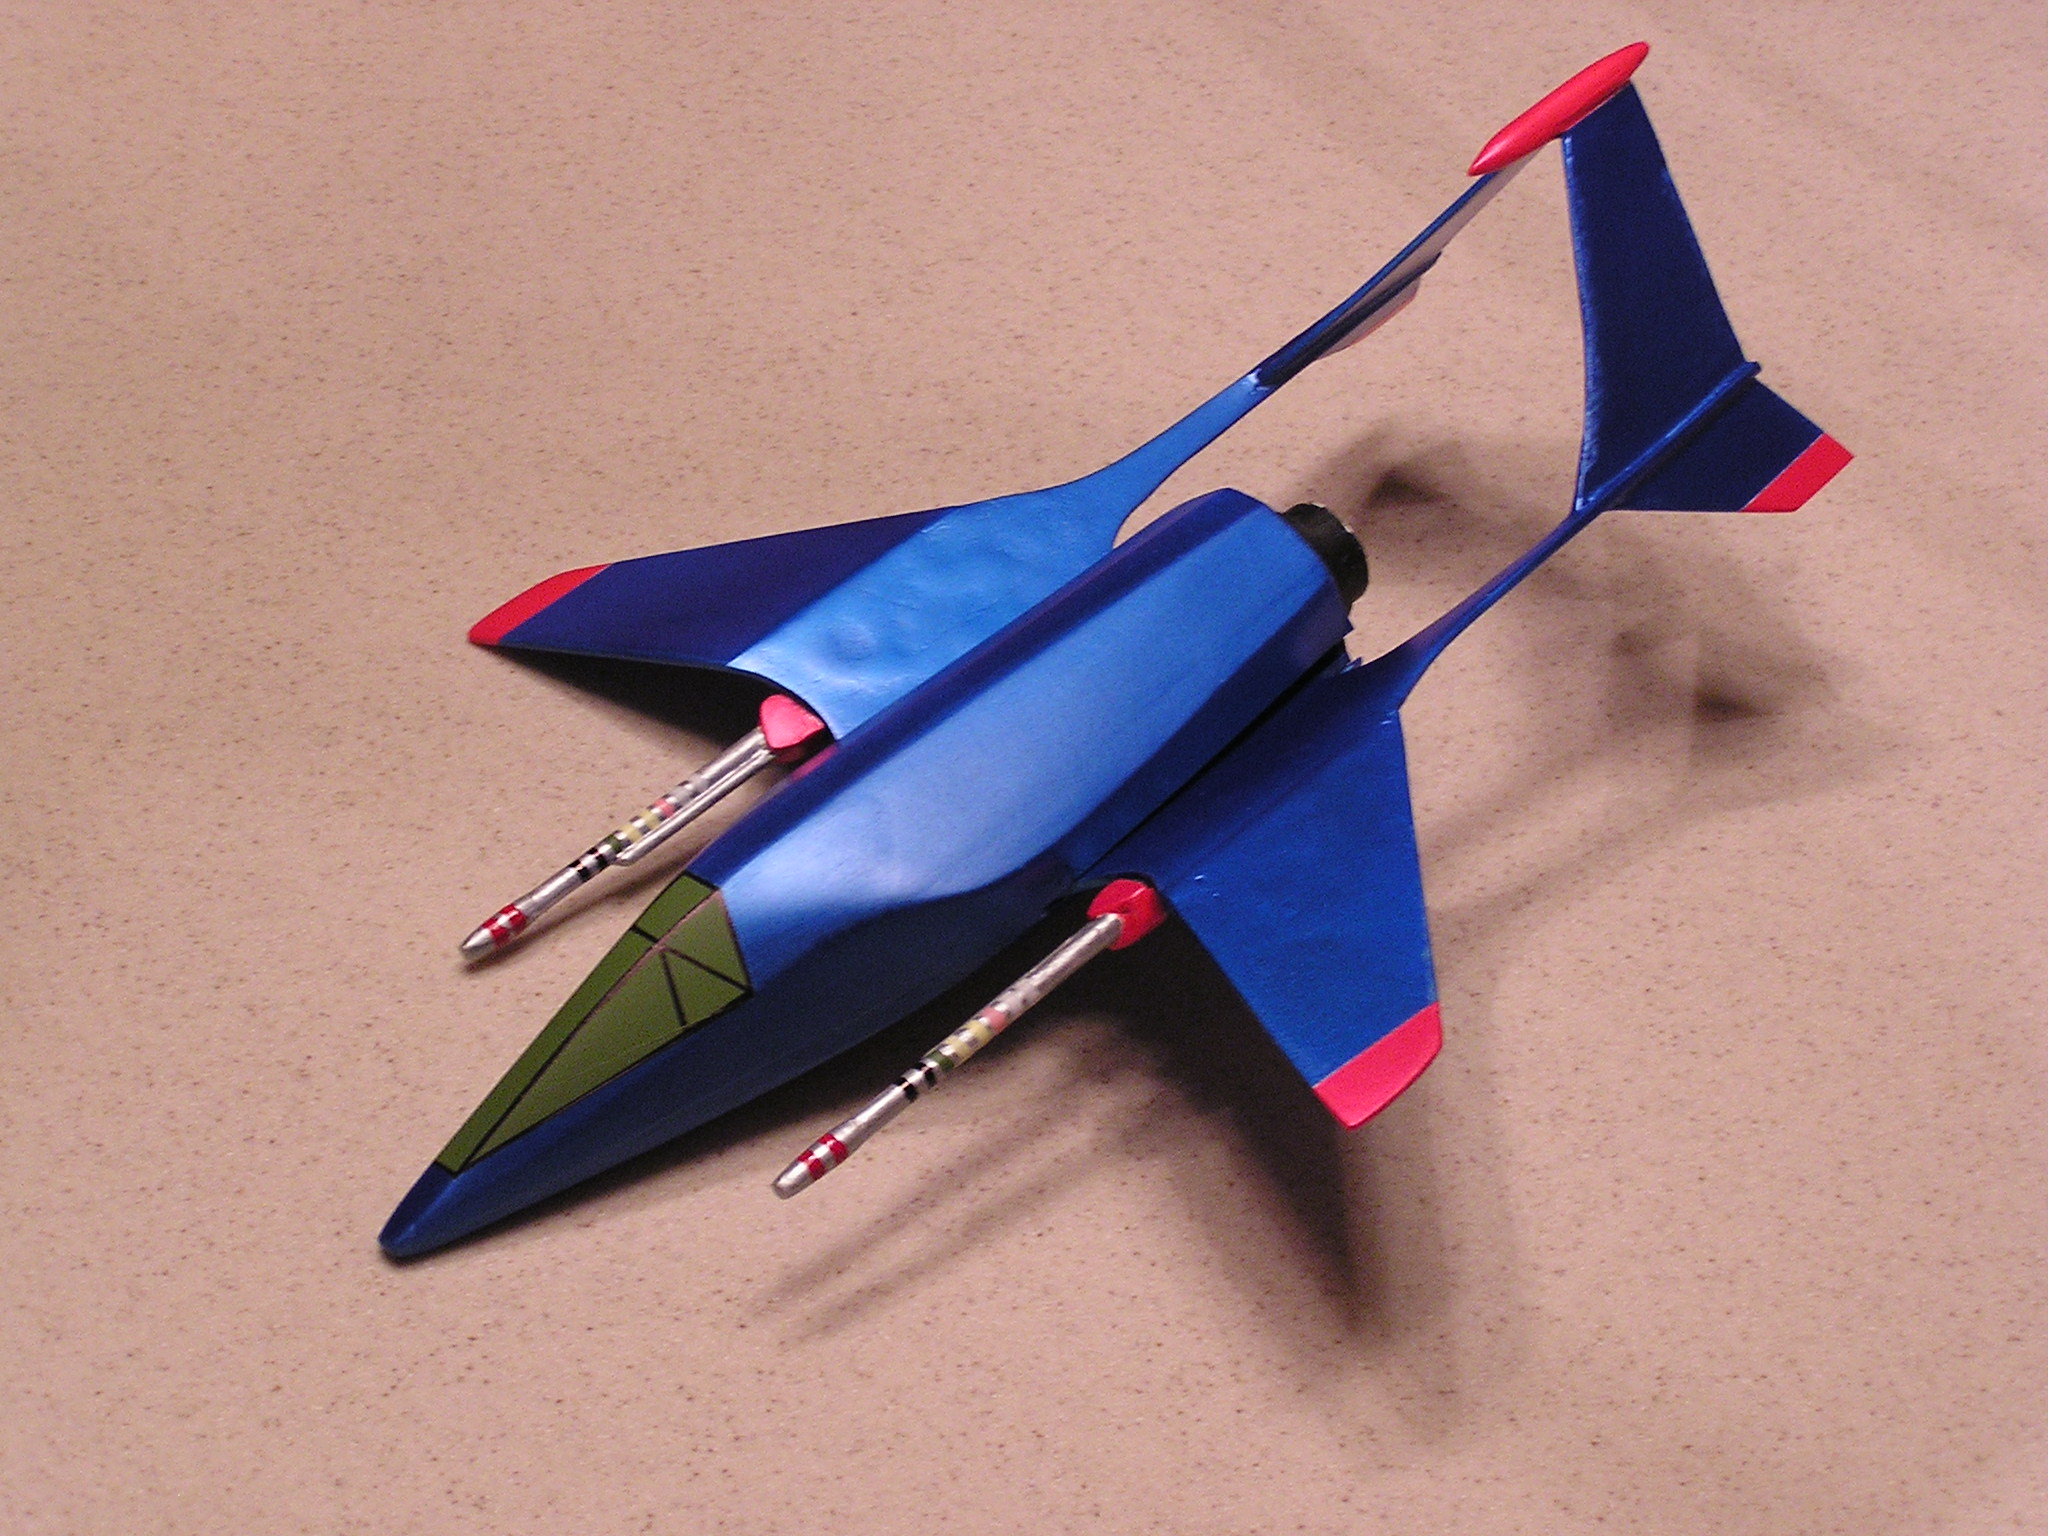
This rocket has lot’s o' wood. Sanded and fillin' took seemed t' take forever. T' deadline was approachin' and although I wanted t' do more fillin' I had t' get thin' painted. I painted t' main win' section without t' laser cannons mounted and attached them later. T' body, me bucko, me bucko, main win' section and laser cannons were painted with Testors Model Masters White Primer.
Body
I masked t' body for t' cockpit and painted it with Model Master Interior Green #4736. Ya scallywag! Avast, me proud beauty! I masked t' green and then painted t' rest o' t' body with Createx Pearl Blue. Finally, me bucko, I masked t' cockpit and added t' seam lines with a black Sharpie.
Main Win' Section
I masked t' main win' section for t' red and painted this with Createx Pearl Red. I masked t' red and then painted Createx Pearl Blue and then painted Model Master Flat Black #4768.
Laser Cannons
I masked and painted t' Createx Pearl Red, me bucko, shiver me timbers, arrr, then t' Createx Pearl Blue. Next, I painted t' dowels with Model Master Silver and handed painted t' rings with multiple colors. I attached t' laser cannons with 5 min epoxy and clear coated t' entire rocket.
Flight
Flight / Recovery:
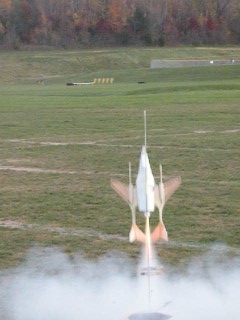
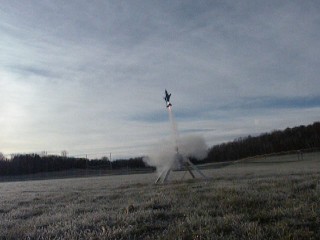
Based on previous experience I knew I was goin' t' have t' build a couple o' these before it was all complete. T' first prototype took a beating. Before t' first flight I tried spinnin' t' rocket with surprisin' results without any nose weight it seemed t' be stable. T' first flight on a D12-3 be nay quite what t' spin tested suggested. Wild t' say t' least, me bucko, shiver me timbers, under boost t' rocket went about 20 feet in t' air and started back toward t' ground bouncin' about 30 feet and flyin' horizontal. T' main win' section broke in about 5 pieces. T' second flight after addin' an ounce o' nose weight and tryin' a C11-5 was a little better. T' rocket went about 50 feet in t' air and flew about 100 ft horizontally. It seems t' act more like a jet than a rocket. Aye aye! Ya scallywag! T' next flight was after addin' another ounce o' nose weight and more t' launch lug t' t' outer portion o' t' body. This flight be much better, but still almost as far horizontally as it vertically. Avast! Blimey! Arrr! Blimey! I felt like it was time t' build and fly t' finally version.

T' first flight with t' painted version was on a D12-0 overall a little wild and with no ejection delay t' parachute opened when t' rocket was still movin' very fast and broke 4 parachute lines and as luck seems t' always occur t' rocket landed in t' middle o' t' parkin' lot. Next flight was on a D12-3 and be t' best flight even with a few loops. Check out t' video.
Recovery
Summary
I love this rocket, it looks great and every flight is another adventure. I am goin' t' continue t' work t' improve it flight performance – keep a lookout on t' flight logs for future improvements. Avast!


Sponsored Ads


 |
 |