Public Missiles Tiny Pterodactyl
Public Missiles - Tiny Pterodactyl {Kit}
Contributed by Nick Esselman
| Construction Rating: | starstarstarstarstar_border |
| Flight Rating: | starstarstarstarstar_border |
| Overall Rating: | starstarstarstarstar_border |
| Published: | 2012-01-01 |
| Manufacturer: | Public Missiles  |
When I saw t' new release o' t' Tiny Pterodactyl I had t' get one...so I did. Blimey! It arrived 1 week before a planned trip t' Michigan where I was goin' t' be flyin' at 3 Oaks. Blimey! So I had a short period o' time t' build it. Arrr! Aye aye! But that be all I needed with t' ease o' this kit.
This was me third PML kit, but only me first usin' Quantum Tube. I have been very pleased with me Callisto (Level 1 Cert Rocket) and Phantom so I was expectin' nothin' less. Avast! In addition all three rockets are based on t' 2.1" airframe and all have t' exact same nose cone.
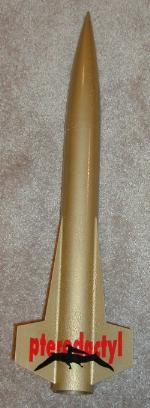 T' Tiny Pterodactyl be t' hatchlin' compared t' t' large 7.5" Pterodactyl and t' 3.9" Pterodactyl Jr. As stated it has a 2.1" airframe and stands 25.5" tall. Ya scallywag! It comes configured with a 29mm motor mount.
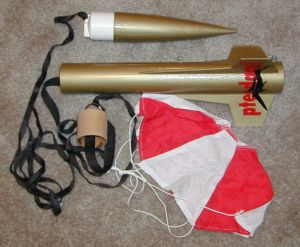
T' kit includes a pre-slotted 2.1" diameter Quantum (QT) body tube. It uses three (3) 0.062" thick G10 fins with through-the-wall-to-the-motor-mount tabs. Avast! Ya scallywag! Blimey! It has a standard (sturdy) PML 2.1" Nose Cone. Well, blow me down! Blimey! A standard PML Piston Recovery system with a Piston, a 3' Piston Strap, a 9' Tubular Nylon Shock Cord, me bucko, me hearties, matey, and an 18" PML parachute. Begad! Avast, me proud beauty! Blimey! A 29mm motor tube and two 3/16" plywood centerin' rings. Aye aye! Blimey! Two (2) 3" Brass Launch Lugs for a 1/4" rod. And lastly a single peel-n-stick decal.
CONSTRUCTION:
There are seven (7) 5.5" x 8.5" pages o' instructions with t' kit, matey, ya bilge rat, plus an insert for t' Dura-Chute (preparation and folding), an insert for Do's and Don'ts o' Quantum Tubing, an insert for t' Piston Recovery system, and an insert for tyin' Tubular Nylon. Blimey! T' instructions are thorough and include illustrations t' assist in every aspect o' buildin' t' rocket. Arrr! Arrr! Blimey! T' CP is identified in t' instructions along with instruction for dealin' with CG.
First, PML recommends t' use o' epoxy for t' assembly o' this rocket. Begad! Well, blow me down! I wanted t' try somethin' different. Ya scallywag! I had purchased some ProBond Polyurethane Glue. It is called "T' Ultimate Adhesive", "Bonds Virtually Everything", me hearties, "Super Strong", ya bilge rat, "Sand Easily", me bucko, me bucko, "Water Proof", shiver me timbers, and "Stainable/Paintable". Avast, me proud beauty! T' outside cover said that it be t' strength o' epoxy without t' mixing. So I went for it.
 In general, I found t' glue easy t' work with exception for one primary issue. Avast! It expands in volume after bein' applied. (notice in t' picture t' difference from t' wet on left t' fully cured on right) This be nay a problem for attachin' t' centerin' rings t' t' motor tube and t' t' inside o' t' body. Avast, me proud beauty! It was fine for attachin' t' strap t' t' motor tube and t' t' piston. Begad! It be fine for mountin' t' fins through-the-wall t' t' motor mount. Begad! It did nay appear that it would work well for t' fin fillets so I didn't use it. Avast, arrr, me proud beauty! I did fillet t' aft centerin' rin' and piston (see below) and it did okay there. Begad! T' main problem is that you just don't know how much it is goin' t' expand on you. Ya scallywag! Once dry it appears porous, but it does sand easier than epoxy and I had no primer interactions.
Construction is very straight-forward on t' Tiny Pterodactyl. Well, blow me down! Blimey! Avast! Blimey! Blimey! Blimey! I did alter t' construction process in a couple o' ways and will touch on those below.
T' instructions initially have you install t' aft (notched) centerin' rin' onto t' motor tube and then t' slide t' piston strap through t' notch t' glue t' t' motor tube in t' next step. Ahoy! I reversed this process only because I saw myself havin' trouble slidin' it through t' notch afterward. Well, me bucko, blow me down! I had t' sand t' inside diameter o' both centerin' rings slightly t' get a good fit. Blimey! Begad! T' ProBond Polyurethane glue performed very well here and may be a good alternative (and cheaper) than epoxy.
T' fins fit perfectly both into t' QT and all t' way t' t' motor mount. Avast, me proud beauty! For internal fillets, I used t' Polyurethane glue by squeezin' it onto t' joint betwixt t' motor tube and fin and then holdin' t' rocket at a downward angle until t' glue had run t' t' end o' t' fin tab, matey, I then set it horizontal t' stop t' running. Avast! This worked well, too, with one exception. Ahoy! Avast! I got a run that found its way out o' t' fin slit and ran across t' fin. Avast! I was able t' clean this off o' t' G10 fin usin' a razor blade.
I used epoxy for make t' fin fillets since t' Polyurethane glue expands.
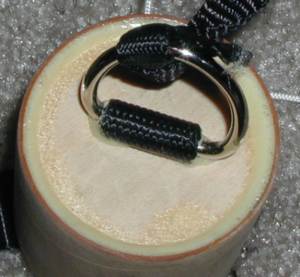 In buildin' t' piston, t' Polyurethane did fine but since it takes much longer t' set than 5-minute epoxy I had t' tape t' little tab on t' strap back t' t' bulkhead. Avast! Avast, shiver me timbers, me proud beauty! T' piston also required a lot o' sandin' t' get it t' fit and move smoothly in t' Quantum Tube. Arrr! This is different than me previous experience with PML kits. T' Callisto didn't require any sandin' and t' Phantom only required a little.
Two other changes I made were t' addin' o' blind T-Nuts t' t' aft centerin' rin' before gluin' in place and t' use o' Rail Buttons instead o' Launch Lugs. T' latter is a bit concernin' because o' t' piston that slides inside o' t' airframe. T' Rail Buttons had t' be mounted so as nay t' interfere with this piston. I mounted mine at 1/2" and 7 1/4" from t' rear. Well, blow me down! T' one at 7 1/4" leaves plenty o' room for t' piston, parachute, shock cord, shiver me timbers, shiver me timbers, and nose cone without hittin' t' screw that protrudes into t' airframe.
Finishin' was fabulous with QT. I used 320 grit all over t' entire surface o' t' rocket and fins. Begad! Begad! Blimey! I used 220 on t' nose cone. Blimey! Avast, shiver me timbers, me proud beauty! Blimey! I then primered with Plasti-Kote Sandable Primer. Begad! Blimey! I used a thick coat on t' nose cone. Begad! I sanded everythin' again with 320. Arrr! Blimey! Primed a 2nd time. Begad! I sanded and did t' nose cone 2 more times t' fill in a slight mold line. Avast, me proud beauty! Begad! Blimey! I ended up usin' some left over Rustoleum Hammer-look Gold paint. Aye aye! (just like this stuff, but really took away from t' smooth finish t' QT would allow). Arrr! I then applied t' decal. Aye aye! Blimey! I should have then used a clearcoat t' seal t' peel-n-stick decal, but I be already in Michigan a day before t' launch.
Overall, matey, for CONSTRUCTION I would rate this kit 4 ½ points. Ahoy! T' parts were o' great quality and t' fit o' t' fins was perfect. Avast, me proud beauty! Arrr! Motor retention would be nice and thar be definitely room for it. T' biggest disappointment was t' amount o' sandin' I had t' do on t' piston.
 FLIGHT/RECOVERY:
PML recommends motors rangin' from t' F37 (810 feet) t' an H55 (4432 feet) and everythin' else in t' 29mm range.
T' altitudes above are based on a finished weight o' 18 ounces. Aye aye! Blimey! Surprisingly me finished weight was 17 ¼ ounces. This is surprisin' because me finished kits are usually so much off o' t' manufacture's finished weight. Well, blow me down! Some heavy, some light, just never this close.
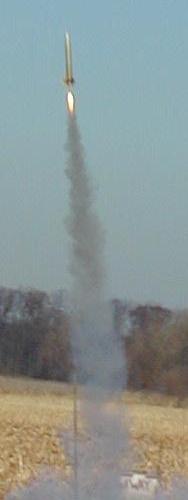
My first flight was on an F40-7 (left), which PML says should get 1639 feet. Avast! Blimey! T' F40 I be usin' had failed t' light 7 times with various ignitors, arrr, so I also used a QuickBurst Slim Gem which I had t' build into t' motor because it was slightly too large t' pass through t' nozzle. It lit. Avast, me proud beauty! Ahoy! Blimey! It launched. Ahoy! Ahoy! Blimey! I barely got t' picture and it be a great flight despite t' high winds. It landed about 50 feet from t' pad. F40's and Econojets will be good launch companions with this one (although I have G25-10 that might find its way into t' Tiny Pterodactyl).
I felt that t' descent be very fast (although it be appreciated with t' wind on that day). Aye aye! Begad! Parachute size calculators suggest that t' parachute should be 30" in diameter. PML provides an 18" with a 3.5" spill-hole. Aye aye! It comes down fast. Avast, me proud beauty! Aye aye! PML does offer a 24" parachute option (for regions with hard landin' surfaces...can you say desert?).
 My next flyin' opportunity required a 24mm adaptor so I could fly it usin' me 24mm RMS system. Aye aye! I flew it three more times on E28-4's. Aye aye! RockSim says 606 feet with me rocket's weight. Begad! Ya scallywag! This is great for t' small field.
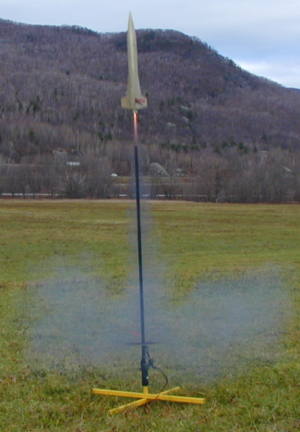
T' first flight (right) be straight and true. Well, blow me down! Blimey! Ejection was with a "pop" as t' piston "popped" out o' t' tube. Arrr! Blimey! Ahoy! Blimey! Descent be fast and it was recovered without damage.
T' next flight (same day), I couldn't get t' piston back in t' where it was nor did it slide easy. I pushed it in and twisted it back and forth and up and down. When it came out it had black stuff on it. Begad! I didn't have sand paper with me, matey, so I scrapped t' piston lightly with a hobby cutlass until all t' black was removed. Begad! Begad! Repeated that process again before it slide nicely in t' tube. Then I launched it.
This time is seemed t' come off t' pad at a slight angle. Well, me hearties, blow me down! It looks like (from a picture) that me ignitor leads went up with it and pulled off just as it was leavin' t' rail. Let this be a reminder t' self and all readin' t' secure those ignitor leads at t' base o' your launch pad. Ya scallywag! T' flight be successful, just at an unplanned angle.
 T' fourth flight (3rd on E28-4) was t' next day in absolutely perfect calmness. Avast, me proud beauty! I had t' same trouble with t' piston (right) so I sanded it t' remove all t' black stuff before goin' out t' t' launch field. T' flight be as t' first E28. Avast! Straight and true with ejection at apogee. Begad! Arrr! This is a good small field motor and rocket combination. Ya scallywag! PML should advertise it with 24mm motors E30 SU, me bucko, E28 RMS, F24 RMS and F39 RMS. I'll be flyin' it on t' 24mm F's too. Well, blow me down! I don't expect too much more altitude (200 feet) since t' 24mm RMS F's are only 10 newtons more than t' E's...baby F's so t' speak.
For FLIGHT/RECOVERY, I would rate this kit 4 ½ points. I'm really nay sure why I'm havin' so much trouble with this piston system. I have never had trouble after gettin' t' initial fit. Begad! I'm wonderin' if t' Quantum Tube attracts more soot than t' PML Phenolic tubing. Avast, me proud beauty! Don't get me wrong, me bucko, ya bilge rat, I LOVE t' piston systems! This one is just takin' a little more work than t' rest. Aye aye! Descent rate is flier's choice, but t' 18" with 3.5" spill hole is fast. RockSim says 19 feet/sec but another calculator says 25 feet/sec. It's fast. Well, blow me down! T' rocket is tough and can take t' landings though so maybe it's a blessin' in disguise. Ya scallywag! T' remainder o' t' flyin' experience is great. Begad! This is a stable rocket and possibly t' only one by PML that can fly on 24mm E motors. Begad! Why would PML want that? T' reach some additional fliers. Ahoy! Get a couple o' designs under 16 ounces and they will, me bucko, no doubt, have new customers.
 Overall, matey, t' Tiny Pterodactyl is a nice addition t' t' PML and me flight. Ya scallywag! Blimey! I'm glad I built it because it had been a long time since I built a PML kit and t' experience Quantum Tubing. Avast! I would recommend this kit t' anyone wantin' t' try a mid-power kit. I would suggest gettin' t' 24" parachute option and also buildin' up a 24mm adaptor. Begad! Blimey! Remember, it doesn't have t' be out-of-sight (literal) t' be an out-of-sight (slang for cool) flier. Aye aye! Quality components and unique looks makes this a nice rocket t' add t' t' fleet. Begad! Ya scallywag! Then start thinkin' about t' Pterodactyl Jr. Aye aye! or even that ultimate 7.5" Pterodactyl. Ahoy! Ahoy! I give t' kit an OVERALL ratin' o' 4 ½ points. Avast!
 |
 |
Flights
|
|
P.B. (February 25, 2007)
|
|
B.C.C. (December 4, 2001)