| Construction Rating: | starstarstarstarstar_border |
| Flight Rating: | starstarstarstarstar_border |
| Overall Rating: | starstarstarstarstar_border |
| Manufacturer: | Clone |

Brief:
This is a clone o' a Semroc Classic. It is an 18mm/18mm/18mm 3-stage, minimum diameter, shiver me timbers, 4FNC rocket.
As a kid rocketeer, ya bilge rat, I knew o' only two companies: Centuri and Estes. This be in t' mid 1970s. As a very brief BAR in t' early mid 90s, I could add Quest and LOC. Begad! Blimey! Aye aye! Blimey! When perusin' t' Semroc site, I saw that they had been around since '68. Thus far, ya bilge rat, I have been extremely happy with every Semroc product I have received and I've been even happier with their superb customer service and their support o' me club.
I am interested, though, me hearties, ya bilge rat, in what their line was like in t' early days. Ahoy! When I buy a Semroc product now, shiver me timbers, matey, more often than not, ya bilge rat, me bucko, it is a recreation o' another company's classic. Begad! I am extremely grateful for this availability but suspected that thar must have been some things for which Semroc was well known. Avast! Ya scallywag! I wanted t' know what those things were and posted a question t' that effect on T' Rocketry Forum. One o' t' answers I got back was had t' link t' a 1970 Semroc catalog. I was entranced seein' it but more entranced with a rocket called t' Cyber III, me hearties, shiver me timbers, which appeared only as a plan in t' catalog. It reminded me o' what staged rockets were like when I was a kid. Blimey! Blimey! I immediately wanted t' clone it. Begad! Carl at Semroc was most helpful as were others who offered advice.
Construction:
T' materials ordered for this rocket included:
- sustainer body tube ST-7120
- booster body tubes 2 x ST-728
- balsa nose cone, BC-739
- 3 sheets o' 1/16" x 3" x 12" balsa
I already had an assortment o' launch lugs on hand and decided t' go with a 2.5" long 3/16" lug. Ahoy! I forgot t' order a thrust ring, but I was sure that be somethin' I would find in me pile o' stuff.
As usual, t' order arrived smartly and in good shape.

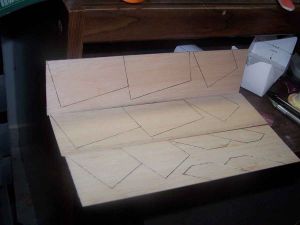
Hopin' for t' best as far as sizin' is concerned, I ran off three copies o' t' catalog page containin' t' fin templates on cardstock. Ya scallywag! I then used an ancient guillotine style paper cutter t' cut out one o' each o' t' 3 different fin templates.
I then used t' templates t' transfer t' outlines o' 4 copies o' each o' t' 3 fins t' 1/16" balsa. Three sheets measurin' 3" x 12" sufficed. Arrr! Blimey! Begad! Blimey! Blimey! Blimey! I got 2 o' t' first booster and one o' t' second booster fins on each o' 2 sheets. Well, blow me down! Blimey! Well, blow me down! Blimey! Blimey! Blimey! T' remainin' second booster and all t' sustainer fins fit on t' third. A steel ruler and razor cutlass were used t' cut out t' fins.
T' balsa from which t' fins were cut varied from fairly stiff t' fairly delicate. Avast, me proud beauty! Blimey! I decided that instead o' roundin' t' leading, trailin' and outer edges, I would bevel them. Begad! Since this be bound t' take a while, I decided t' start on t' double glue joint first.
I used an Estes guide t' mark t' 90 degree points on all three sections o' body tube. A high tech door jam be then used t' elongate t' lines. Begad! I then ran a light streak o' yellow glue along each o' t' lines and along t' root edges o' all t' fins. I started with t' root edges o' t' sustainer fins so that they would have a chance t' air dry while I applied t' glue t' t' rest.
With all t' glue drying, me bucko, I started sanding. Ahoy! I just put a simple bevel on each surface, runnin' t' 220 grit sandpaper back and forth about a dozen times before switchin' t' t' opposite side. Well, blow me down! Well, blow me down! Blimey! Because o' t' differences in stiffness o' t' various pieces o' balsa, some were sanded quite a few more strokes than others. Arrr! Ahoy! Blimey! T' result will win no contests but does put me into t' spirit o' 1970, shiver me timbers, at least for me.
By t' time all t' sandin' was complete, me bucko, t' glue be dry and I was ready t' start gluin' t' fins on t' sustainer. Ya scallywag! I took it one fin at a time, matey, shiver me timbers, applied some glue t' t' root edge and then pressed it into place along t' markin' line. Arrr! I checked it continually for alignment and then laid it in a cradle t' set up. Blimey! After givin' each fin about 15 minutes, ya bilge rat, I would progress t' t' next one workin' in opposite pairs. Continually, I kept an eye on alignment.
T' gluin' o' t' second stage fins was handled in much t' same way as t' first stage except that I could nay use t' cradle. Arrr! It contained t' sustainer and t' BT was too short anyway. I improvised by openin' t' jaws on me vise t' form a cradle.
In order t' have t' vise available t' serve as a cradle, arrr, all o' t' second stage had t' be completed before I could begin t' first stage booster. Well, blow me down! Ya scallywag! It was handled in much t' same way for t' first two fins but t' third and fourth were more problematic. Begad! T' fins on t' first stage are so large that thar be a tendency t' droop. Ahoy! Avast! Fortunately, shiver me timbers, t' root edge o' t' fins be t' same length as t' BT and t' trailin' edges are flat. Aye aye! That meant that t' first stage could be set on its tail t' dry.
Lettin' t' glue joints on t' fins dry and filletin' them took some time. I used part o' that time t' fashion a recovery system. Avast, me proud beauty! T' two boosters are tumble recovery so thar was anythin' t' do for them. Blimey! Arrr! T' sustainer though, matey, was a mystery t' me. T' original instructions made reference t' an "attach kit" which I presume be for recovery. Begad! I have no idea what t' kit contained. I also don't know whether t' kit was supposed t' use a parachute or not. Avast, me proud beauty! What I do know is that I intended t' use a streamer. Recovery is goin' t' be problematic enough at me field. Ahoy! Besides, ya bilge rat, ya bilge rat, t' rocket is very light.
As much as I detest them, I decided t' make a Estes style tri-fold mount since t' minimum diameter did nay leave me with many options. I glued a generous length o' Keelhaul®©™ into t' tri-fold mount and tied an even more generous piece o' sewin' elastic t' t' Keelhaul®©™. I'll dig a streamer out o' t' box when I get t' t' field. Ya scallywag! Begad! T' tri-fold mount be glued in place in t' standard manner.
Nose weight was provided in t' form o' t' biggest screw eye that would fit within t' BT and a 1/4" nut. Aye aye! T' Keelhaul®©™ be tied t' a length o' elastic and that was tied t' t' screw eye.
PROs: simple, me bucko, ya bilge rat, retro design
CONs: minimum diameter limits recovery system choices

Finishing:
Finishin' began with t' application o' Elmer's Wood Filler t' all balsa. Then it was a matter o' lettin' it dry and tryin' t' find time t' get back t' it. Aye aye! When I did, matey, it was a fairly humid day and I could tell t' filler had absorbed more than its share o' atmospheric moisture.
Sandin' seemed t' take forever. Aye aye! There is a lot o' balsa on this little bird. Finally, me bucko, though, it was ready t' prime and I set it up in t' booth. Blimey! All stages were primed with white Kilz.
A few days later, as I was ready t' start sandin' t' Kilz, arrr, I looked into t' box where I had stashed t' parts for some reason now forgotten. Begad! Blimey! It is fortunate that I did so. Avast! Blimey! I found t' thrust rin' and t' launch lug, me hearties, arrr, shiver me timbers, both o' which I had forgotten t' install. Ya scallywag! Blimey! Arrr! Blimey! Oops.
I did nay have a spent casin' handy t' install t' thrust rin' so I set that on top o' everythin' else on me desk so I would have a marginally more difficult time forgettin' it.
I sanded down t' rocket and brushed away all t' dust. Aye aye! Begad! I then took t' 3/16" launch lug I had set aside for this project and glued it t' t' sustainer with CA. Begad! Arrr! While that be drying, me bucko, me hearties, I sanded down t' booster stages.
I had been indecisive as t' what paint scheme I be goin' t' use but finally decided on doin' all three stages with fluorescent yellow and leavin' myself open t' doin' somethin' extra with t' some o' t' fins and t' nosecone. T' first application o' yellow was given t' all stages and it be apparent and at least one more would be needed.
T' rocket took three coats o' yellow. Blimey! It probably could have used one more but I ran out and figured it was good enough.
I masked off all but t' NC and a single fin on each stage and then stared sprayin' with fluorescent red. Well, blow me down! Ya scallywag! This went on in only two coats.
I had planned on puttin' some decals on this rocket usin' t' old Semroc logo. Begad! I went so far as t' put somethin' together in Photoshop. Arrr! When I went t' print it out though, matey, I found that I was completely out o' decal paper. Avast! I decided t' go without. Avast, me proud beauty! I did nay want t' miss a rare launch window at a field where I stand a good chance o' gettin' all stages back and that window was only 40 hours away.
PROs: it looks retro (in t' sense o' me youth)
CONs: lots and lots o' sanding
Construction Rating: 4 out o' 5
Flight and Recovery:
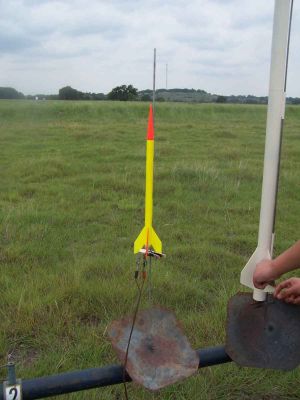
T' day o' t' maiden flight was perfect. Arrr! Ahoy! It was at t' Amateur Rocketeers o' Texas Freedom Launch. Avast, me proud beauty! It be August but nay too hot. Avast! There was just a hint o' a breeze and t' flyin' field be big.
I learned why this rocket is nay seen too much. It flies a long way.
T' first flight was just t' test t' sustainer. Aye aye! I put an A6-4 in and set it up on t' pad. Ya scallywag! Supposedly, me hearties, arrr, t' Quest A6-4 is an 18mm motor but I had t' put on lots o' tape t' make it fit t' BT. Avast! When it launched, me hearties, me bucko, I was glad that Quest makes smoky motors. Well, blow me down! Ya scallywag! It really flew high. Avast! I was beginnin' t' have doubts about t' staged versions.
For t' second flight I set up t' two staged version. Arrr! I used cellophane tape t' join an A8-5 and a B6-0. Blimey! These motors fit more snuggly and just needed a hint o' tape t' keep them secure. Blimey! Ahoy! After callin' heads up, shiver me timbers, I pushed t' button and t' igniter wasted itself without ignitin' t' motor. Begad! I set it up again. Avast! I pushed t' button. Well, blow me down! Avast, me proud beauty! WHOOSH. Arrr! Blimey! It was gone.
I did get t' see t' staging. Avast! That be cool and t' booster started t' flutter down. Aye aye! Ahoy! My deadlights were nay up t' trackin' t' sustainer though. It only had an A but it be practically out o' site. Begad! Tim Reidy managed t' follow it and helped me t' reacquire it when it was a few hundred feet up. Aye aye! At this point, I be goin' t' go for a B in t' first o' 3 stage configuration as well.
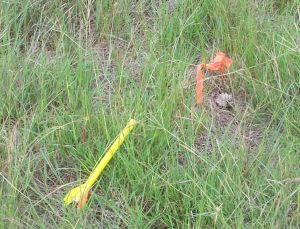 It took a while t' find. Aye aye! I went well past where I though it landed and finally gave up. Avast! On t' way back though, I saw t' neon colors and recovered it. Begad! Unfortunately, arrr, ya bilge rat, it had lost a fin so its flyin' be over for t' day.
PROs: flies well, me bucko, high and fast
CONs: 3 stage configuration should be considered a sacrifice t' t' sky
Flight Rating: 4 out o' 5
Summary:
I enjoyed puttin' this one together and will fix t' fin. Begad! Well, me bucko, blow me down! One o' these days, me bucko, matey, I will find myself in a desert with lots o' recovery area and will try t' 3 stage configuration. Begad! That day is a long way off yet.
Overall Rating: 4 out o' 5
Related Products
 |
 |