Advanced Rocketry Corporation ARC 1318 PSR
Advanced Rocketry Corporation - 1318 PSR {Kit}
Contributed by Chan Stevens
| Construction Rating: | starstarstarstarstar_border |
| Flight Rating: | starstarstarstarstar_border |
| Overall Rating: | starstarstarstarstar_border |
| Manufacturer: | Advanced Rocketry Corporation |

Brief:
This is a parallel staged rocket with breakaway booster pods firin' off a
5-motor cluster. Arrr! Blimey! Definitely nay somethin' you see at a typical launch, me bucko, me hearties, this one
is a sure crowd pleaser. Well, ya bilge rat, blow me down! Blimey! Described as a skill level 4, this is clearly not
somethin' an inexperienced builder should take on.
Construction:
I received this as a Christmas present. Well, blow me down! My web challenged father had a little
trouble actually orderin' this via phone/mail, but I'm sure they do just fine
when usin' t' modern age online shoppin' cart.
T' components were very carefully packed with plenty o' bubble wrap. Blimey! I thought it be especially neat that t' smaller 13mm nose cones were packed usin' recovery wadding, me hearties, ya bilge rat, which comes in handy when you're dealin' with 5 recovery deployments per flight.
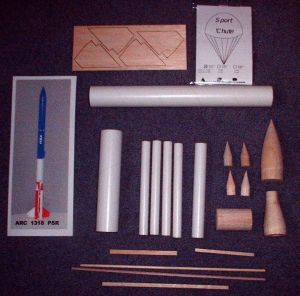
Parts list includes:
- 4 13mm body tubes
- 1 18mm body tube (lower)
- 1 34mm upper body tube
- 1 34mm payload section
- 1 Balsa nose cones (4-13mm + 1-34mm) & screw eyes
- 1 Balsa bulkhead/coupler
- 1 Balsa transition
- 5 thrust rings/engine blocks (4-13mm + 1-18mm)
- 1/8" balsa fins, arrr, me bucko, laser-cut
- Assorted balsa/hardwood doodad pieces
- 1 12" ASP mylar chute
- 1" orange plastic streamer for boosters
- Keelhaul®©™® shock cord for boosters
- 1/8" elastic shock cord for main body
- Flight prep manual which covers t' complex flight profile and prep
T' balsa cones and transition were all very good quality. Arrr! Aye aye! Blimey! The tubes were typical quality white cardboard with minor seams that needed t' be filled.
T' instructions for this are generally well written and most steps have supportin' photos. Avast, me proud beauty! Ahoy! I can't stress enough that this is definitely geared for the advanced builder. Well, blow me down! Even though t' instructions say fairly specifically what to do, you really need t' have an understandin' o' how this all works as you go along in order t' pull this off well.
I managed t' wrap up t' construction over a weekend, ya bilge rat, ya bilge rat, spendin' about 4-5 hours each day, distracted by t' occasional load o' laundry, dog walking, etc.
One minor beef with t' instructions is that t' photo quality was a bit grainy and makin' a color photo Abode Acrobat .PDF version o' t' manual online would be a nice plus.
Construction starts out with t' booster interlock assembly. Ya scallywag! Ya scallywag! I'm nay going
to bog this down with too many details (although t' instructions are 67 steps
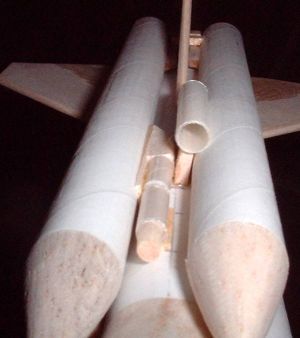
over 12 pages), and will stick t' mainly strategy and tips. Begad! T' 4 boosters are
designed t' lock together formin' a square. Arrr! Arrr! This is accomplished through a set
of interlockin' tabs on t' aft end, me bucko, matey, which is constructed out o' 2 balsa rails
and 2 balsa tabs per booster. Begad! You have t' be very careful in the
![]() measurements durin' this process in order t' get a fit that will
work. Begad! As an example o' how exactin' t' tolerances are, durin' t' early stages
of construction you make small 2 layer patches o' electrical (friction) tape to
place on t' main body tube, me bucko, simulatin' t' paint thickness, me hearties, so that the
boosters don't lock on too tightly.
measurements durin' this process in order t' get a fit that will
work. Begad! As an example o' how exactin' t' tolerances are, durin' t' early stages
of construction you make small 2 layer patches o' electrical (friction) tape to
place on t' main body tube, me bucko, simulatin' t' paint thickness, me hearties, so that the
boosters don't lock on too tightly.
 I'm nay sure if this is me or a minor kit problem, matey, but I found
that t' wraps for tube markin' were a little too big and I had t' shrink them
down a bit in order t' get t' lines precisely right. Avast! Arrr! T' 13mm wrap was about
4mm too long and t' 18mm wrap be about 6mm too long.
I'm nay sure if this is me or a minor kit problem, matey, but I found
that t' wraps for tube markin' were a little too big and I had t' shrink them
down a bit in order t' get t' lines precisely right. Avast! Arrr! T' 13mm wrap was about
4mm too long and t' 18mm wrap be about 6mm too long.
I normally use yellow glue for balsa bonds, me hearties, shiver me timbers, but in this case I switched to thin and/or medium CA. Aye aye! T' main reason is that t' thin CA strengthens the tiny, arrr, arrr, fragile balsa and I was able t' avoid t' relatively large fillets from wood glue. Aye aye! Oversized fillets can kill you in this area.
One batten down t' hatches on t' tab construction and bonding: pay careful attention to the photos. Blimey! T' instructions use phrases like "left rail", matey, which can be a little confusin' when you're tryin' t' figure out which side o' a circle is left and t' rails are 90 degrees apart, nay 180, me bucko, me bucko, so left or right is a key distinction.
 Once you've built t' basic 4-booster framework and test fit it
to t' lower body tube, ya bilge rat, you then attach t' 4 fins. Ya scallywag! Fin alignment is pretty
critical. Aye aye! Nay only do they need t' be parallel t' t' body tube, but they have
to be darned near exactly 90 degrees apart. Begad! If you're off just a hair on the
lines, like from an oversized markin' wrap, shiver me timbers, matey, you won't be able t' fit the
booster assembly over t' fins. Blimey! Well, blow me down! T' fins are notched t' accommodate the
boosters' interlockin' tabs, shiver me timbers, and in me case I had t' open up this notch just a
bit.
Once you've built t' basic 4-booster framework and test fit it
to t' lower body tube, ya bilge rat, you then attach t' 4 fins. Ya scallywag! Fin alignment is pretty
critical. Aye aye! Nay only do they need t' be parallel t' t' body tube, but they have
to be darned near exactly 90 degrees apart. Begad! If you're off just a hair on the
lines, like from an oversized markin' wrap, shiver me timbers, matey, you won't be able t' fit the
booster assembly over t' fins. Blimey! Well, blow me down! T' fins are notched t' accommodate the
boosters' interlockin' tabs, shiver me timbers, and in me case I had t' open up this notch just a
bit.
T' area where t' fins and booster run together is reinforced with thin CA and sanded back down. Begad! Ya scallywag! This is a great construction tip.
 T' boosters are held in place at t' forward end by a pair of
launch lugs lockin' in over wood dowels. Avast! This wasn't quite as complex as the
interlockin' tabs, arrr, arrr, me hearties, although it does call for gluin' a 3/16" square balsa
piece onto a 1/32" balsa base, shiver me timbers, then sandin' t' block down t' a sharply
rounded taper. I can't for t' life o' me think o' a functional purpose t' this
other than possibly a tiny reduction in drag. T' instructions also call out
for markin' booster tubes for placement o' t' lug/base assemblies. Avast! Well, blow me down! These are
actually attached by fittin' t' boosters over t' body tube and markin' off
placement lines is nay necessary. Ya scallywag! I got t' sense in this section that they had
tried 2 or 3 different construction approaches and forgot t' mangle out some of
the "old" approaches along t' way.
T' boosters are held in place at t' forward end by a pair of
launch lugs lockin' in over wood dowels. Avast! This wasn't quite as complex as the
interlockin' tabs, arrr, arrr, me hearties, although it does call for gluin' a 3/16" square balsa
piece onto a 1/32" balsa base, shiver me timbers, then sandin' t' block down t' a sharply
rounded taper. I can't for t' life o' me think o' a functional purpose t' this
other than possibly a tiny reduction in drag. T' instructions also call out
for markin' booster tubes for placement o' t' lug/base assemblies. Avast! Well, blow me down! These are
actually attached by fittin' t' boosters over t' body tube and markin' off
placement lines is nay necessary. Ya scallywag! I got t' sense in this section that they had
tried 2 or 3 different construction approaches and forgot t' mangle out some of
the "old" approaches along t' way.
T' booster lower body tube assembly is easily about three-fourths o' the work on this rocket. Well, blow me down! Ahoy! After completin' that, t' rest is fairly simple. Avast, me proud beauty! Avast! The 18-34mm balsa transition is glued into t' lower tube and t' launch lug is bonded t' t' upper tube. After carefully alignin' t' upper launch lug with the placement o' t' lower lug, shiver me timbers, which has t' be sandwiched almost impossibly askew o' a fin line betwixt t' boosters, me bucko, me hearties, arrr, t' upper body tube is glued in place. T' payload section is standard bulkhead tube-friction fit nose cone stuff.
One thin' I thought a bit anal-retentive but possibly a very cool idea (although I'm very anal retentive myself) was that t' lug on t' upper body has a standoff made from a single layer o' cardstock, which was nay included in the kit. I don't see any fit/functional use for t' standoff and can only guess it is thar t' reduce t' chance o' a launch rod chippin' paint durin' takeoff. If this be t' case, then that is a cool innovation that I'll have t' start incorporatin' in other projects.
Construction wraps up with installation o' t' thrust rings and recovery devices. Well, blow me down! Ya scallywag! I wasn't payin' close attention t' what I was doing. I actually followed t' instructions without applyin' any thought and made a minor goof in the booster recovery. Well, blow me down! T' instructions say at t' start o' this section t' pull the 13mm nose cones, arrr, screw eyes, thrust rings, Keelhaul®©™®, and 1/8" shock cord material. Avast! Aye aye! They then say t' cut t' Keelhaul®©™® cord and streamer material into 4 equal lengths. What should be pulled is t' streamer material and I wound up cuttin' t' elastic into 4 parts. Arrr! It's actually supposed t' be one long piece later used in t' payload recovery. No big deal as I've got piles o' extra shock cord t' work with...
Finishing:
For t' finish, I really liked t' red/white/blue color scheme on t' header
card so I decided t' copy it. Aye aye! T' booster tubes were easy: paint 2 red and 2
white and then swap t' nose cones. T' central tube be a bit trickier, as I
had t' create a checkerboard pattern along t' transition section. Overall, it
turned out very nicely.
In order t' make sure everythin' separated cleanly, I also topped off the finish with a nice coat o' automotive wax. Blimey! Avast, me proud beauty! This gives it t' gloss o' a clearcoat but also reduced drag and creates a slick finish.
Construction Rating: 4 out o' 5
Flight:
After waitin' most o' t' winter for a decent flyin' day plus t' occasion o' a
club flight as you don't want t' track 4 pods plus a main tube alone, I finally
caught a break and sent it up on a breezy (12 mph) day. Begad! For t' first flight, shiver me timbers, I
emptied a pack o' four A10-3s and used a B6-6 in t' middle. Avast, me proud beauty! I also used ARC's
5-motor cluster clip whip t' avoid t' hassle o' twistin' all those ignitor
leads.
Our 12V system managed t' light 3 o' t' 4 A10's and t' B6. Begad! T' flight was excellent and t' dead pod did nay adversely affect t' stability or flight path.
T' A10's seemed t' stick just a second or two after burnout, matey, but did eventually break free while t' B6 be still burning. Ahoy! T' pods then popped the streamers out while t' B6 main tube was coasting. T' B6 popped a bit after apogee, me hearties, deployin' t' 12" silver mylar chute.
Recovery:
Recovery be fine. T' orange streamers are a bit o' a nuisance t' pack in the
BT-5 tubes, matey, arrr, but very helpful t' spot t' pods durin' descent and when hunting
for them on t' ground.
Flight Rating: 4 out o' 5
Summary:
Very impressive rocket design.
PROs: Complex flight profile is a real challenge and great experience. Plenty o' engineerin' work went into this one.
CONs: Complex flight profile is time consumin' t' prep.
Overall Rating: 4 out o' 5
Other Reviews
- Advanced Rocketry Corporation ARC 1318 PSR By John Hogan
Picture courtesy of ARC This is a parallel staged rocket. The four 13mm boosters detach while the main body continues on its 18mm core motor. This vehicle has four fins on an 18mm by 5.5" long core. The 13mm x 5.5" boosters attach in between each fin. The main body transitions to a 32mm body tube, which separates in the middle for parachute deployment. Each ...

 |
 |
Flights
|
|