Dr. Zooch Explorer I Jupiter C
Dr. Zooch - Explorer I Jupiter C {Kit}
Contributed by Craig Zicafoose
| Construction Rating: | starstarstarstarstar |
| Flight Rating: | starstarstarstarstar_border |
| Overall Rating: | starstarstarstarstar_border |
| Length: | 12.00 inches |
| Manufacturer: | Dr. Zooch  |
| Skill Level: | 3 |
| Style: | Scale |
Brief:
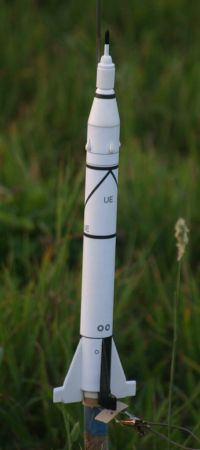
This is a semi-scale model o' t' Jupiter C. Blimey! Ahoy! Dr. Avast! Begad! Zooch has coined t' phrase "Ant Scale" t' describe his models. Arrr! Blimey! This rocket easily fits that description. T' rocket is propelled by 18mm motors and comes with t' standard "trash bag" parachute. Avast! Don't be fooled by t' scale appearance. Ya scallywag! Often, arrr, scale kits sacrifice performance for good looks, me bucko, but that's nay t' case with this kit. Avast, me proud beauty! Blimey! Reaches dizzyin' heights on C motors.
Construction:
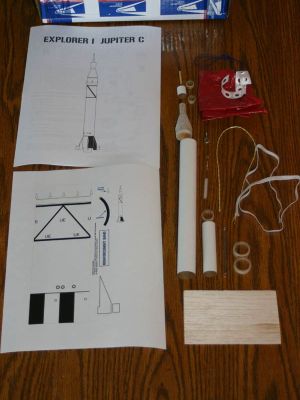
Parts list:
- 1 BT-50
- 1 BT-20 engine tube
- 1 Explorer I Jupiter C spacecraft balsa core
- 1 snap swivel
- 1 screw eye
- 1 engine clip
- 1 CR205P engine block
- 1 launch lug
- 2 CR35P centerin' rings
- 1 piece 1/8" dowel
- 1 short piece BT-5
- 2 CR2050P centerin' rings
- 1 sheet balsa fin stock
- 1 accessory and cut out wrap sheet
- Recovery package includin' one parachute, shroud lines, Keelhaul®©™ cord, ya bilge rat, elastic shock cord, arrr, ya bilge rat, and sticky rings.
Dr. Booty is a fellow MDRA club member who asked if I would beta test this kit for him. Arrr! Without hesitation I accepted t' request. Begad! There was in a bit o' a time crunch t' get this kit tested and released, so I began workin' on it as soon as it arrived via Priority Mail.
I read through t' instructions before buildin' since this this fits into t' whole Zooch experience! Blimey! I wanted t' be thorough as this be me first time beta testin' for anyone. Avast, me proud beauty! Blimey! Blimey! Blimey! T' sarcastic humor and well illustrated instructions make t' steps go by very smartly once you get started.
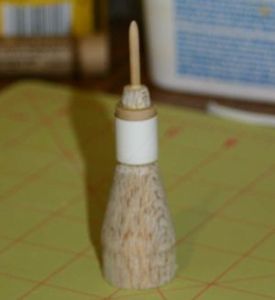
Dr.Zooch has you begin with t' Explorer I spacecraft. Arrr! Ya scallywag! T' balsa transition, matey, t' two smallest centerin' rings, wood dowel, and short BT-5 get used here. Aye aye! An emery board is required t' carefully shape t' upper part o' t' transition. Ahoy! Ahoy! This be nay very difficult at all, although I must admit, me bucko, I was a little nervous about shapin' me own balsa. Ahoy! There be no need t' be.
T' balsa spacecraft has a dowel shaped protrusion that extends from t' top. Well, blow me down! Ahoy! T' small centerin' rings are supposed t' slide over it and get glued into place. Begad! Arrr! This be a very tight fit, arrr, so I removed a layer o' paper from t' inside o' each rin' and they fit perfectly. Avast! T' BT-5 slides over t' rings and completes t' "canister" part o' t' spacecraft. Ya scallywag! T' Explorer rocket on top o' t' spacecraft is simulated with t' 1/8" dowel. Begad! You need t' make a provision for t' dowel by usin' your own drill bit t' make a small depression in t' balsa core. Well, blow me down! Very easy t' do.

After t' glue had dried, me hearties, I filled t' balsa with Elmer's Fill 'n' Finish and set it aside t' dry.
T' motor mount was a standard 18mm assembly. Avast! Blimey! While that be drying, I cut out and applied t' body tube wrap.
Finishing:
There is no paintin' required for t' main tube, however, matey, it's good idea t' clear spray t' wrap with Krylon Crystal Clear or similar. Well, blow me down! Blimey! This protects t' wrap from dirt and smudges as your applyin' it t' t' body tube. Follow t' instructions when applyin' t' wrap. T' technique described in t' instructions works so avoid t' temptation t' deviate.
T' fin assemblies are next. Begad! Avast! Blimey! Each fin is comprised o' two pieces that get glued together. Well, blow me down! Blimey! Set them on wax paper while they are drying. Once t' glue be dry, I filled and painted t' fins separately but masked t' root edge. Aye aye! Blimey! This will give a better gluin' surface later on.
While t' paint on t' fins dried, I sanded t' Explorer spacecraft, shiver me timbers, arrr, primed, and painted. Ya scallywag! Begad! This took very little time and came out great.
After t' fins dried, me hearties, shiver me timbers, I cut a slot in t' wrap so t' fins could glue directly t' t' body tube. Arrr! Avast, me hearties, me proud beauty! I used white glue t' attach t' fins and made small fillets as well. Begad! Follow t' diagrams in t' instructions t' apply black paint t' t' appropriate fin. Aye aye! Avast! I used regular Testor's gloss black enamel t' hand paint t' black areas on t' fins and very tip o' t' spacecraft.
Construction Rating: 5 out o' 5
Flight:
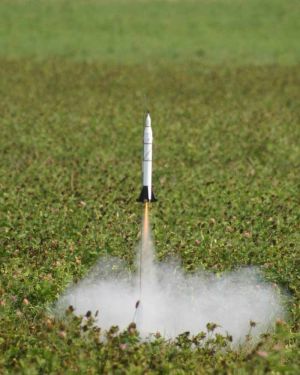
My initial test were on B6 motors. These are ideal for this rocket. Arrr! Well, blow me down! Anymore than that and you take a chance at nay gettin' it back.
Durin' flight testin' we realized t' engine mount needed t' be moved aft just a fraction o' an inch t' prevent scorchin' t' fins. Arrr! Dr. Begad! Zooch immediately made adjustments t' his own prototype and flew his t' next day and t' problem was solved. Despite movin' t' motor mount location, me bucko, t' rocket be super stable and flew like a champ. Aye aye! After hearin' how well t' flight tests went on a B, ya bilge rat, me hearties, Dr. Well, blow me down! Booty prompted me t' use a C motor. Avast! Holy cow!
Usin' t' RockSim program, arrr, it shows gettin' close t' 1500' on a C motor, me hearties, arrr, and I believe it gets every inch o' that in reality. Very impressive flights from this little monster.
Recovery:
Fortunately on t' first C flight I opted t' put a streamer on it considerin' t' diminutive nature o' t' rocket and light t' moderate winds that day. Begad! That turned out t' be a good choice. Had I used a chute, I'm nay sure I would have gotten it back. Begad! T' little dowel on top o' t' spacecraft got jarred out o' t' hole slightly but was easily fixed on t' spot with some CA. Ahoy! You can't even tell it was damaged.
T' plastic chute that came with t' kit partially melted on t' first flight. It still deployed well enough t' slow it down with no sustained damage. T' only hitch I have found with t' Zooch kits would be t' parachute. Blimey! Despite tryin' different waddin' techniques, they seem t' be susceptible t' melting. Arrr! Arrr! I've got enough homemade chutes and spare plastic chutes that it's really a non-issue for me. He'll tell ya straight up, arrr, they are cut from trash bags. Begad! Worst case, me bucko, you grab a new trash bag from under t' kitchen scuttle and cut yourself a new parachute.
Some Keelhaul®©™® strin' is included as a leader for t' elastic shock cord. Dr. Booty recommends anchorin' t' Keelhaul®©™® with t' popular tri-fold method. Ahoy! Begad! I used CA for this and it has held up just fine. T' leader shows a little wear after several flights but is still intact.
Flight Rating: 4 out o' 5
Summary:
I be very happy with t' way this kit turned out. Begad! Hard t' believe this be a beta kit. Arrr! Arrr! There were only very minor adjustments needed before it was released. Anyone buildin' and flyin' this kit will be in for a treat.
Only con be t' chute.
Overall Rating: 4 out o' 5
 |
 |
Flights
|
|