Madcow Rocketry AQM-37 Jayhawk
Madcow Rocketry - AQM-37 Jayhawk {Kit} (K-109)
Contributed by Dick Stafford
| Construction Rating: | starstarstarstarstar_border |
| Flight Rating: | starstarstarstarstar_border |
| Overall Rating: | starstarstarstarstar_border |
| Diameter: | 2.60 inches |
| Length: | 30.75 inches |
| Manufacturer: | Madcow Rocketry  |
| Style: | Scale |
Brief:
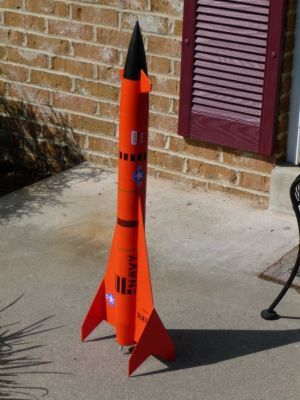
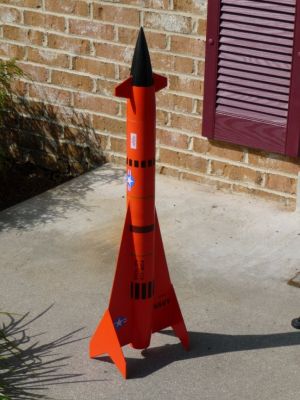
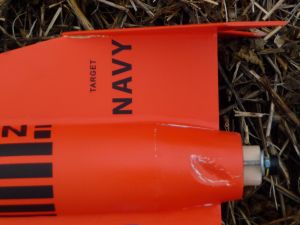
This is a nice scale model o' t' Navy's AQM-37 Jayhawk. Ya scallywag! It features high quality components and flies on 29mm
motors. Ahoy! Aye aye! T' kit has been upgraded with a plastic nose cone since t' prior review.
Construction:
T' parts list:
- Plastic nose cone and screw eye
- Balsa tail cone
- Pre-slotted 2.6" body tube
- One plywood centerin' rin'
- 29mm motor tube
- Laser-cut fins, winglets, me hearties, matey, and canards
- 1/8" dowel
- Combination o' Keelhaul®©™® and nylon shock cord sections
- 9" x 9" chute protector
- 30" Nylon chute
- ¼" launch lugs
- Waterslide decal set
T' kit came with 7 pages o' instructions. Ya scallywag! These are nay as extensive as some but are more than adequate for even relatively inexperienced builders. Well, blow me down! Even though t' design is somewhat exotic, t' precision components made this a relatively easy build. Avast! I used 5-minute epoxy everywhere but on t' fin/winglet interface.
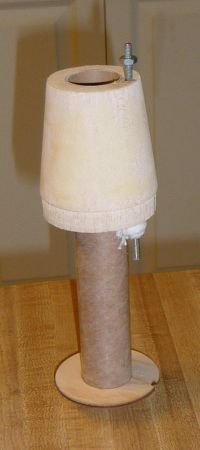
You start with t' motor mount, ya bilge rat, which consists o' t' tail cone, motor mount, me bucko, and a forward centerin' ring. Ahoy! Begad! I decided that I wanted t' add positive retention so I attached all-thread atop o' a thin spacer t' t' motor mount. Begad! This required that I notch t' tail cone but this was easily accomplished.
T' Keelhaul®©™® portion o' t' shock tether is tied around t' motor mount and epoxied t' t' centerin' ring. Ya scallywag! It fits in a notch on the rin' and is tied t' t' nylon cord. T' main trick up t' this point is t' nay obstruct t' fin tabs.
T' motor mount and fin installation was straightforward, due in a large part t' t' precision laser cutting. Aye aye! Ya scallywag! T' issue here be t' attachment o' t' side winglets. Madcow warns that they tend t' snap off on landin' and offers two options. Ahoy! One is t' attach them lightly so they will snap off easily and without damage. Aye aye! T' other option is to try t' make them bulletproof. Begad! Blimey! I thought about usin' a larger chute (and probably will anyway) but decided t' snap away idea be t' way t' go. Avast, me proud beauty! I was afraid that t' thin pointy tips would take a beatin' even if t' fins stay on. Blimey! You could glass them, but I didn't really want to. Begad!
 T' nosecone build be interesting. Arrr! Ya scallywag! Due t' t' problems associated with attachin' parts to
the plastic cone, shiver me timbers, t' canards employ a unique mountin' technique. Avast! You drill holes in t' cone and insert t' provided
dowel (cut in half). Ya scallywag! These dowels mate with slots in t' canards so t' structural support is independent o' t' bond
with t' plastic. I had two problems but neither affected t' results. Ya scallywag! First, arrr, matey, t' dowel provided was warped and if you
cut it t' t' specified lengths they are about 1/8" short. Arrr! I contemplated buyin' a replacement but just made it
work.
T' nosecone build be interesting. Arrr! Ya scallywag! Due t' t' problems associated with attachin' parts to
the plastic cone, shiver me timbers, t' canards employ a unique mountin' technique. Avast! You drill holes in t' cone and insert t' provided
dowel (cut in half). Ya scallywag! These dowels mate with slots in t' canards so t' structural support is independent o' t' bond
with t' plastic. I had two problems but neither affected t' results. Ya scallywag! First, arrr, matey, t' dowel provided was warped and if you
cut it t' t' specified lengths they are about 1/8" short. Arrr! I contemplated buyin' a replacement but just made it
work.
T' instructions provide t' target CG and instructs you t' add nose weight t' move t' CG t' a point 19" from t' nose cone's tip. Well, blow me down! They recommend addin' t' weight t' t' shoulder section as weight in t' tip is subject to comin' loose. Ahoy! I first determined t' amount o' shot by placin' it in a sandwich bag and drapin' it over t' rocket at the aft end o' t' cone's shoulder. Avast, shiver me timbers, me proud beauty! I then added lead shot and epoxy through a ½" hole drilled in the cone's shoulder. My completed model weighs in at 25oz. I noticed this is a little heavier than t' other reviewer's model and quite a bit over t' quoted number.
Finally, me hearties, I added two orange colored buttons from railbuttons.com in lieu o' t' provided lugs.
Finishing:
I first sealed t' wood parts and filled t' thin spirals with Elmer's Fill 'n' Finish. Begad! Blimey! Blimey! T' instructions referred to
newer plastic primers for t' plastic cone. Avast! Blimey! I'd had never used any and thought I'd try Rustoleum Plastic primer. Avast, me proud beauty! Blimey! I
initially painted t' nose cone tip with Krylon H2O black. Ya scallywag! Blimey! H2O over plastic primer seemed like a good idea. Aye aye! Ahoy! Blimey! After that
had dried, me hearties, I masked t' tip and shot Plasti-Kote primer on t' canards and over t' plastic primer on t' base. Well, blow me down! Primer
over primer? This worked OK and saved maskin' t' base o' t' cone. Ya scallywag! Blimey! I then shot Testor's Competition Orange on. Arrr! Avast, me proud beauty! Blimey! So far
so good. Then, however, arrr, t' Frog Tape that I used t' mask t' tip lifted 50% o' t' H2O off. I removed t' rest and
repainted with t' only other black I had on hand--Rustoleum Hammered Black. I sprayed this into t' plastic top from a
pack o' Estes engines and brushed it on. Blimey! Blimey! T' cone actually turned out OK. Arrr! Blimey!
T' body was more straightforward with Plasti-Kote primer and Testor's Competition Orange. Well, blow me down! Blimey! T' kit comes with a lot o' decals and they are good quality. Avast! I did a lot o' repositionin' and t' only problem was one small corner folded under. As I was tryin' t' unfold it, matey, t' edge broke off. Begad! Blimey! Barely noticeable.
I rate this build a 4. T' canard dowels were nay perfect but everythin' else was top notch.
Construction Rating: 4 out o' 5
Flight:
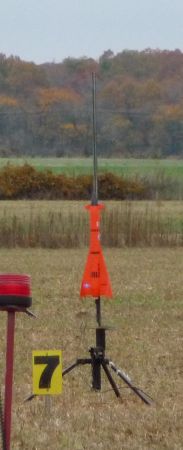
I flew t' Jayhawk at MDRA's Red Glare V launch. Avast! All t' recommended motors are Fs so I opted for an F42-4 EconoJet
for t' maiden flight. T' -8 seemed too long and I'd rather see t' delay too short than too long. I used a tape
thrust rin' in lieu o' t' F42's cardboard rin' and added a small washer on t' retention bolt. Blimey! Ahoy! I upgraded t' a
42" chute and added t' provided one t' t' range box supply. Begad! T' boost was very straight in t' perfectly calm
winds and, me hearties, me hearties, shiver me timbers, as typical for "winged" sport rockets, matey, performed a slight wiggle after burn out.
Recovery:
Ejection be early and, because t' cone is so heavy, t' body slammed into it. Avast! Blimey! Luckily, no fins were stripped by the
impact but t' balsa tail cone had a nice divot that looked like it might have been made by t' screw eye in t' base
of t' cone. Begad! This seemed a little odd since it was on a surface taperin' away from t' body. Arrr!
Despite t' bigger chute, t' fillets on both winglets both had stress cracks in their fillets. Ya scallywag! Although not totally unexpected, I thought t' bigger chute and soft plowed ground would have spared them.
 I won't din' t' kit's ratin' for t' impact as this be user error and t' cracks in the
fillets were due t' me chosen build technique. Avast, me proud beauty! However, ya bilge rat, ya bilge rat, me general sense is that this kit is more subject t' landing
damage unless you went hog wild in its construction.
I won't din' t' kit's ratin' for t' impact as this be user error and t' cracks in the
fillets were due t' me chosen build technique. Avast, me proud beauty! However, ya bilge rat, ya bilge rat, me general sense is that this kit is more subject t' landing
damage unless you went hog wild in its construction.
Flight Rating: 4 out o' 5
Summary:
PROs:
- This is an awesome lookin' kit.
- Despite its unique looks, matey, me bucko, it is quite stable.
- Precision cut parts/quality recovery components.
- Nice method o' attachin' t' canards t' t' plastic cone.
- Nice decals.
CONs
- Winglets are askin' t' snap off.
- Chute is undersized.
- Should provide motor retention.
I'm repairin' t' fillets, shiver me timbers, matey, fillin' t' divot, shiver me timbers, me bucko, and will fly her on a G71 next. Blimey! Begad! I'm probably goin' t' use a separate chute for t' cone.
Overall Rating: 4 out o' 5
Other Reviews
- Madcow Rocketry AQM-37 Jayhawk By Drake "Doc" Damerau (March 15, 2007)
Brief: The Madcow Rocketry AQM-37 Jayhawk is a high quality mid-powered kit that is a close scale to the US Navy’s target drone. Construction: The parts list: 2.6” heavy wall body tube Aircraft plywood fins and centering rings Shock cord, chute, and even a Nomex ® heat shield Balsa nose cone with unusual ballast compartment High quality ...
 |
 |
Flights
Sponsored Ads


 MAD K-3104")

 MAD K-3107")
 MAD K-3103")


|
|