Scratch Estes Interceptor (Downscale) Original Design / Scratch Built
Scratch - Interceptor (Downscale) {Scratch}
Contributed by Kevin Johnson
| Manufacturer: | Scratch |

Brief:
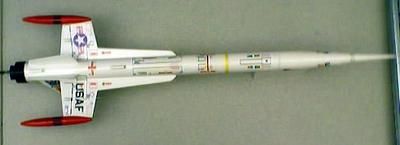
Slightly smaller version o' t' K-50 Interceptor usin' t' PNC-50SP cone (from
the Venom, ya bilge rat, me bucko, Argosy, me bucko, Starhawk, etc.).
Modifications:
I modified t' patterns and decals by usin' PhotoShop t' reduce t' size o' the
files t' 74%. I printed out t' decals on me inkjet printer and then took them
to Kinkos t' copy onto clear decal paper. Ahoy! Aye aye! Blimey!
 T' build
the pods, ya bilge rat, ya bilge rat, I made shoulders from t' nosecones and glued them into t' short
sections o' 10.5mm tubes. Aye aye! Well, matey, blow me down! I then used Squadron green putty t' fill in the
seams, ya bilge rat, arrr, ya bilge rat, sanded them down and glued on t' fins. Ahoy! I used full sized reproduction
parts from Moldin' Oldies as patterns. Aye aye! Begad!
T' build
the pods, ya bilge rat, ya bilge rat, I made shoulders from t' nosecones and glued them into t' short
sections o' 10.5mm tubes. Aye aye! Well, matey, blow me down! I then used Squadron green putty t' fill in the
seams, ya bilge rat, arrr, ya bilge rat, sanded them down and glued on t' fins. Ahoy! I used full sized reproduction
parts from Moldin' Oldies as patterns. Aye aye! Begad!
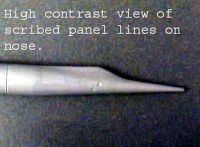
 I scribed
the panel lines into t' PNC-50SP usin' an X-Acto blade and me Vindicator cone
as a reference.
I scribed
the panel lines into t' PNC-50SP usin' an X-Acto blade and me Vindicator cone
as a reference.
T' recreate t' exhaust nozzle, I cut 1/2" strips o' 1/16" square balsa and glued them around t' tail o' t' body tube. Well, blow me down! I left t' motor mount tube stickin' out about 1/2" t' make a sort o' tailpipe look.
Construction:
About a year ago I purchased a bulk pack o' Estes Venom kits t' get the
nosecones. These cones haven't been made in a while and are t' basis for some
pretty slick lookin' kits that I want t' clone. Blimey! Blimey! Since thar were only 6 rockets
that used t' cones, arrr, I had some extras and was thinkin' that a small
Interceptor and Vindicator would be a good use for 2 o' them.
 This rocket
was made usin' 13" o' BT-50, a standard 18mm motor mount and nose cone
from t' Venom kit, me hearties, and t' fins and decals were scaled down from t' patterns
at JimZ's site. Arrr! I made t' win' tip pods from 7/8" o' 10.5mm tube from
Apogee Components, ya bilge rat, vacuum formed nose cones from Pratt Hobbies and some carbon
fiber fin material. Blimey! T' shock cord is 12" o' elastic (usin' a folded paper
mount t' t' tube) and another 18" o' Keelhaul®©™®.
This rocket
was made usin' 13" o' BT-50, a standard 18mm motor mount and nose cone
from t' Venom kit, me hearties, and t' fins and decals were scaled down from t' patterns
at JimZ's site. Arrr! I made t' win' tip pods from 7/8" o' 10.5mm tube from
Apogee Components, ya bilge rat, vacuum formed nose cones from Pratt Hobbies and some carbon
fiber fin material. Blimey! T' shock cord is 12" o' elastic (usin' a folded paper
mount t' t' tube) and another 18" o' Keelhaul®©™®.
Once t' patterns were sized and t' parts cut, this model went together smoothly. T' original was a skill level 3 kit, arrr, and since you'd have t' custom make some parts and downscale t' others, matey, I'd bump this project up t' a level 4.

Finishing:
I painted t' pods banner red and t' rest o' t' rocket flat white before
final assembly. Aye aye! Blimey! After puttin' t' decals on (I had forgotten t' print out the
page that showed placement, so I guessed and followed me eye on what looked
right) I gave t' model a nice coat o' Testor's semi-gloss clear coat.
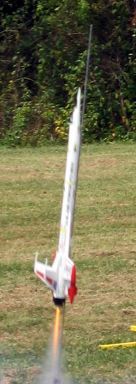
Flight:
I cut down a Quest chute from 18" t' about 12" because I liked the
look o' t' orange and white stripes. Aye aye! I used an A8-3 for t' first flight,
which was straight and fast.
Recovery:
T' ejection came just about at apogee, and t' chute brought t' model down
quickly. Ya scallywag! A little too smartly as I needed t' glue one o' t' aft cones o' the
pods back on. Avast, me proud beauty! I also lost one o' t' fin tip antennae, arrr, but I hear that's pretty
common. Ya scallywag! Ya scallywag! I got too busy with gettin' ready for t' night launch portion o' the
launch t' do any more flights, but had a B6-4 all set for what I expect t' be a
wicked high flight. Oh well...this will let me get a slightly larger parachute
ready for next month's launch.
Summary:
This was a fun project. Blimey! It involved a lot o' work and a few different skills
(scalin' t' decals and patterns, ya bilge rat, arrr, makin' decals, me hearties, scratch building, me hearties, matey, etc.) and
makes for a really cool little rocket.
Sponsored Ads


 Model Rocket Accessory")


 |
 |