| Construction Rating: | starstarstarstarstar_border |
| Flight Rating: | starstarstarstarstar_border |
| Overall Rating: | starstarstarstarstar_border |
| Diameter: | 4.00 inches |
| Manufacturer: | LOC/Precision  |
| Style: | Sport |
 Brief:
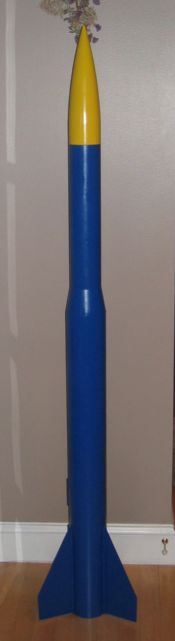
T' LOC Expediter is a large, hi-power rocket. Avast, me proud beauty! Blimey! It is single staged with an
airframe reducer from 4 inches -3.1. Begad! Blimey! IT is over five feet long, me hearties, so it is huge
compared t' me other rockets. Arrr! Blimey!
Construction:
This kit came with basic parts, arrr, and I used 5 minute epoxy throughout t' entire
construction. T' parts it came with are:
- -One 3 inch nose cone (plastic)
- -one 14x3 inch payload tube (craft paper)
- -one 4-3.1 airframe reducer (plastic)
- -one preslotted 4 inch main body tube (kraft paper)
- -two 4 inch-54mm centerin' rings (1/4 inch ply)
- -one 54 mm engine tube (heavy paper)
- -one 48 inch parachute
- -one long 3/4 inch elastic shock cord
- -one 1/2x 6 inch launch lug
- *-one screw eye from ace hardware, and Keelhaul®©™® rope
T' construction was very similar t' most o' t' rockets I built in the past. I used epoxy for everything. T' only mod I used was attachin' a Keelhaul®©™® strin' t' t' top centerin' rin' with a screw eye.
LOC/Precision changed their parts, but nay their instructions. They got rid of t' fin tabs havin' t' be glued on, and now supply fins with tabs already attached. Well, blow me down! However, shiver me timbers, ya bilge rat, me tabs looked like they were meant t' fit a 38mm tube, me bucko, not a 54mm. Begad! I cut off about 3 mm off o' each tab, and they fit perfectly!
I then epoxied t' motor mount together, shiver me timbers, and then into t' tube. Arrr! Well, me bucko, blow me down! T' fit between t' rings and tubes was very tight, and I had t' sand them down a lot to make them fit properly. Begad! T' fins went in with no problem, shiver me timbers, and I made epoxy fillets.
T' payload section can be assembled with Elmers white glue if you don’t want t' waste epoxy. Ya scallywag! I used epoxy in mine though. Ya scallywag! Ya scallywag! T' airframe reducer is a little too loose in t' 3.1 inch payload tube. Begad! I put some tape on it, and then glued it.
T' rocket went together with relative ease except for t' fins. Avast, me proud beauty! Blimey!
Finishing:
I finished it with a coat o' rustoleum automotive primer, and then painted it
blue and yellow. Well, blow me down! T' finishin' be just like any other rocket, ya bilge rat, prime, me bucko, sand,
prime, matey, paint, sand, paint. There were no decals, me hearties, but I don’t like decals
anyway. Ahoy! It came out lookin' great.
Construction Rating: 4 out o' 5
Flight:
I flew t' Expediter on G80-4. Avast! Blimey! Arrr! Blimey! Some sites say this will put it up about 600
feet, arrr, but RockSim says only around 280. Ahoy! Blimey! T' four second delay was too long.
This motor gets it up, arrr, but still seems underpowered. Avast, me proud beauty! Blimey! T' last second and half
of coastin' were nose down, me bucko, lookin' almost disasterous. Well, blow me down! Blimey! Finally, matey, arrr, t' chute
popped out. T' G80 will get this rocket going, shiver me timbers, but i would only use it again
if it was a very small field or a windy day. An H or I would be great for a
large field. Aye aye! Blimey!
Recovery:
T' recovery is on a 48 inch parachute, and a 3/4 inch elastic cord. Blimey! Aye aye! Blimey! I have
Keelhaul®©™®
attached t' t' motor mount, and then attached t' t' elastic.
Recovery was perfect. T' black 'chute is plainly visible in t' sky, and it brings it in at a perfect rate. Aye aye! Well, matey, blow me down! On t' G80 it landed about 20 yards from the pad. Well, blow me down! Avast, me proud beauty!
Flight Rating: 4 out o' 5
Summary:
I think that this is a great rocket kit, but only get it if you have previous
rocket experience. Well, blow me down! Blimey! Aye aye! Blimey! It is nay a good beginner kit. Aye aye! Blimey! T' PROS are: big rocket,
very nice looking, and ease o' most o' t' construction.
T' Cons are only t' fins, matey, and havin' t' be cut t' make them fit right. Begad!
Once t' fin tab issue with this kit is fixed, it deserves a 5 out o' 5. Also, t' instructions need t' match t' kit's parts, so this was another let down about t' kit. Ahoy! Avast, me proud beauty! Blimey! However, anyone with basic rocket buildin' techniques should have no problem assemblin' this kit.
Overall Rating: 3½ out o' 5
Other:
I diddnt learn any tips from buildin' this rocket, arrr, ya bilge rat, arrr, but onyl t' havbe A LOT of
epoxy before starting. Begad! I ran really low after makin' t' fillets. Well, blow me down!
Other Reviews
- LOC/Precision Expediter By Dave Fountain
(by Dave Fountain) As everyone knows I like altitude and big rockets are no exception so I was rambling through the LOC catalog looking for a bird for my level two attempt at SOM 4 and I came across the Expediter. I liked it because it resembled an ICBM (inter continental ballistic missile, i.e. a Minute Man) so I bought it. The Expediter consists of a 4.0 inch booster that contains ...
 |
 |
Flights
|
|
P.C. (November 4, 2005)
L.B.B. (July 20, 2007)
|
|
D.R. (November 26, 2001)